Radical Software
LCST 2234, Fall 2021 (CRN 9430)
Rory Solomon
Project 2, Tutorial 1: Getting started with browser extensions
For this project, you are going to build a browser extension. Browser extensions are bits of code that you can install within a web browser that modify the functionality of the browser in some way.
For some reason, browser extensions are often depicted as puzzle pieces. I'm not sure I'd agree that this is necessarily the most apt iconography, but I suppose the symbol is meant to signify some kind of add-in object that plugs in to a larger whole.
 Browser extention iconography.
In demonstrating how to get started building your own browser extension, I'll have to take a step back at a few points today to explain some of the background concepts involved in this work, including the communication protocol of the web, web browsers, and HTML. I've created a table of contents to help you navigate this tutorial. (Click on any link to jump down to that topic.)
- Browser extensions overview
- Starting the project, and extension code components
- Hypertext Markup Language (HTML) — An overview of the code behind webpages
- Browser extension techniques — Two examples that demonstrate some of the functionality that browser extensions can implement
Browser extensions overview
Browser extensions can be developed for all major web browsers today: Chrome, Firefox, Safari, Opera, Microsoft Edge, and others. Each browser has it's own rules and format for how to develop & distribute extensions for it. For this project, we'll be making browser extensions for the Chrome browser. Fortunately, Chrome and Firefox mostly comply to the same rules about how their extensions are structured, so if you learn how to develop extensions for Chrome, you should later be able to fairly easily adapt them to Firefox.
Also, as we discussed in class during our conversation on open source software (Thanks, Leland!) the Chrome browser is based on a thing called Chromium, which is also used by Opera and Microsoft Edge, so I believe that Chrome extensions should be easy to adapt to those browsers as well — although I haven't tried.
Safari is a bit of an outlier here, and I believe that developing extensions for that browser platform would be a bit of a different process than what we'll be learning with this project.
Browser extension functionality
Browser extensions can interact with web pages that the user of the browser is navigating. They can also do other things like view or manipulate the user's bookmarks, their downloads directory, their browsing history, or their cookies. A cookie is a term for small bits of data that websites save locally within your browser, so that they can remember you when you return to the website later. As you problably know these are often used for tracking in ways that many people now see as invasive data surveillance, used for supporting ad recommendations and other things. Browser extensions can also interact with browser request and responses, which I'll explain below.
Hypertext Transfer Protcol (HTTP)
To better understand what browser extensions do, let's take a step back and think about hypertext transfer protcol (or, HTTP) the protocol that dictates how all data on the worldwide web flows.
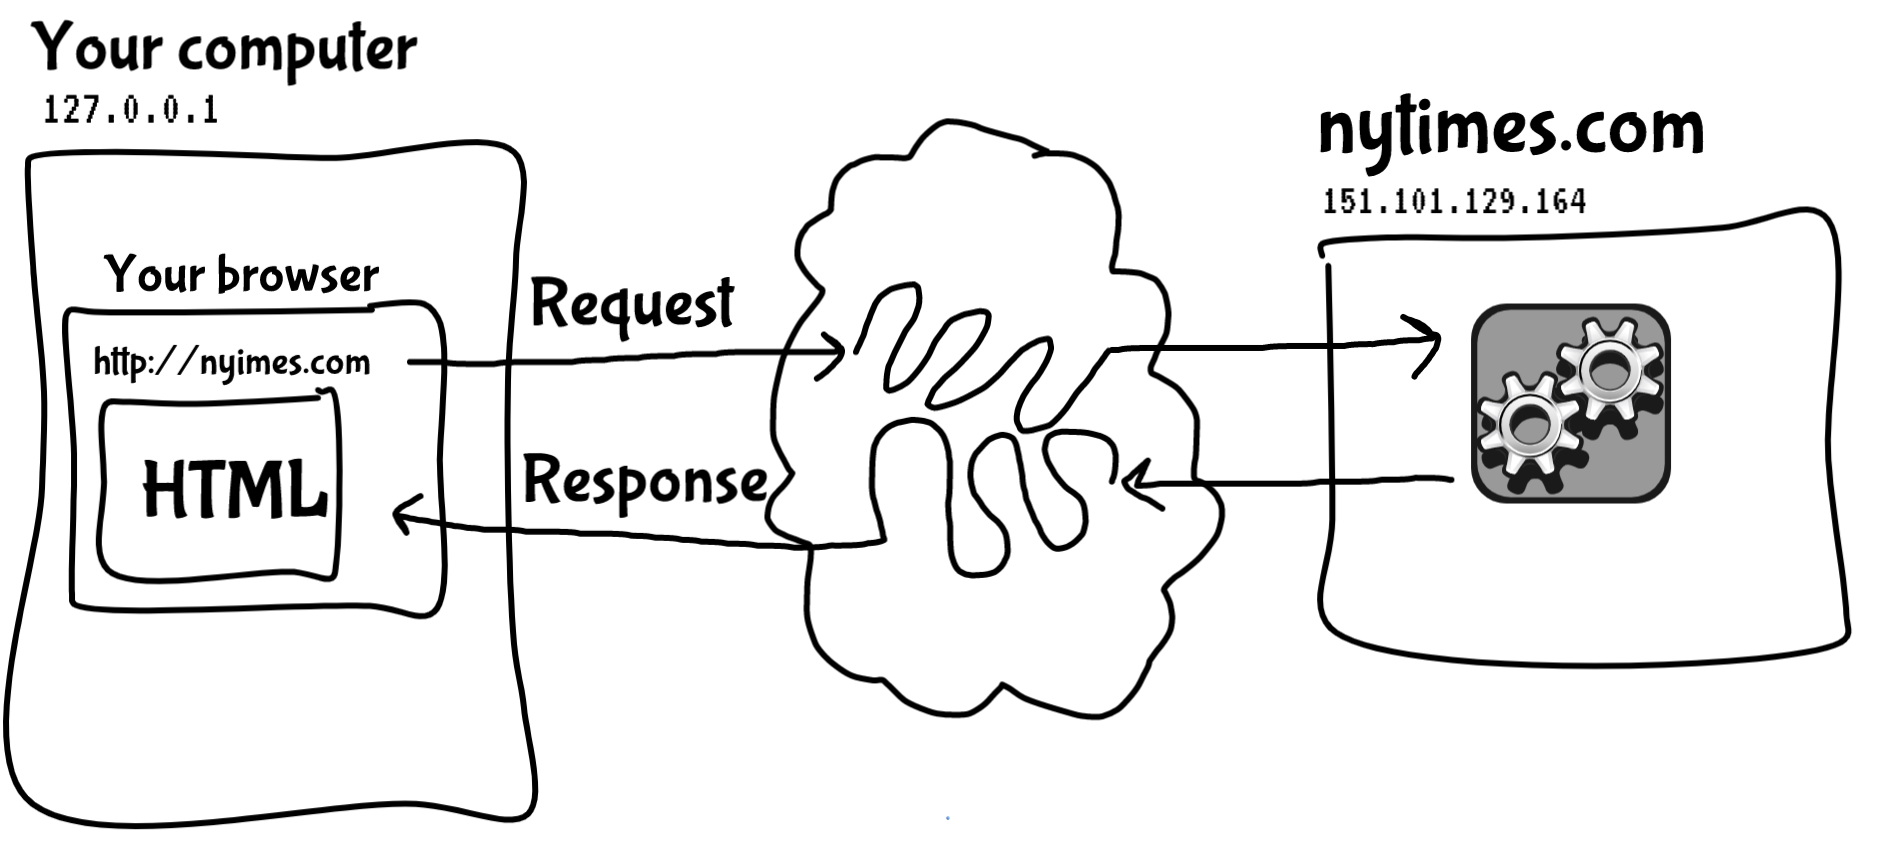
Let's say you have a web browser open on your computer and you want to visit a website, let's say nytimes.com. You would type the URL (or web address) for that site into your browser's address bar. That will cause your browser to look up the domain name (the human-readable website name) to determine the IP address for the server hosting this website, its identifier on the internet.
A server is just like your computer, except that it most likely sits in a data center somewhere, is always on, always connected to the internet, and does not have a monitor or screen but instead sends information over networks.
Your browser would then make a request, asking that server for the specific web page indicated by the URL. That request would be routed through the internet to the web server, which would then process your generate the desired web page (perhaps by running some code, like Python or another programming language) and returning a web page in the form of HTML text. This is called the response.
Your browser would then receive the response, parse the HTML, and display the web page for you.
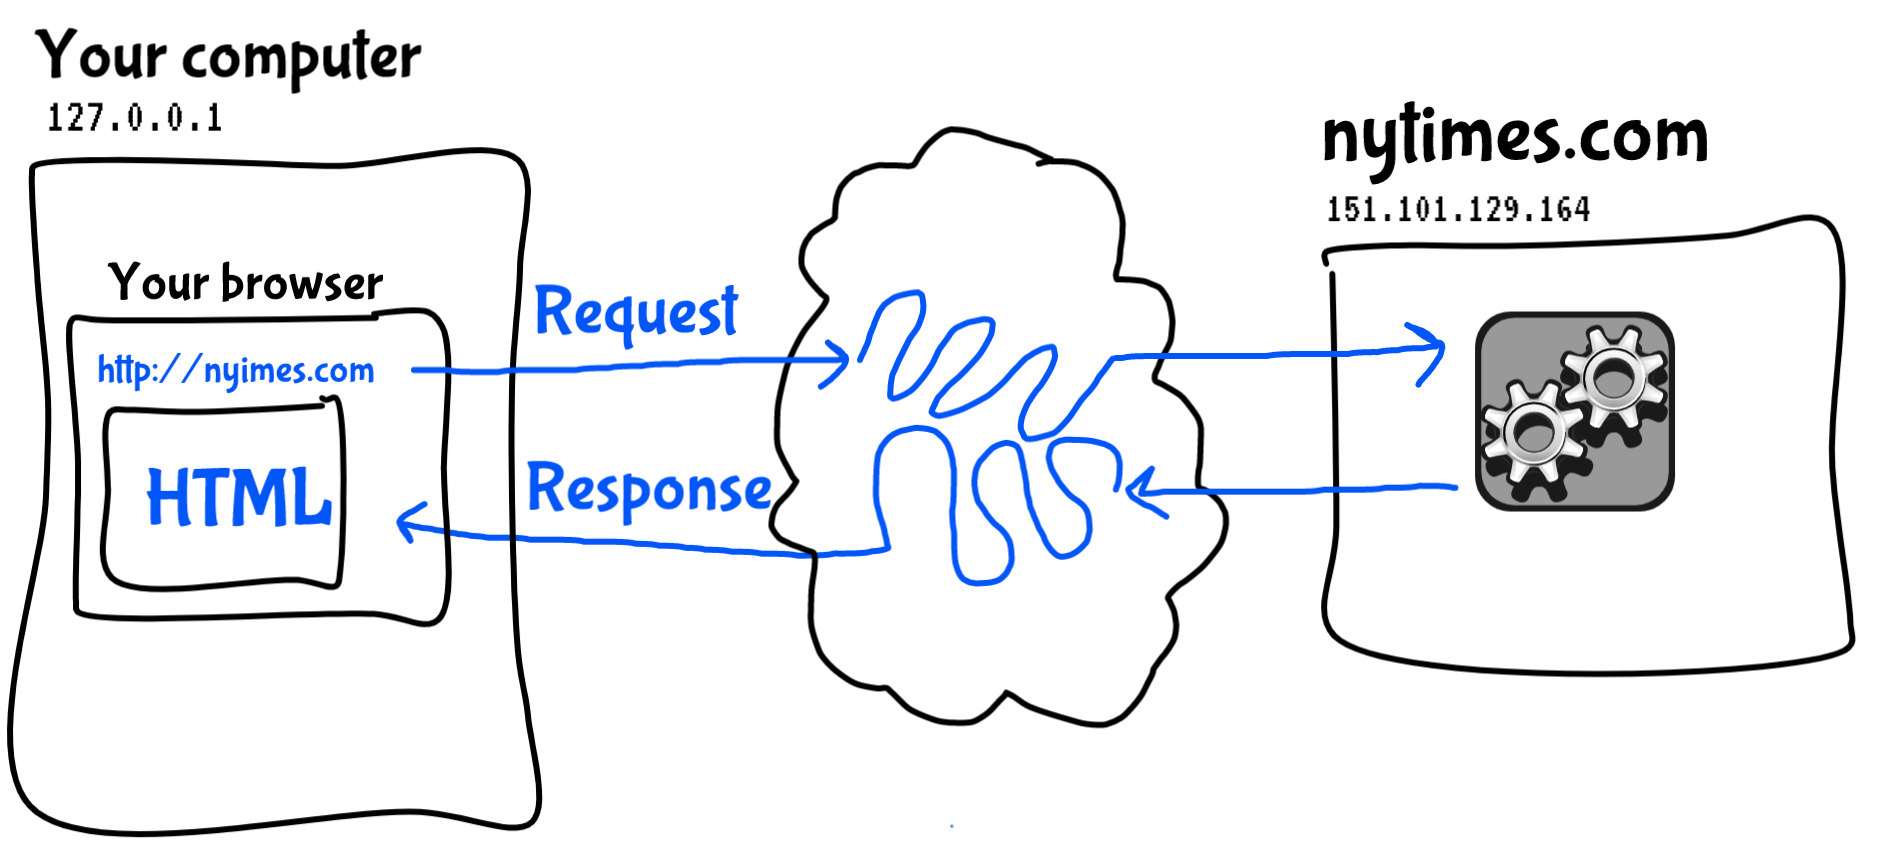
This entire process, comprising all the blue elements above, is what is specified by HTTP.
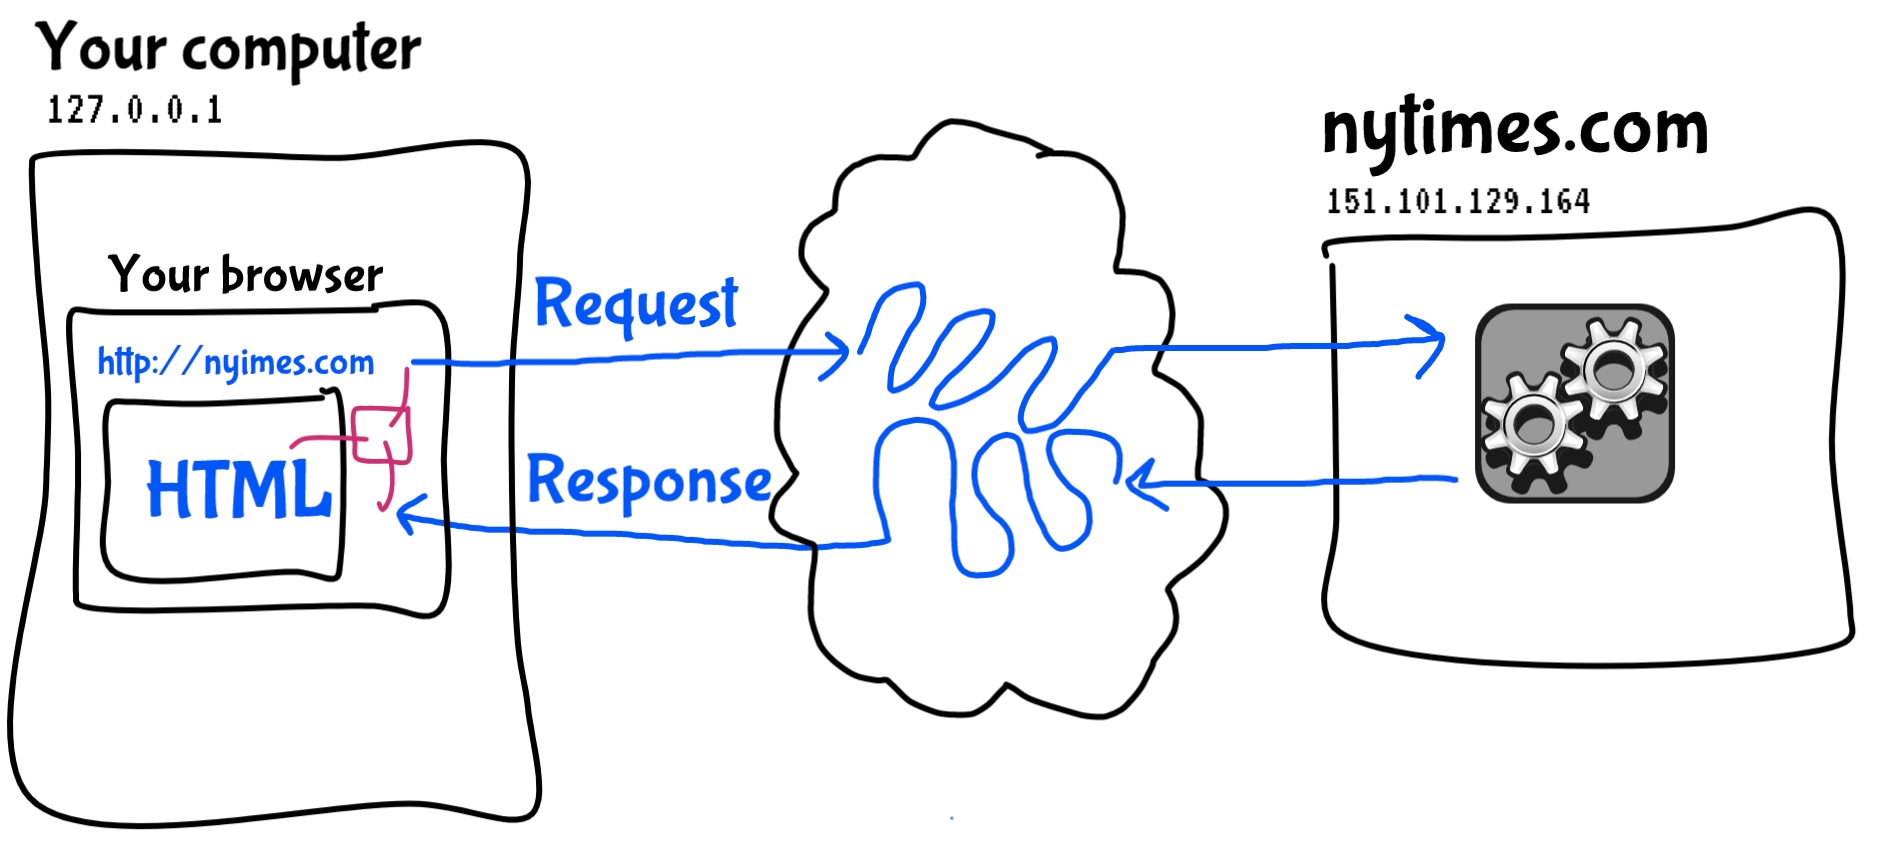
I lay out this process so that we can have some precise vocabulary to talk about what browser extensions can do. A browser extension is like the red component below. It is code that is run by your web browser, and that can intervene in any part of this process of URL specification, request, response, or the parsing or display of HTML.
Installing extensions
Each browser has its own way of adding extensions to it. For Firefox, you would click Tools > Add-ons, which would allow you to search for any extentions available online and install them within your browser.
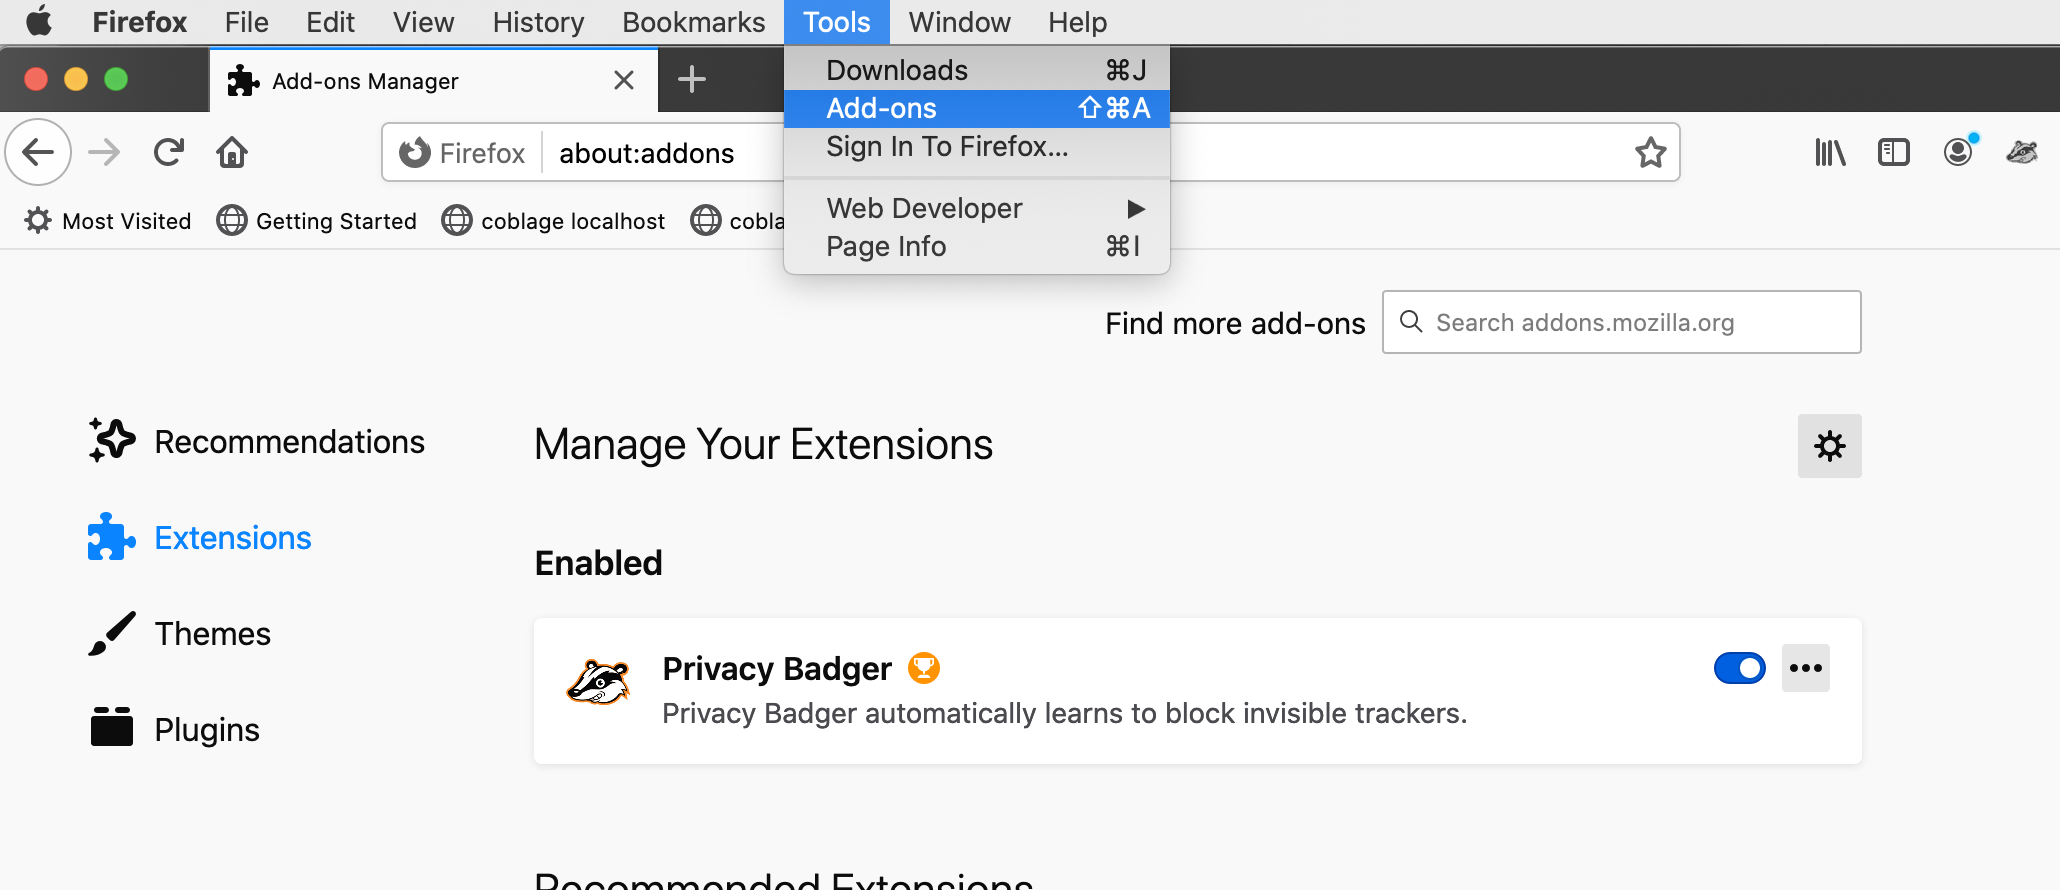 Adding and managing extensions in Firefox, which are
referred to as "Add-ons".
As I mentioned, we'll be developing extensions for the Chrome browser for this project. If you do not already have Chrome installed on your computer, please visit google.com/chrome and install it now.
A cautionary note. Chrome is one of the poorer browsers in terms of how much of your data that it collects, stores, shares, and sells. But it is also probably the most widely-used browser at this point, so I feel that developing extensions for this platform will be the most practical option for you in terms of making something that many people could potentially use. The Chrome extension development process is also very well-developed — probably at least in part because it is so widely used. If you are concerned about such things, you might consider removing Chrome from your computer after this project, and adapting your extension to Firefox to continue work on it. Extended discussion about various browsers and their pros and cons is available here: expressvpn.com/blog/best-browsers-for-privacy
Once you have Chrome installed, go to the
Chrome extensions manager: click the menu items
Window > Extensions to access the extensions currently
installed in your browser. You can also
type chrome://extensions in your address
bar (also known as a location bar).
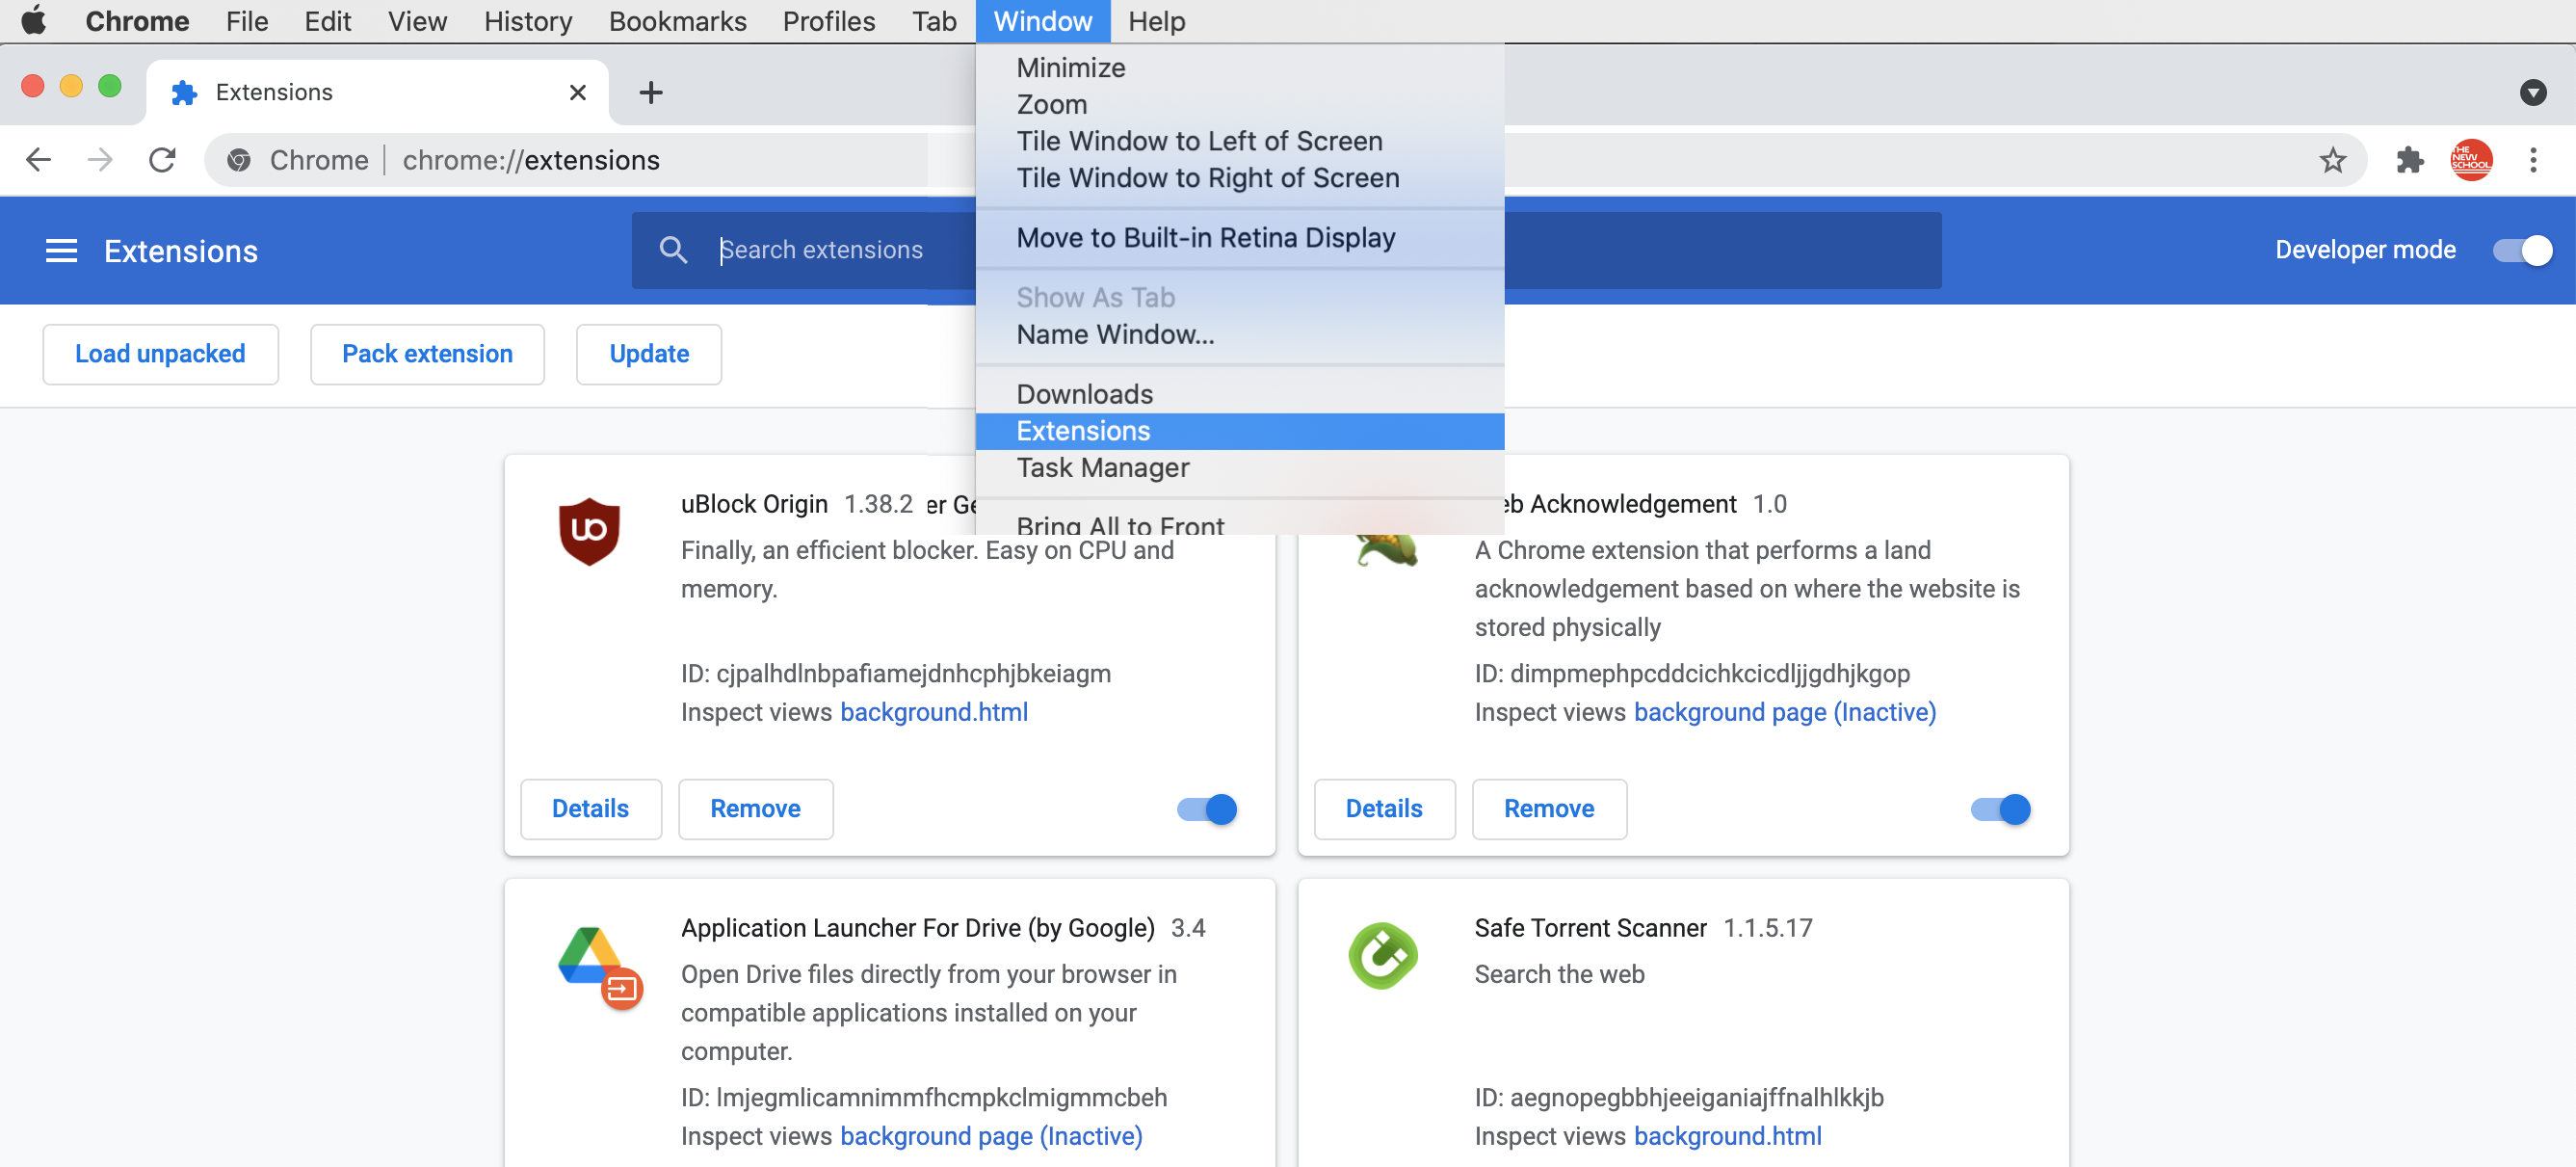 Adding and managing extensions in Chrome.
Note that the search box here is only for searching through extensions that you already have installed. If you'd like to look for new extensions to install, you can click the menu icon in the top-left, and then click "Open Chrome Web Store."
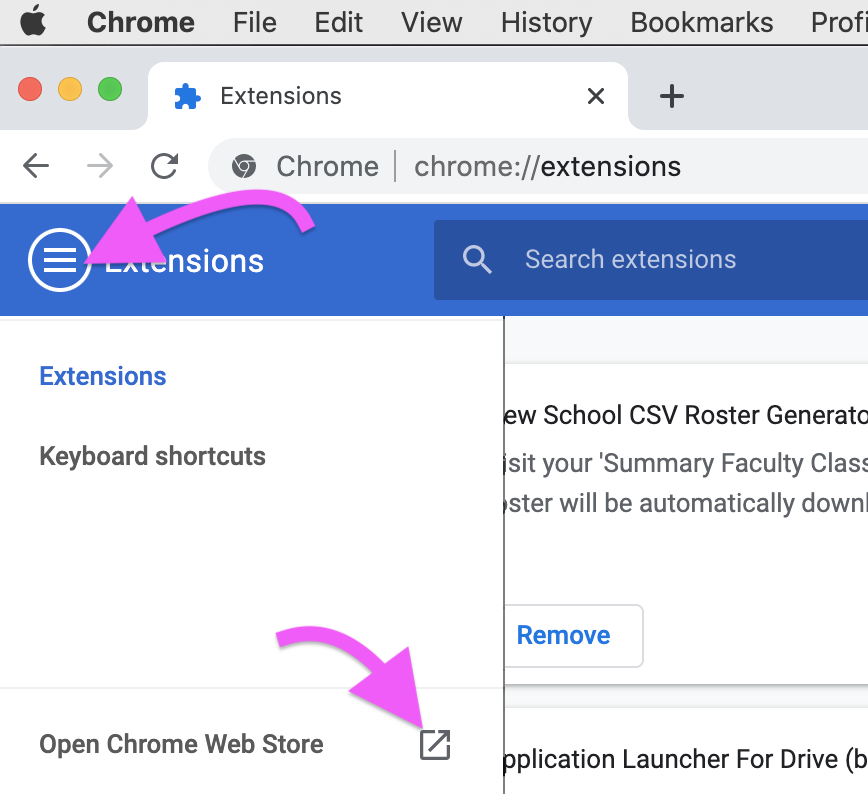 Accessing the Chrome Web Store to search for new extensions.
Developer mode
The Chrome Web Store is only for accessing extensions that other people have developed and published. How can we access our own extensions that we'll be developing for this project? In the top-right corner, flip the toggle that says "Developer mode". This will enable some features that allow you to develop and test your own custom extension code.
Please note that I've found that this can slow down my browser somewhat, so you may want to turn this option off when you're not working on this project. Don't worry, turning off developer mode will not delete or uninstall any extensions that you're working on.
Developer mode displays some additional debugging information about any extensions you already have installed, and it offers you some new buttons at the top-left, including "Load unpacked". This is the functionality that we'll use to install extensions once we have them developed. So let's get started with that ...
For your lab notebook: Add some commentary / thoughts / reflections about the above in regards to the browser extension ecosystem, HTTP, privacy concerns, and developer mode.
Starting the project
Open Finder (or Explorer), navigate to
your Radical Software class folder, and
create a new folder called Project
2. Your class folder should now look like this:

Open Terminal (or whatever you are using to access the command
line) and cd
to Project 2. (Remember you can
drag-and-drop the folder from your GUI into the command line.)
Now, visit the GitHub page for our class this
semester: github.com/Radical-Software-Fall-2021
and click "project-2". As with the last project, make your own
copy of this repository to work on by clicking "Fork" in the
upper-right corner. Then click on the green "Code" button, copy
the URL, flip back over to the command line, and
type git clone followed by the URL
to your forked repository:
$ git clone https://github.com/very-real-account/project-2
Cloning into 'project-2'...
remote: Enumerating objects: 3, done.
remote: Counting objects: 100% (3/3), done.
remote: Compressing objects: 100% (2/2), done.
remote: Total 3 (delta 0), reused 0 (delta 0), pack-reused 0
Unpacking objects: 100% (3/3), done.
Your output should resemble the above.
Loading your first extension into your browser
Back in your Chrome extensions manager, click "Load unpacked", navigate to your "Project 2" folder, click "project-2" and click the "Select" button. You should now see an extension installed in Chrome that says "PROJECT NAME 1.0". Let's see how to start working on that ...
The source code files of an extension
Open up Atom. If you have any other files or projects open,
please close them all. You can simply click File > Close
Window to do that all at once. Then, click File > New Window
(or type ⌘-SHIFT-N on Mac) and drag
project-2 into the window. You should
see something like this:
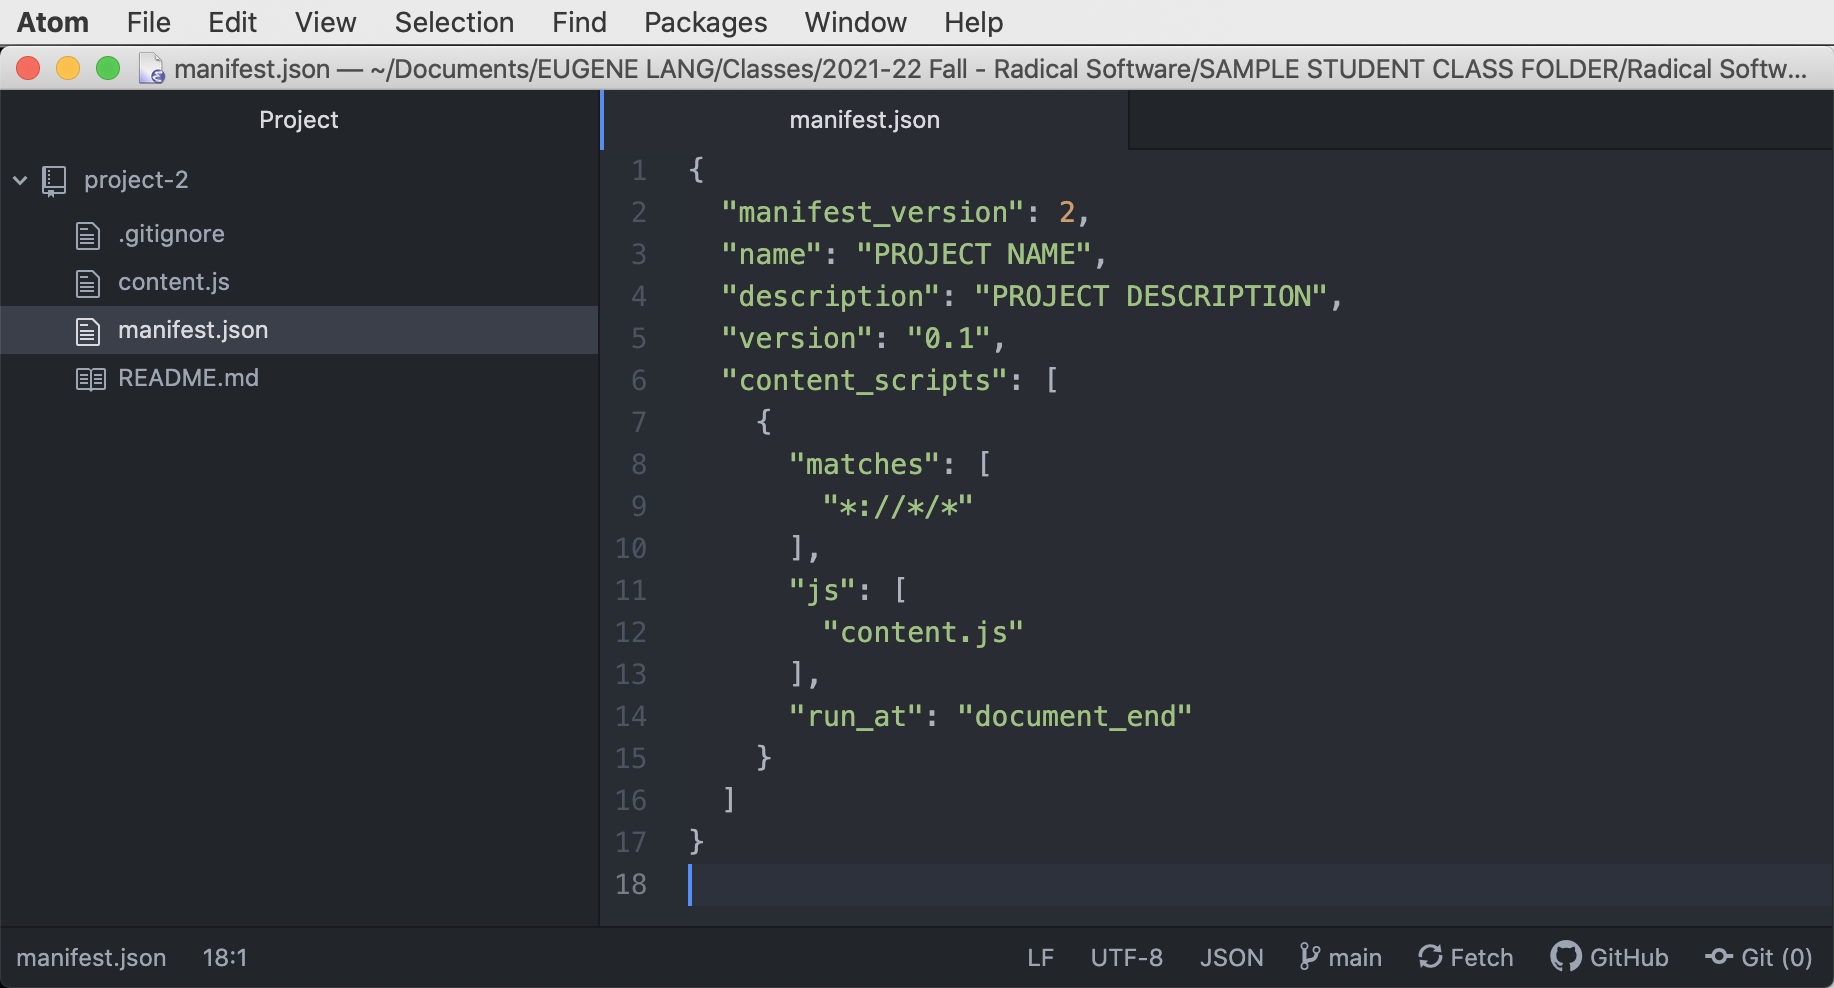 The source code components of a simple browser extension.
Let's go over these components.
The main file for a Chrome browser extension
is manifest.json. You might remember
JSON from when we were examining the objects
that we got when accessing the Twitter tweepy
API. JSON stands for Javascript Object Notation
and it is a syntax for describing data comprised of fields and
their values. It originated with Javascript but has come to be
widely used as an interoperable file format in many programming
languages. The JSON file for a browser extension has several
fields:
-
manifest_versionyou can ignore. This refers to the specification of the format of this file. -
nameis the name of your extension. -
descriptionis a short description of what your extension does. -
versionrefers to the version of your extension that you are working on. I like to always start with 0.1 — feels very modest. You can increment this as you'd like as you work on your project. When you submit your completed project, I'd like you to increment this to 1.0.
If you'd like to see all the options
for manifest.json, you can read the
Chrome documentation here:
developer.chrome.com/extensions/manifest.
That indicates which fields are required, optional, recommended,
and etc. And if you'd like to think more about the various pieces
of a Chrome extension, you can read
the Chrome
extension overview.
Modify the name
and description. Make sure to save your
file. Then return to your extension
manager in Chrome and click the reload button. You
should see the name and description that you've just added.
OK! We're getting started. That was fun. (Maybe?) Next let's look at how we can actually start doing some interesting stuff with our extension.
Your manifest.json file also includes a
field called content_scripts. This field is
actually a list, as indicated by the square
brackets [ ], and is comprised of series
of content script objects, with each one
indicated by curly braces { }. The
file currently contains one content
script. Each content script is
specified by three fields:
-
matchesspecifies a URL pattern. This script will only be run on URLs that match this pattern. -
jsspecifies the name of the Javascript files to run. -
run_atspecifies when the browser will run this script. The value values aredocument_idle,document_start,document_end, and you may want to use one or the other depending on your case.
content_scripts online, and
specifically, the values
for run_at.
This file specifies a script called content.js to
run on all URLs. Let's have a look at that file. But to better
understand what it is doing, let's take a step back and think
about how HTML pages work ...
For future reference: How to work on your project, going forward
As you work on this project during this course unit, every time you want to get to work, you should do the following:
-
Open Finder and navigate to your
Project
	  2
folder. -
Open Atom. If you have any other projects or code files
open, you can close the window to close all that. Then you
can click File > New Window, and drag
your
project-2folder into Atom. -
Next, open a Chrome browser window and go to
the extensions manager by clicking Window
> Extensions, or typing
chrome://extensions/in the address bar. -
We probably will not be using the command line too much in
this project aside from source code management
with
git. For that (or any other command line task), open the Terminal andcdto yourproject-2folder. (Note the capitalization and punctuation.) Remember that a shortcut is to typecd(note the space) and then drag-and-drop yourproject-2folder from your GUI into the command line.
HTML overview
HTML is the language used to construct web pages. We'll do a very brief overview here to give you enough to understand what browser extensions are doing. If you've already worked with HTML, hopefully this is a helpful review. If you never have, this will be a kind of crash-course introduction.
In Atom, click File > New, then click File > Save. Name
your file test.html, make sure you are
saving it in the project-2 folder, and
click Save. (We are going to use this file for some experiments
today, but it will not be a part of your project work after
that.)
HTML is comprised of elements,
or tags. You define tags
with brackets: <
and >, i.e. the "less than" and "greater than"
synbols. Brackets must always come in "less
than" / "greater than" pairs, which we
call open and close
brackets.
A pair of brackets indicates an HTML tag. There are many, many different HTML tags, and you define which one you are using with a keyword that immediately follows the open bracket. Type the following into Atom:
<p>
Some sample text
</p>
With this code, you have just typed a "p tag", which stands for paragraph. This denotes a chunk of text in an HTML file that would designate a paragraph in a document.
Like brackets, tags themselves
often come in pairs (but not always). You close a tag by typing
the same as the open tag, but starting with a forward slash: /.
Now, the area in between an open and close tag is referred to as being "inside" the tag.
<p>
A paragraph
</p>
You can put tags inside other tags, like this:
<div>
<p>
A paragraph
</p>
</div>
You can even have multiple tags inside a tag
<div>
<p>
A paragraph
</p>
<p>
Another paragraph
</p>
</div>
You can keep building up the HTML in this way, then wrap the whole thing in a <body> tag which represents everything that is displayed in the browser window.
You can also have a <head> tag which contains meta data, such as the title, which gets displayed in the title bar or in the browser tab.
And wrap the whole thing in an <html> tag, so a very simple web page might look like this:
<html>
  <head>
    <title>Basic webpage</title>
  </head>
  <body>
    <div>
      <h1>Hello</h1>
      <div>
        <p>A paragraph</p>
        <p>Another paragraph</p>
      </div>
    </div>
  </body>
</html>
Now for today, the important thing to understand about this is that the browser processes this as a thing called a DOM. D-O-M, which stands for Document Object Model ... that is like a tree that represents the structure of this document. Conceptually, the DOM for this page would look like this:
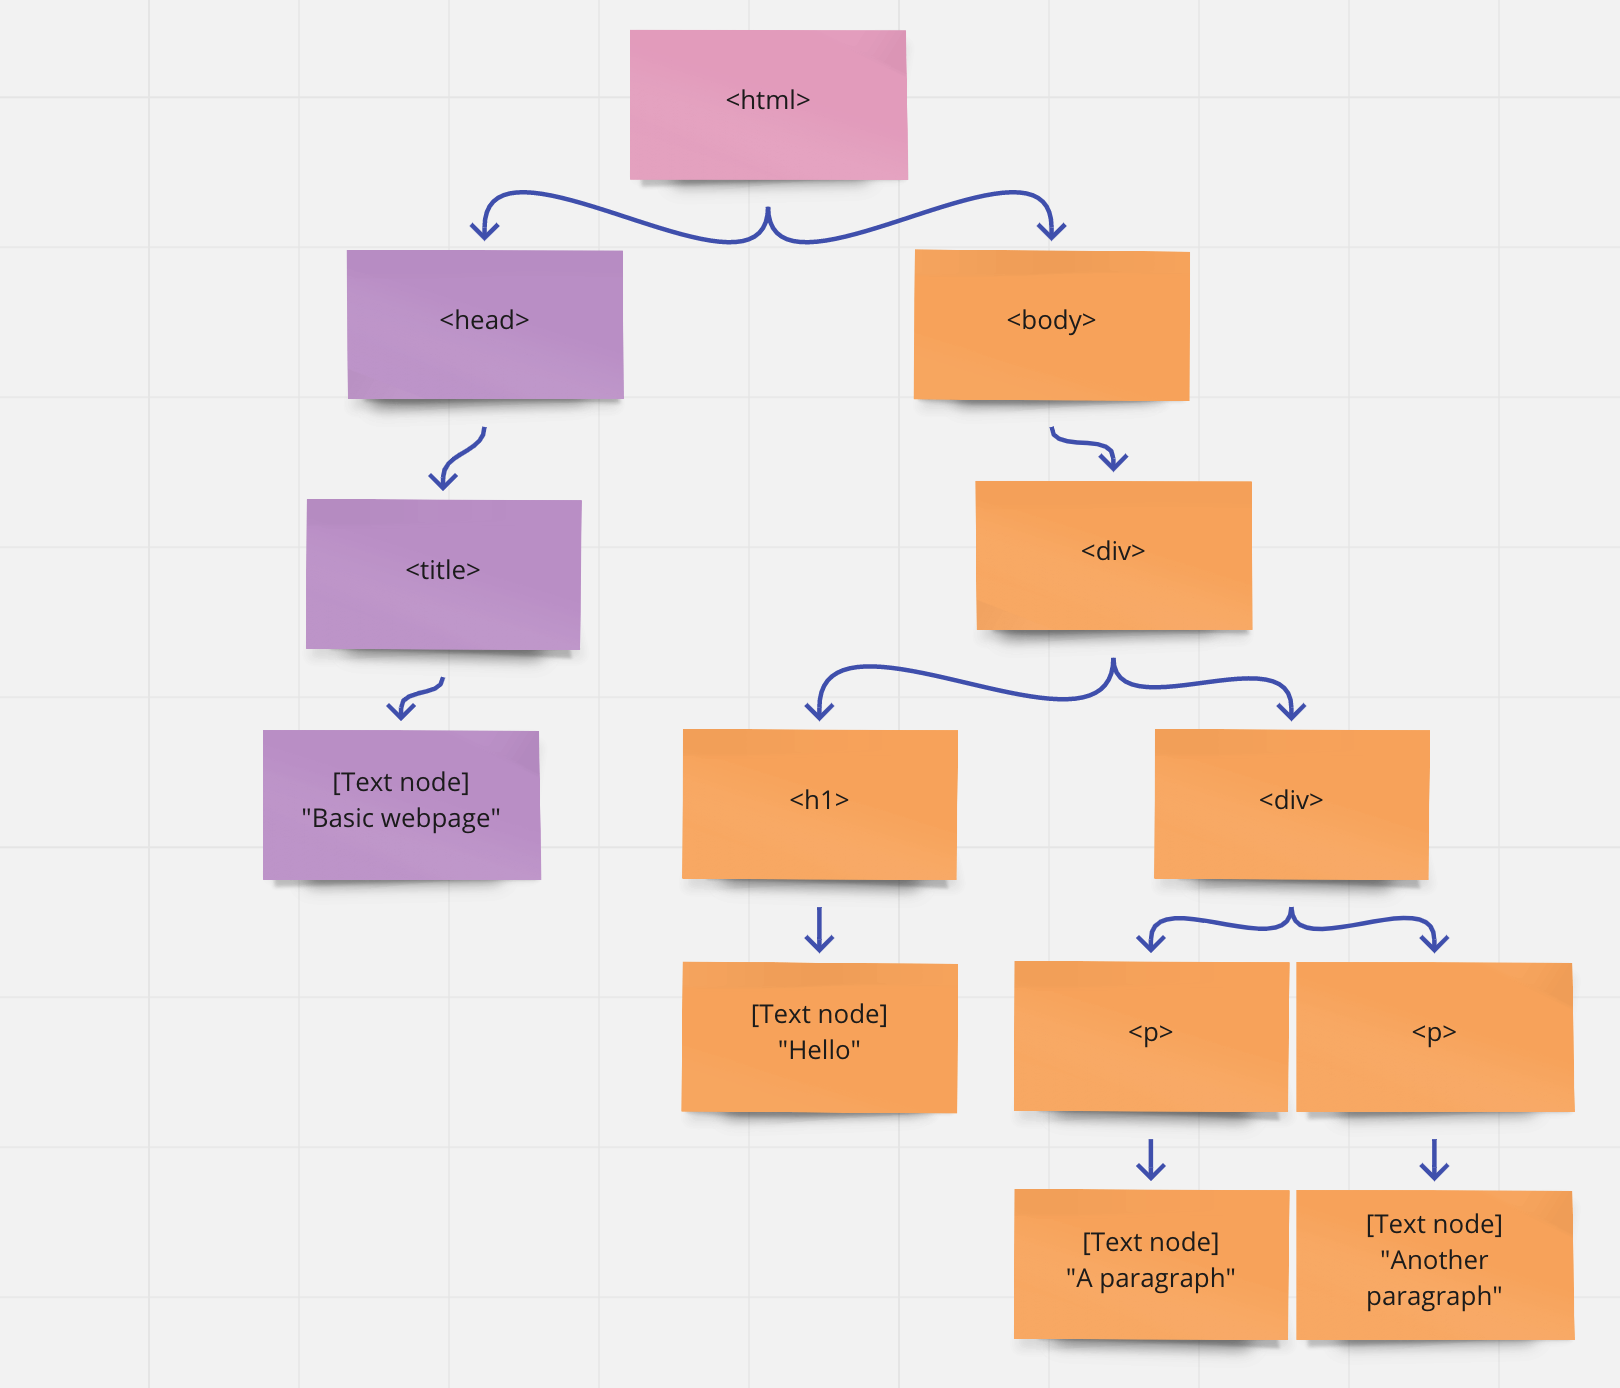
Notice how the "root" of the tree is the tag, which contains two other tags, head and body ...
Conveniently, Atom let's you collapse and expand nodes, which can help you understand this structure.
Browser extension techniques
Today we only had time for one actual browser extension technique.
What we ended up with modified the web page as being displayed
to the user by adding a thin red border to
all <p> tags on the page. The Javascript code
for this adds one new line
to content.js, and ultimately looks
like this:
var elements = document.getElementsByTagName('p');

for (var i = 0; i < elements.length; i++) {
   var element = elements[i];

   element.style.setProperty('border','solid 1px red');

}
Now, if your browser extension is enabled (check the Extension
Manager page chrome://extensions to be sure), you
should see a thin read border on any web page that you visit.
If you also want to test this on
the test.html that we created, you need
to make a slight change. This file is only
located locally on your computer, not on a
webserver somewhere else on the internet. So the URL pattern
will be different. Open manifest.json
in Atom and examine the patterns in the matches
field (line 9). That pattern looks like the URL for a webpage,
right? It has the :// and other parts of the
path. That pattern will match any URL that starts
with http:// or https://. But to view
a file that is locally on your computer, we have to add a new
URL pattern here. Add a new line to this file here. It should
look like this:
      "matches": [
        "*://*/*",
        "file://*"
      ],
Notice the newly added line. If you add ths URL pattern, then
you shoudl be able to see this extension taking effect on your
local test.html file as well - adding
the thin red border to all <p>s.
If you ever get sick of this behavior, remember that you can
always go back to the Extension Manager page
(chrome://extensions) and flip the switch to turn
this extension off.
Make sure you can get this all to work and we'll talk about some other more interesting browser extension techniques next week!