[ Links open in: same window | new window ]
Radical Software
LCST 2234, Fall 2024 (CRN 9430)
Rory Solomon
Project 1, Tutorial 1: Getting started with browser extensions
Last week we covered some introductory ideas about what browser extensions are, what their iconography might signify, and some basic principles of HTTP, hypertext transfer protocol: the technical rules for exchanging data that govern how the web operates.
Today we will cover how to get started developing browser extensions, including the tools that I recommend you to use in this process.
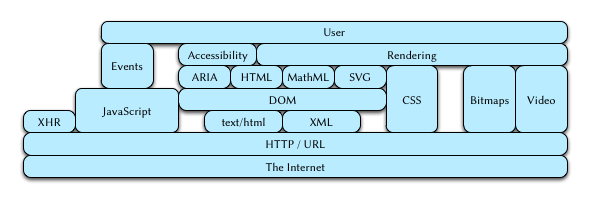 A web browser technology stack?
No need to scrutinize this too closely. I present it here as an
aesthetic object rather than a technical one. But if
you are curious about what this might signify about our
project one work, I would call your attention to the layered
boxes on the left that go from internet, to HTTP, to JavaScript,
to events, to user. You
can read more about
this particular diagram and what its creator was attempting to
do.
A web browser technology stack?
No need to scrutinize this too closely. I present it here as an
aesthetic object rather than a technical one. But if
you are curious about what this might signify about our
project one work, I would call your attention to the layered
boxes on the left that go from internet, to HTTP, to JavaScript,
to events, to user. You
can read more about
this particular diagram and what its creator was attempting to
do.
Table of contents
- Installing browser extensions
- Starting the project
- Developing an extension
- Working with a text editor: Visual Studio Code
-
The main component of a Chrome extension:
manifest.json - Modifying & reloading your extension
-
Working with
content_scripts - Detour: HTML overview
- HTML syntax: open and close brackets and tags
- Structure and content, versus appearance
- Example of HTML as structure
- Examining a web page with the browser extension tool
- Our first browser extension technique: modifying CSS properties
- Conclusions & lab notebook entries
01. Installing browser extensions
Each browser has its own way of adding extensions to it. For Firefox, you would click Tools > Add-ons, which would allow you to search for any extentions available online and install them within your browser.
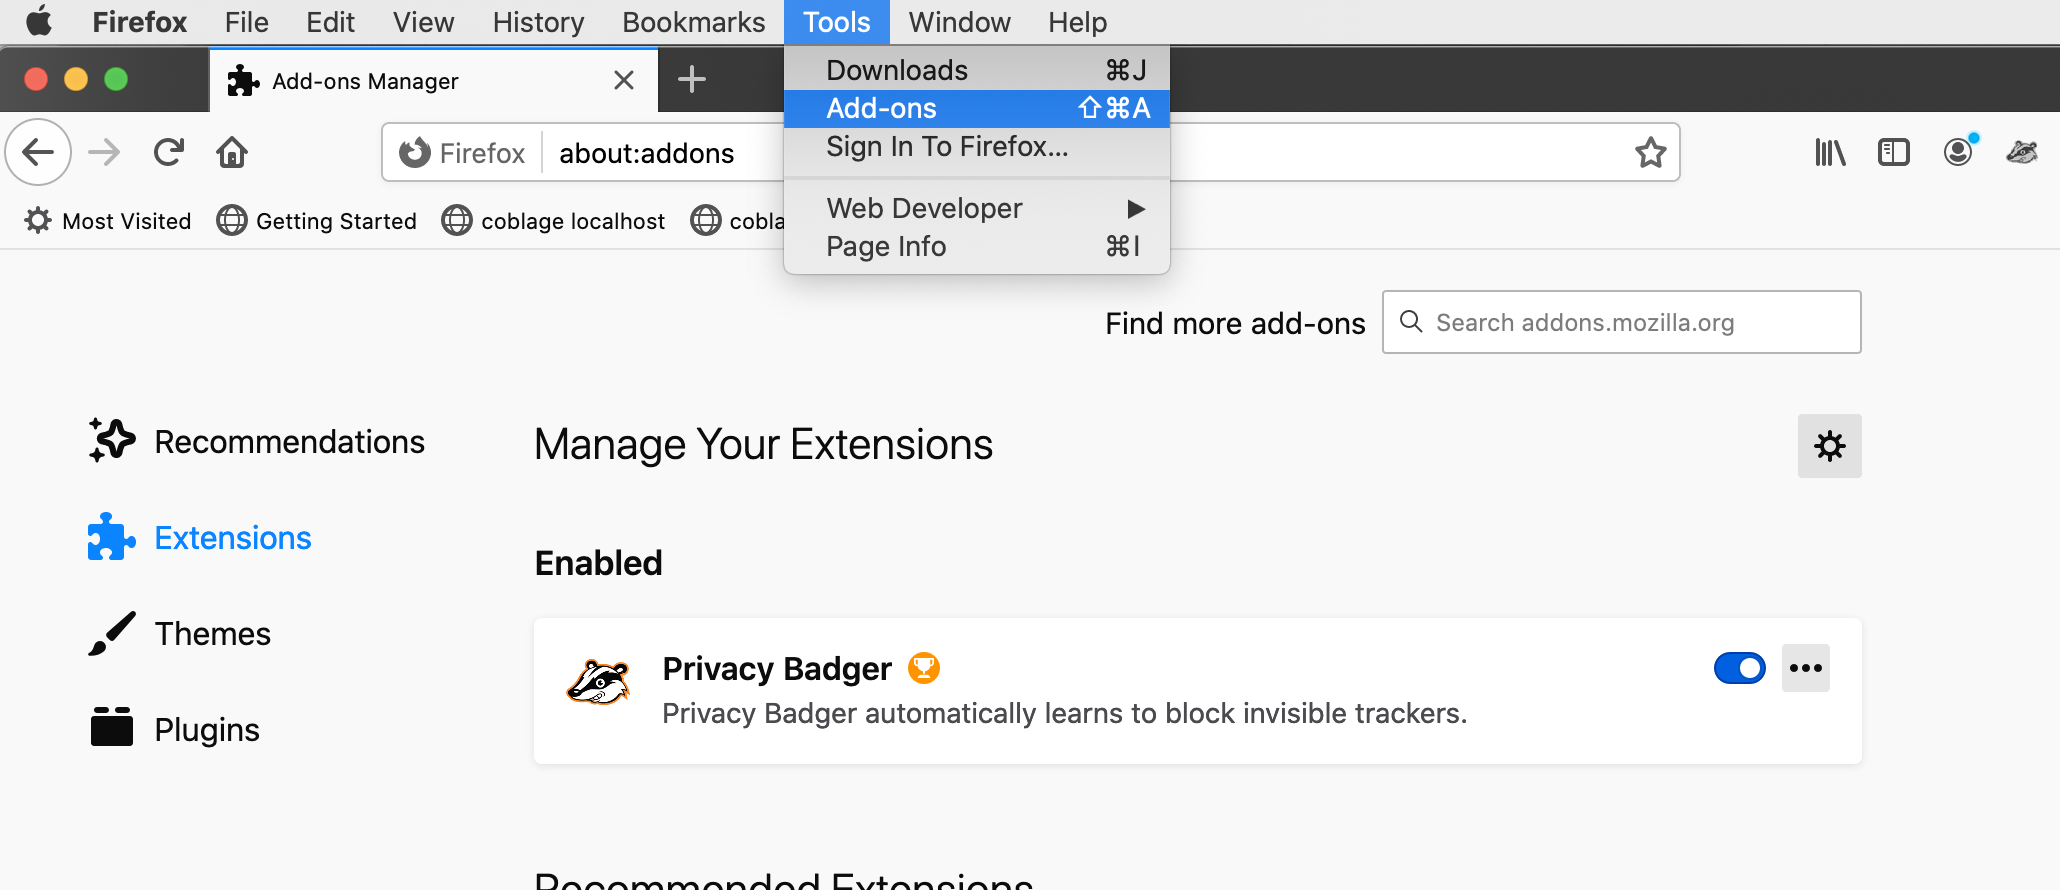 Adding and managing extensions in Firefox, which are
referred to as "Add-ons" on this platform.
Adding and managing extensions in Firefox, which are
referred to as "Add-ons" on this platform.
As I mentioned, we'll be developing extensions for the Chrome browser for this project. If you do not already have Chrome installed on your computer, please visit google.com/chrome and install it now.
A cautionary note. Chrome is one of the poorer browsers in terms of how much of your data that it collects, stores, shares, and sells. But it is also probably the most widely-used browser at this point, so I feel that developing extensions for this platform will be the most practical option for you in terms of making something that many people could potentially use. The Chrome extension development process is also very well-developed — probably at least in part because it is so widely used. If you are concerned about such things, you might consider removing Chrome from your computer after this project, and adapting your extension to Firefox to continue work on it. Extended discussion about various browsers and their pros and cons is available here: expressvpn.com/blog/best-browsers-for-privacy
Once you have Chrome installed, go to the
Chrome extensions manager: click the menu items
Window > Extensions to access the extensions currently
installed in your browser. You can also
type chrome://extensions in your address
bar (also known as a location bar).
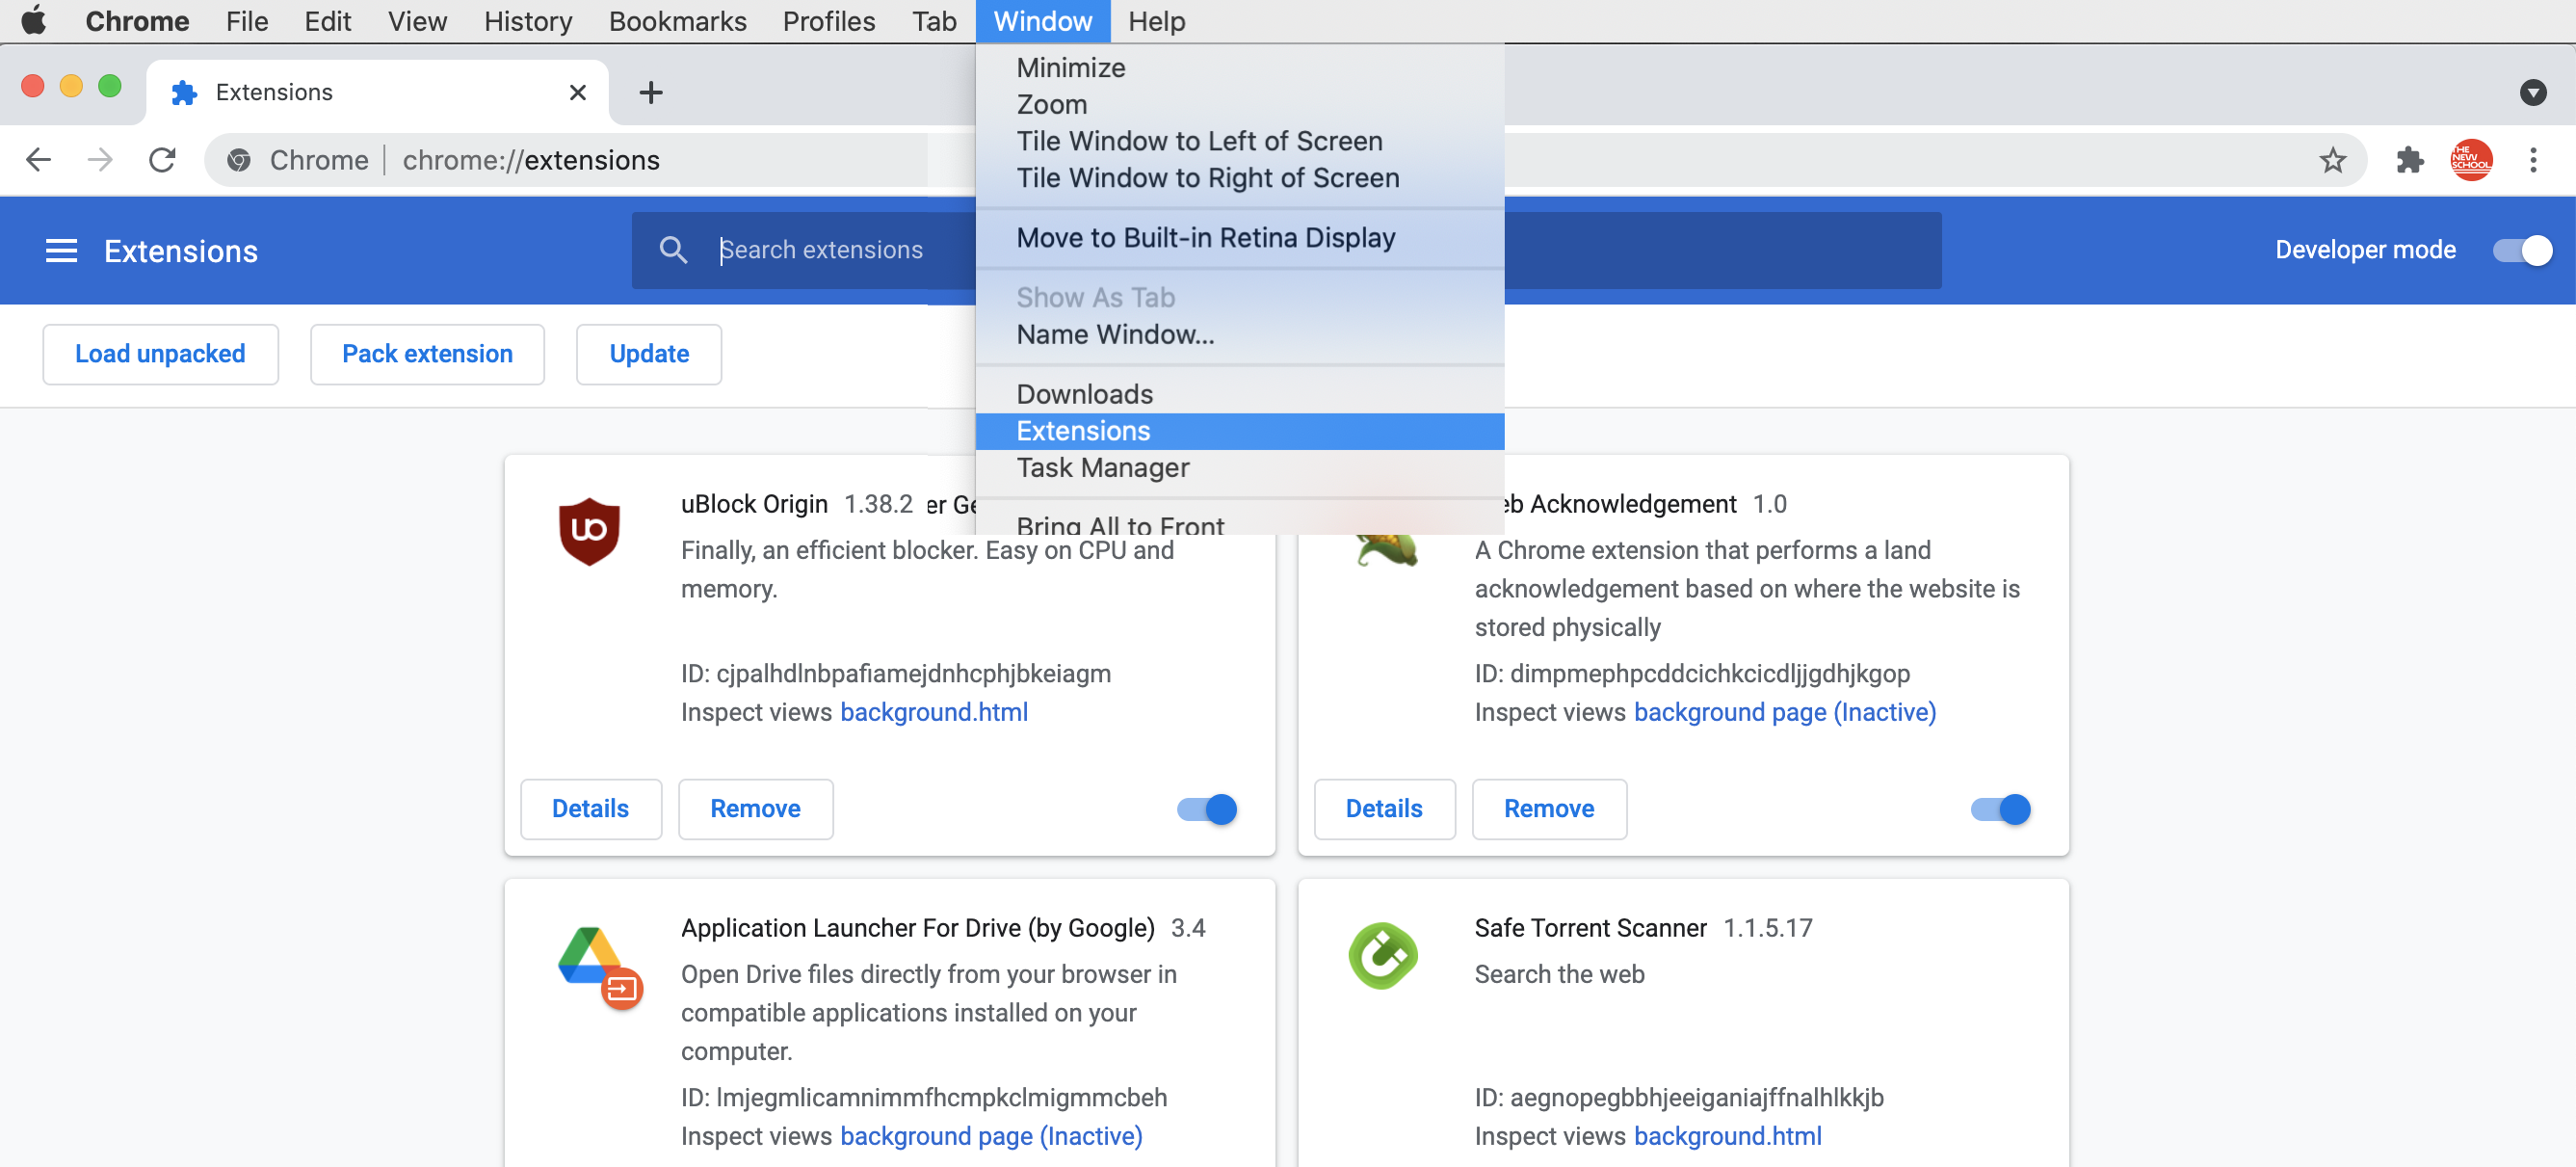 Adding and managing extensions in Chrome. (Click image to enlarge.)
Note that the search box pictured above is only for searching through extensions that you already have installed. If you'd like to look for new extensions to install, you can click the menu icon in the top-left, and then click "Open Chrome Web Store."
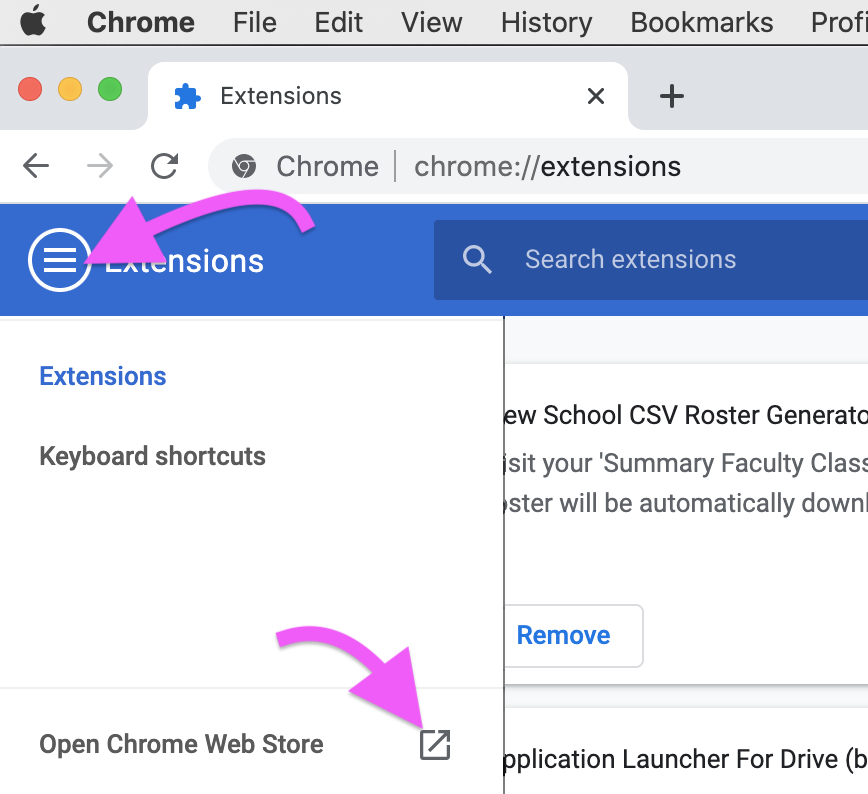 Accessing the Chrome Web Store to search for new extensions.
01.a. Developer mode
The Chrome Web Store is only for accessing extensions that other people have developed and published. How can we access our own extensions that we'll be developing for this project? In the top-right corner, flip the toggle that says "Developer mode". This will enable some features that allow you to develop and test your own custom extension code.
Please note that I've found that this can slow down my browser somewhat, so you may want to turn this option off when you're not working on this project. Don't worry, turning off developer mode will not delete or uninstall any extensions that you're working on.
Developer mode displays some additional debugging information about any extensions you already have installed, and it offers you some new buttons at the top-left, including "Load unpacked". This is the functionality that we'll use to install extensions once we have them developed. So let's get started with that ...
(jump back up to table of contents)For your lab notebook. Along the way in our technical tutorials, I will occasionally offer some questions or comments about things for you to remark on in your lab notebook. I will indicate these with a note like this, labeled "For your lab notebook". If you have not yet created a lab notebook for this tutorial, let's pause and do that now. Go the class Resources page and click "Lab notebook template" (or click here for a direct link). You should have read but not write access to this document. From the menu, click File > Make a copy. Click where it says "Folder" and navigate to your personal Google Drive folder for this class. Select that, and rename the file "Project 1, Tutorial 1" and click the blue button. Do this for each tutorial.
As your first comment, add some thoughts / reflections about the above in regards to the browser extension ecosystem, HTTP, privacy concerns, and developer mode.
02. Starting the project
02.a. A simple folder structure
It is essential this semester that you create a simple scheme for organizing your work into folders and subfolders by project and tutorial. I know many people these days seem to resist this kind of file organization technique and prefer to work with lots of files in one folder, using search for everything. That is fine, and I do wish to respect everyone's different work patterns and the ways we all prefer to organize our thinking. But when working on coding projects, folders and subfolders are a key organizational technique.
As we will discuss this semester, even though we often see software as a powerful tool for various kind of expresssion and activism, the digital remains a highly hierarchical realm, with layers of permissions and organizational containment. Examining this (and perhaps struggling with it) will be a recurring theme this term.
Computer programs, including ones we will write, often reference other digital objects like images, multimedia, data files, or other programs, and folders are the default way of grouping these resources together. And when it comes time to bundle up your work to share with others, folders of code will typically be used to distribute collections of functionality as a library, app, or full application.
Simply putting all your work into one large folder and searching for things may work for you, but it will not work for the tools we'll be using.
So, for this class I would like to require that you create a simple folder structure to organize your work.
Start by creating a folder for our class for the semester. (I recommend you put it in your Documents folder or a similar location on your computer, but that is up to you. Within that, I also recommend that you create a folder for coding, and a folder for the other work you'll be doing this semester, but that is also up to you.) What is essential is that within your class folder, you create subfolders for each project, and within that, subfolders for each technical tutorial.
Open Finder (or Explorer), navigate to
your Radical Software class folder, and
create a new folder called Project
1. Your class folder should now look like this:

02.b. Getting the source code
Now, visit the GitHub page for our class this
semester: github.com/Radical-Software-Fall-2024
and click "project-1". Later on we'll talk about how to make use
of more git and GitHub functionality, but for now, use this to
simply download some code to get started with this
project. Click on the green "Code" drop down and click
"Download zip". That should save
a .zip file to your Downloads
folder. Move that file into your Project
1 folder, and double-click it to expand its contents. You
should now also have a subfolder
called project-1-main in this folder.
02.c. Loading your first extension into your browser
Back in your Chrome extensions manager, click "Load unpacked", navigate to your "Project 1" folder, click "project-1" and click the "Select" button. Now, under "All Extensions", you should now see something labeled "PROJECT NAME 0.1". Congratulations, you've just loaded your first custom browser extenion.
(jump back up to table of contents)03. Developing an extension
Now let's see how to start working on that ...
03.a. Working with a text editor: Visual Studio Code
To create and develop computer program files, you need a text editor: a program that lets you type and save text as plain text, without any fancy formatting like Microsoft Word offers.
The text editor that we will use this semester is a very useful,
open source tool called VS Code (which stands for Visual Studio
Code), which you can get here:
code.visualstudio.com
The fact that it is open source means that the computer program files and algorithms of this tool are freely, publicly available, not proprietary or hidden. That means you can view the source code for this tool! In fact, the full source code is posted here on GitHub. Feel free to have a look. This also means that if you wanted to, you could modify VS Code to change its behavior in some way, then rebuild it and run your own customized version. (A very advanced exercise, but possible!)
If you have not yet installed VS Code, download and install it. VS Code is free, freely available, trustworthy software that is easy to download and install.
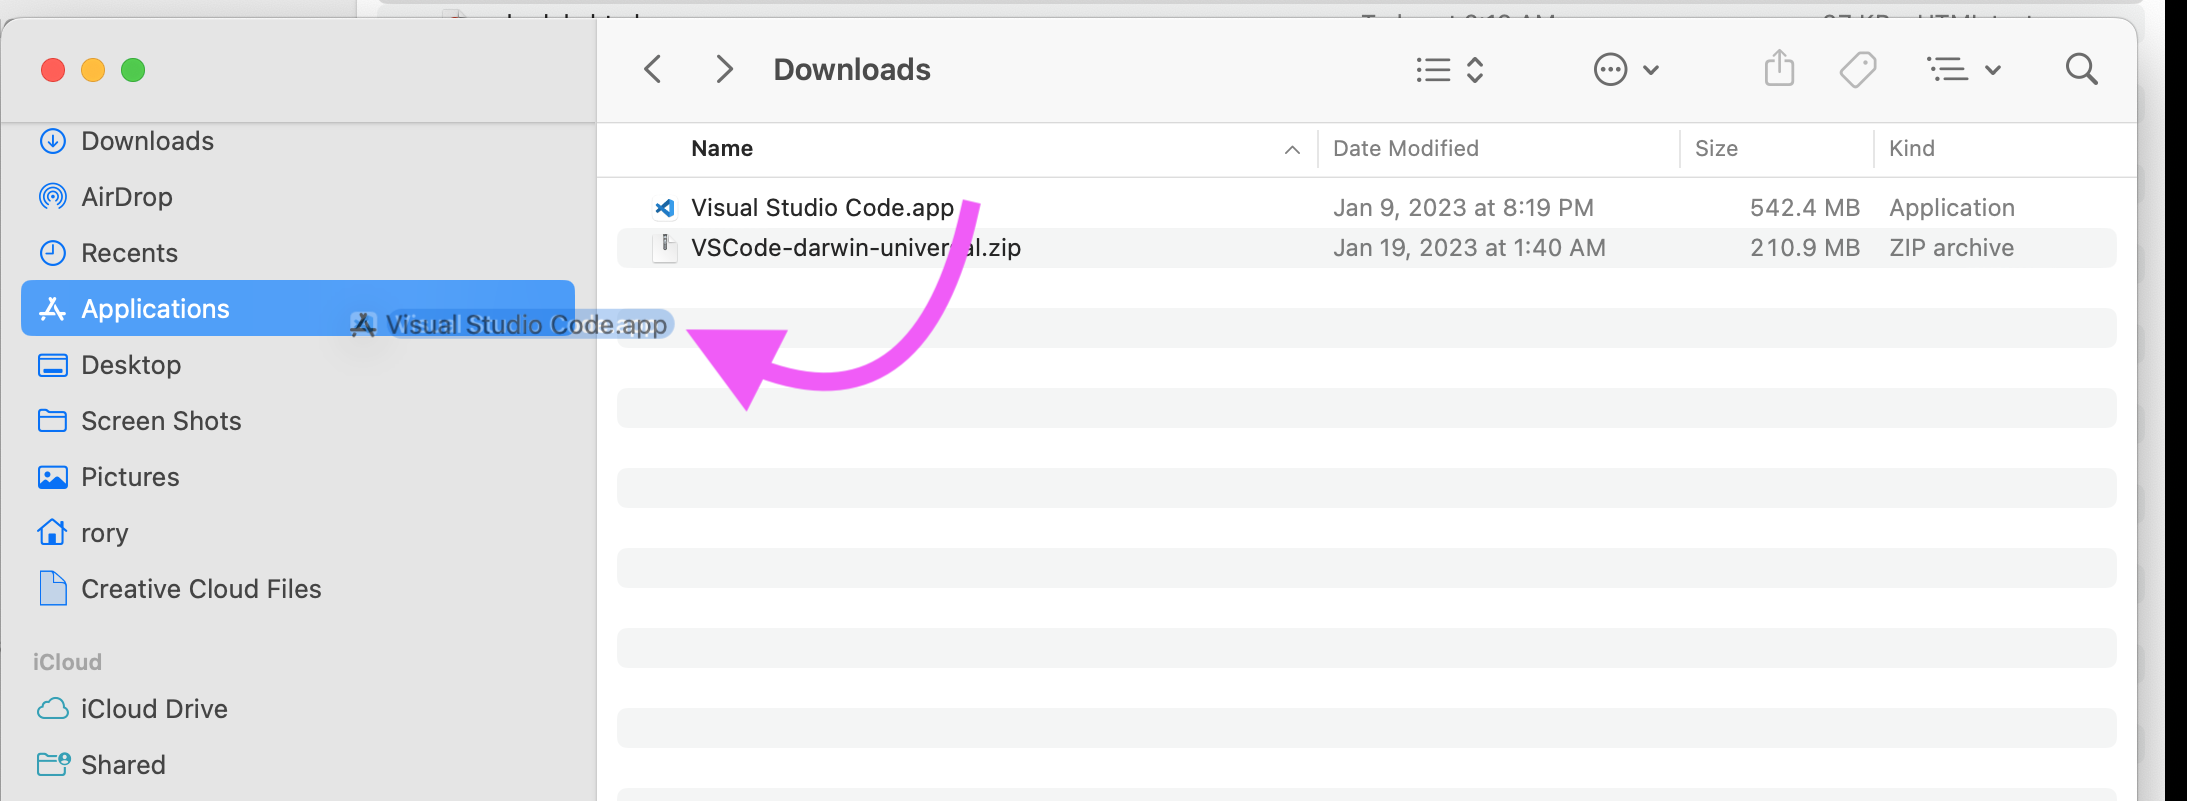
After clicking "Download" on the above site, you should have a
new file in your Downloads folder called something
like VSCode-something.zip. Double-click
this file to create the VS Code application, and then drag that
into wherever you keep applications on your computer. On Mac,
this is typically the Applications folder. Like so:
 (Click to enlarge.)
(Sidenote: So that you don't get confused at some point in the future, I want to point out that Visual Studio Code is one product within Microsoft's wider Visual Studio brand and product line. The product known as "Visual Studio" has been around for over 20 years, was originally created for Windows desktop application development, and has since expanded to support other types of coding but mainly focused around larger, server-side, and desktop projects. Visual Studio Code is a newer, open source program designed for coding in many programming languages and is more suitable to smaller projects, even though it can also be used for larger ones as well.)
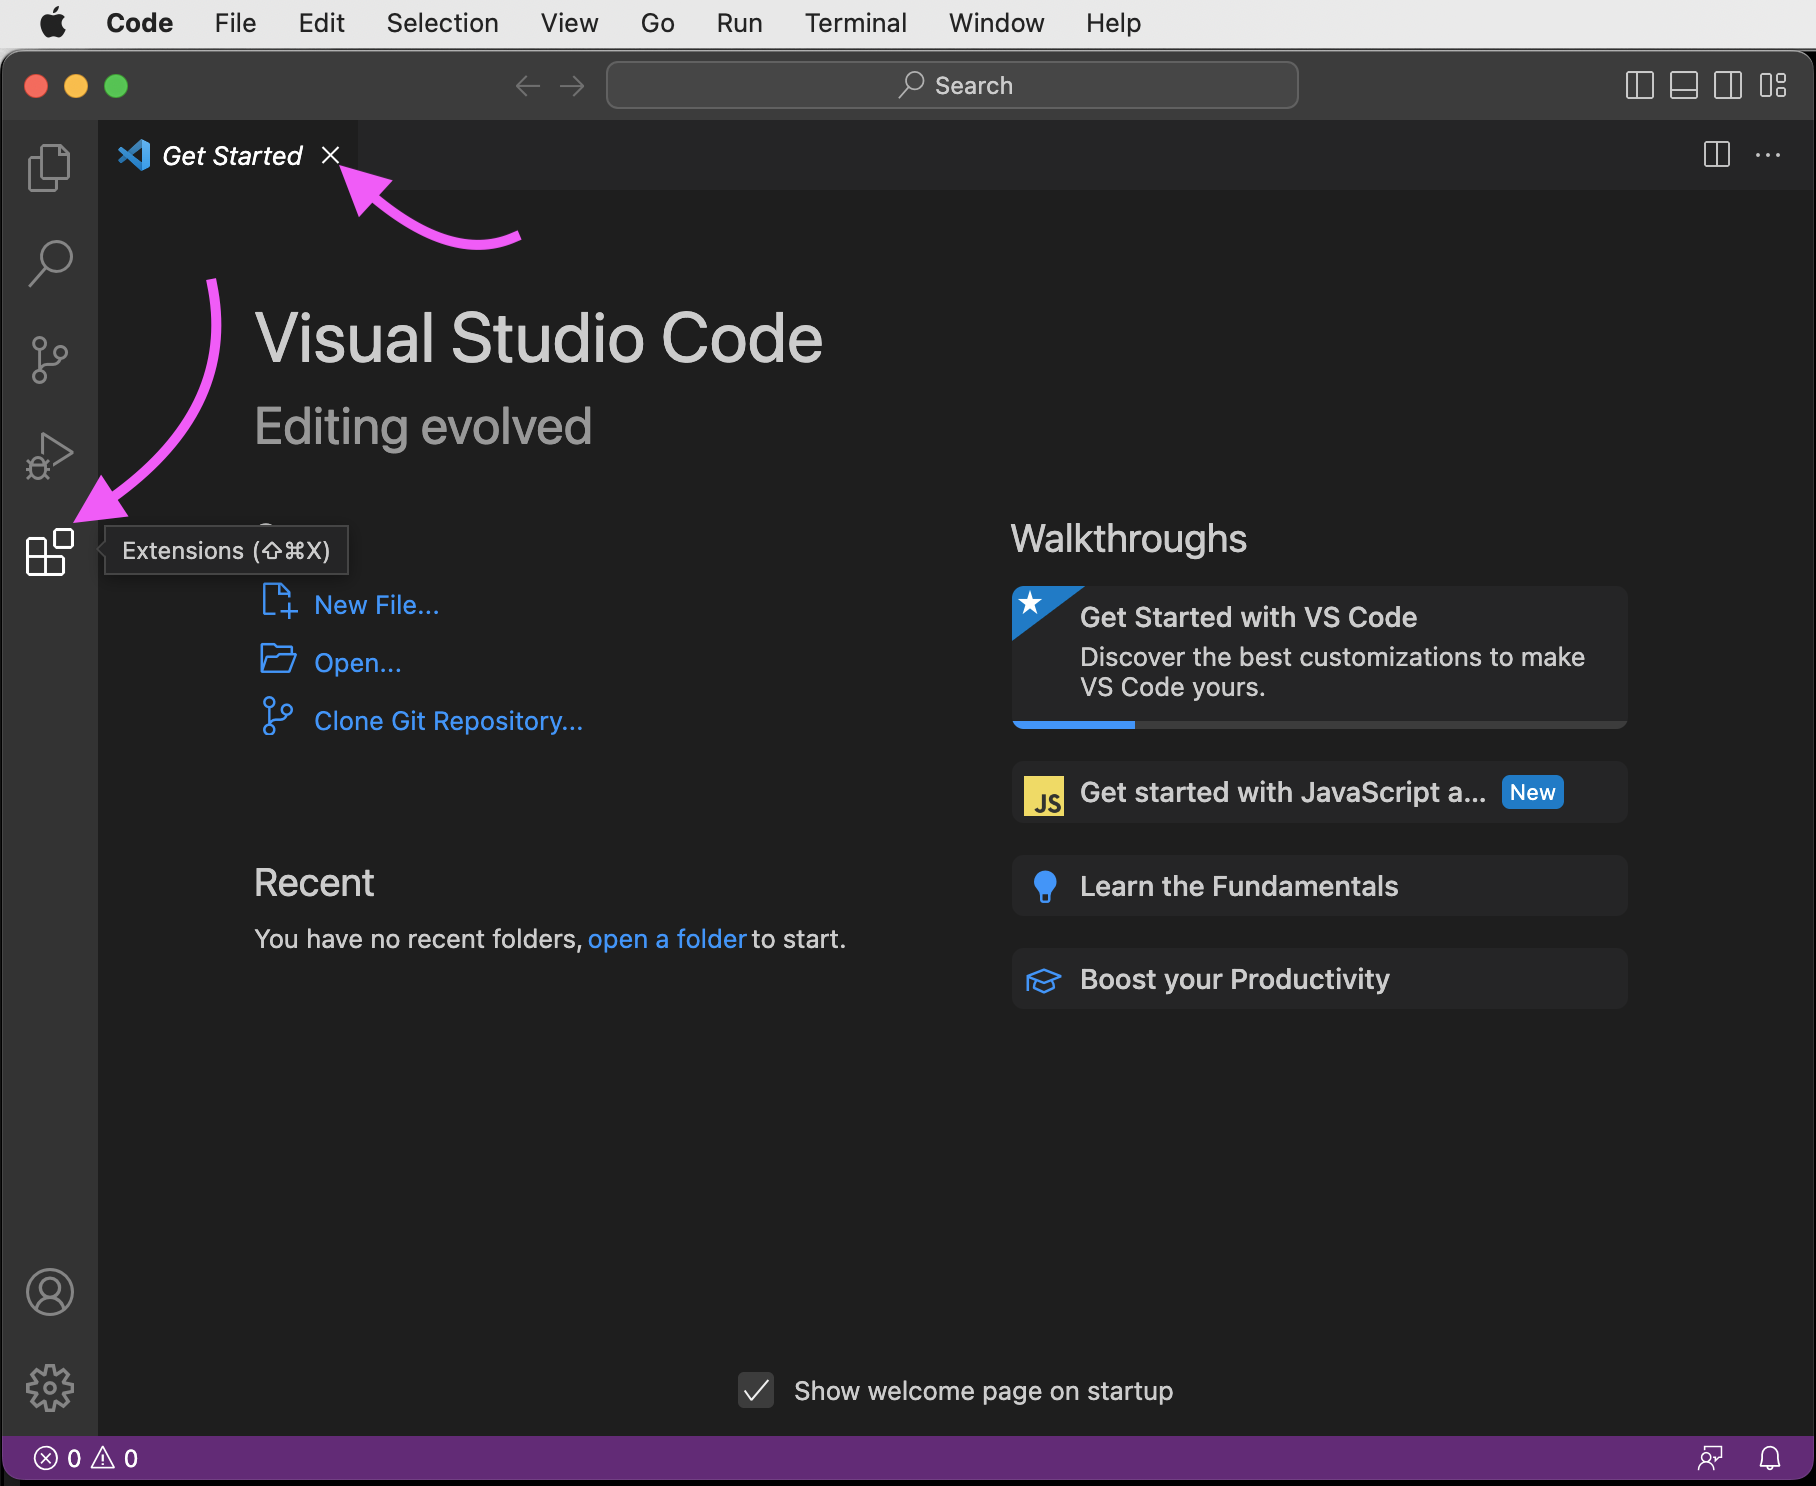
Next, find the application and double-click to open it. You should see something like this. You can ignore this "Getting Started" screen for now, so click the small "X" on its tab to close it. (You can easily get it back later if you'd like to see what it says by clicking "Help" in the top-level menu and then clicking "Welcome"). The "Extensions" has nothing to do with browser extensions and instead is a reference to extensions that people have created for the text editor itself. You can click there to explore if you'd like, but we can ignore it for today.
 (Click to enlarge.)
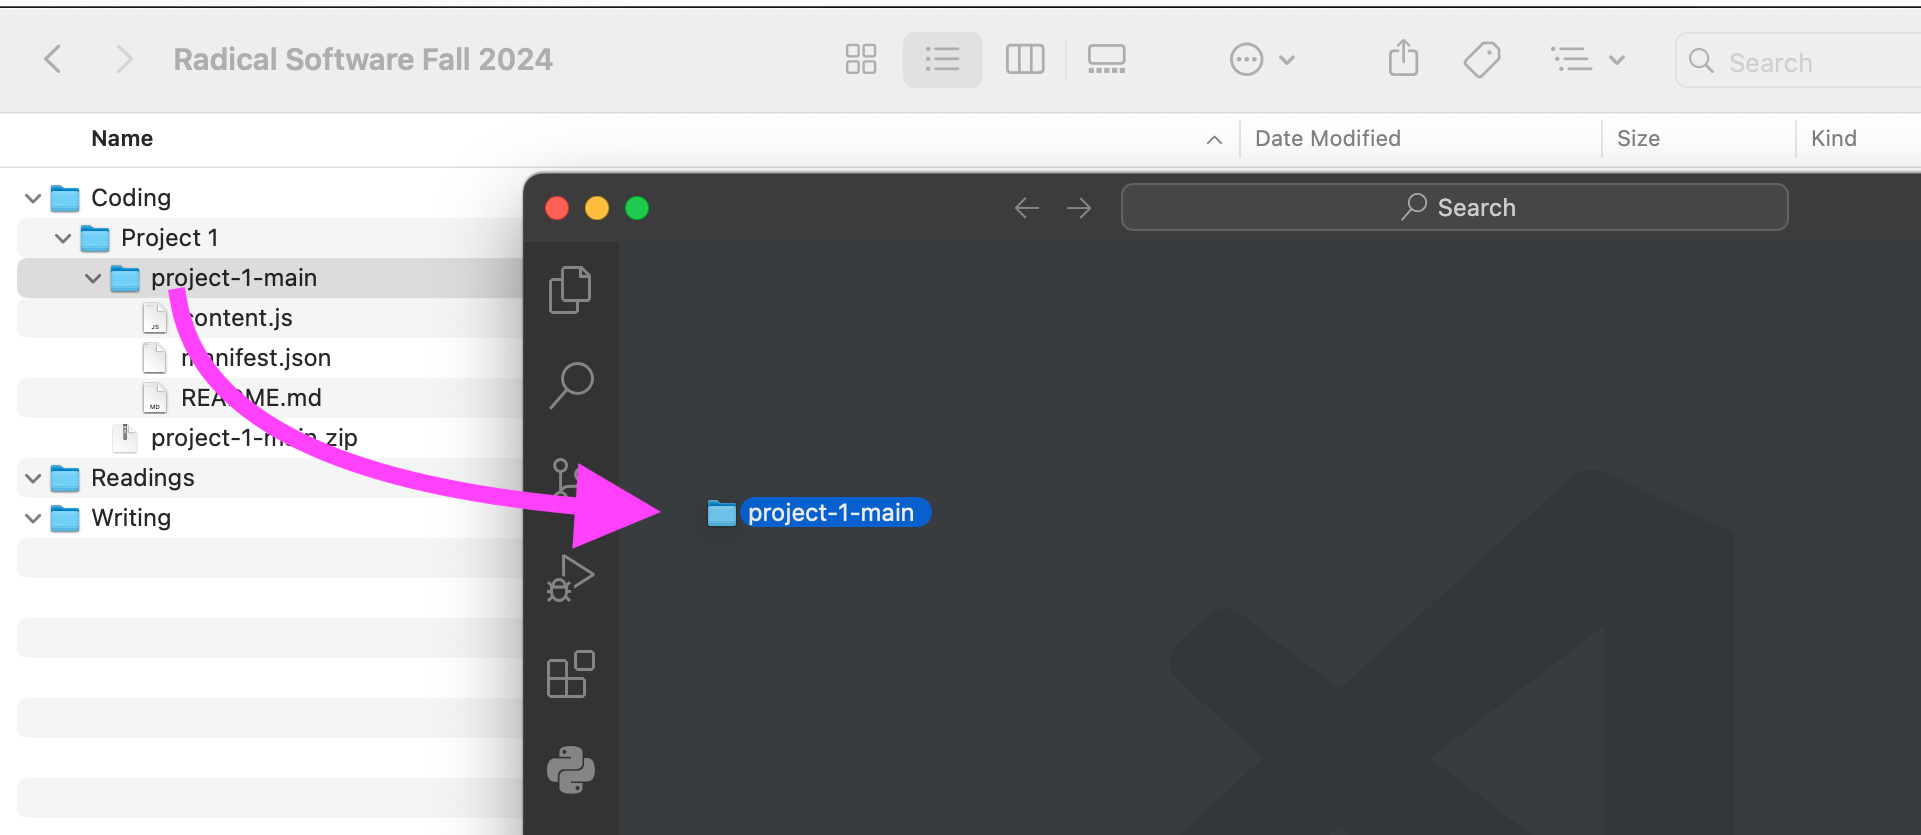
Now, drag your "project-1-main" folder into the VS Code window:
If you are prompted with this question about trust you can click 'Yes'. (If you trust me! ;) ) In the future, you should always think carefully before accepting such terms. Who is this code coming from? What does it do? Opening and running arbitrary code on your system potentially gives the authors of that code artibtrary permissions to access all of your files, data, and control of your machine. So be careful.
For your lab notebook. Consider posting some comments in your notebook about this question of trust and security as it relates to radical software, and in particular as it relates to working as a developer within a text editor like VS Code.
You should now see the source code of your first browser extension, with all files listed in the sidebar, like this:
Now let's go over these various files.
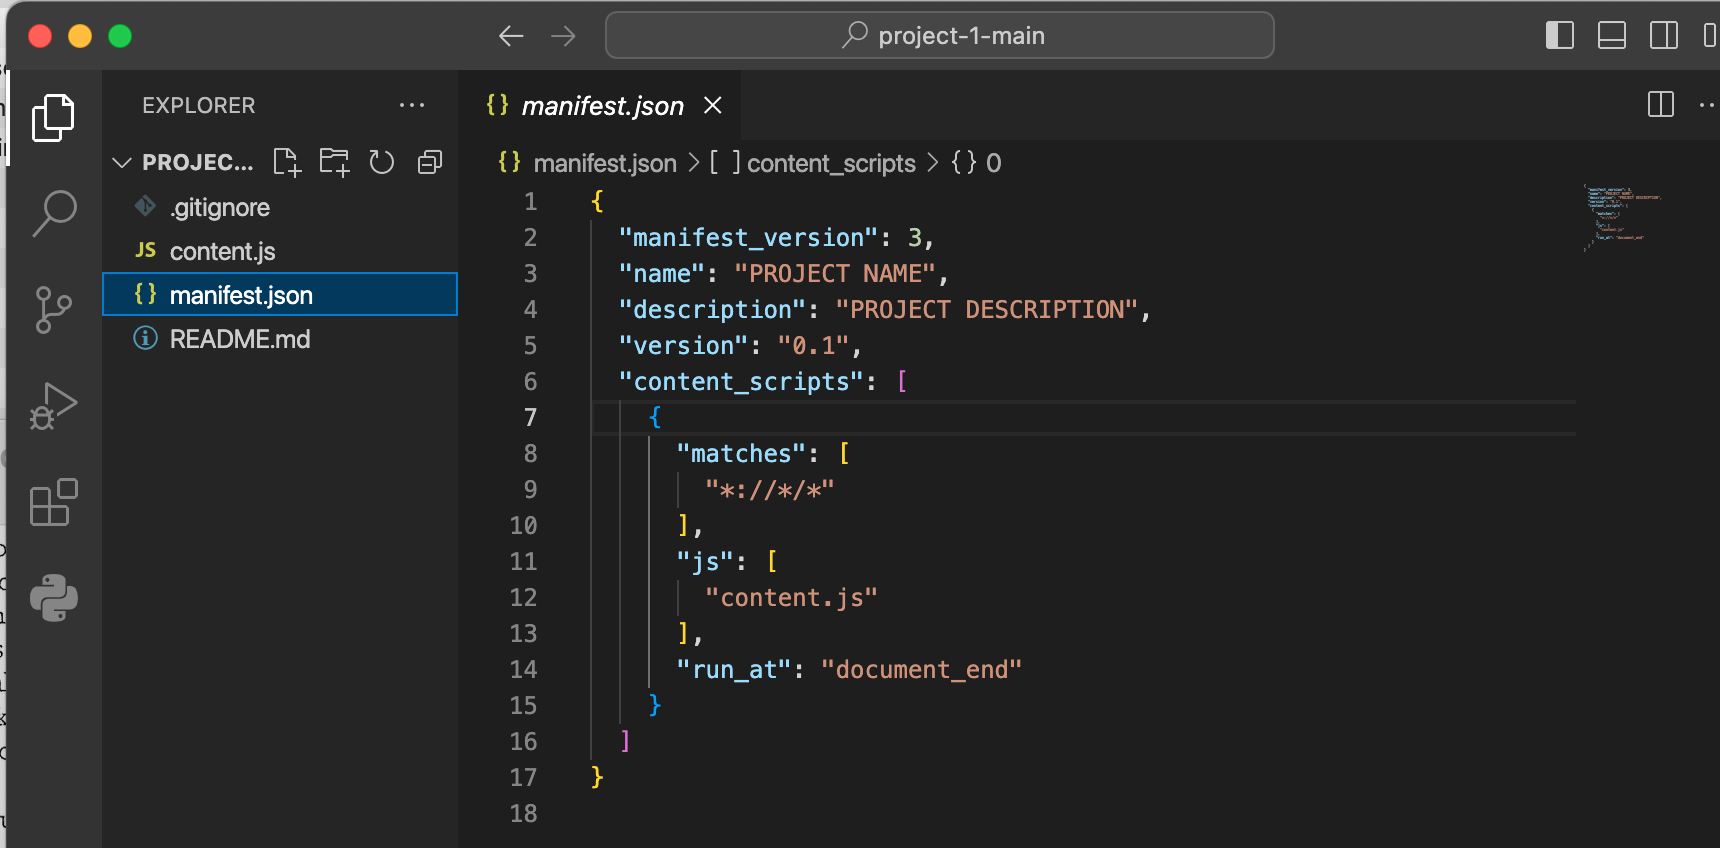
(jump back up to table of contents)03.b. The main component of a Chrome
extension: manifest.json
The main file for a Chrome browser extension is
manifest.json. This file is like a kind
of meta-data that describes the extension,
including its name and description, what permissions the
extension will be using, what code files it comprises, and what
other resources it will be using such as multimedia.
In any filename, the letters after the dot
(.) are called the file
extension and they specify what type of file it is. In
this case, JSON stands for JavaScript
Object Notation. As the name implies, JSON emerged out
of JavaScript — but it has now become an open standard
file format, meaning that it is used in many programming
languages and many contexts. JSON is a syntax
for formatting text to describe data, data structures, and other
code objects used in computer programs. It is meant to be
human-readable, but it can still be quite difficult for us to
parse. The syntax can be quite rigid and unforgiving, and small
mistakes like a comma out of place can cause an entire file to
be unreadable by machines.
JSON consists largely of key-value pairs: names
of properties and their values, like a dictionary of words and
their meanings. These are typically linked in pairs by the colon
character (:). For example, in
your manifest.json file right now you
should see:
"manifest_version": 3,
"name": "PROJECT NAME",
"description": "PROJECT DESCRIPTION",
"version": "0.1",
Throughout the semetser, I will indicate valid programming code in with this fixed-width font on a light blue background. Whenever you see this, it should be valid code that you can copy/paste into a code file. If you have trouble seeing this or if I can help make it more legible to you, please let me know!
This indicates 4
properties: manifest_version, name, description,
and version — and their current corresopnding
values.
-
manifest_versionRefers to the version of the rules determining the format of thismanifest.jsonfile. We are working with the Google Chrome extension version 3. Google will occasionally release new version of the Chrome extension specification, and you as an extension developer would then need to update and republish your extension, or risk being labeled out-of-date. -
nameis the name of your extension, in double quotes" ". -
descriptionis a short description of what your extension does, also in double quotes" ". -
versionrefers to the version of your extension that you are working on. I like to always start with 0.1. You can increment this as you'd like as you work on your project. When you submit your completed project, I'd like you to increment this to 1.0.
If you'd like to see all the options
for manifest.json, you can read the
Chrome documentation here:
developer.chrome.com/extensions/manifest.
That indicates which fields (i.e. which keys)
are required, optional, recommended, and etc. And if you'd like
to think more about the various pieces of a Chrome extension,
you can read
the Chrome
extension overview.
03.c. Modifying & reloading your extension
Let's make a change to our extension code and reload it in the browser, starting with something simple.
Modify your manifest.json file to
change the name and description to whatever you'd like. Let's
also change the version to 0.2. (That's
the version field,
not manifest_version.)
Now go back to your extension dashboard
(chrome://extensions), find your extension, and
click the reload button.
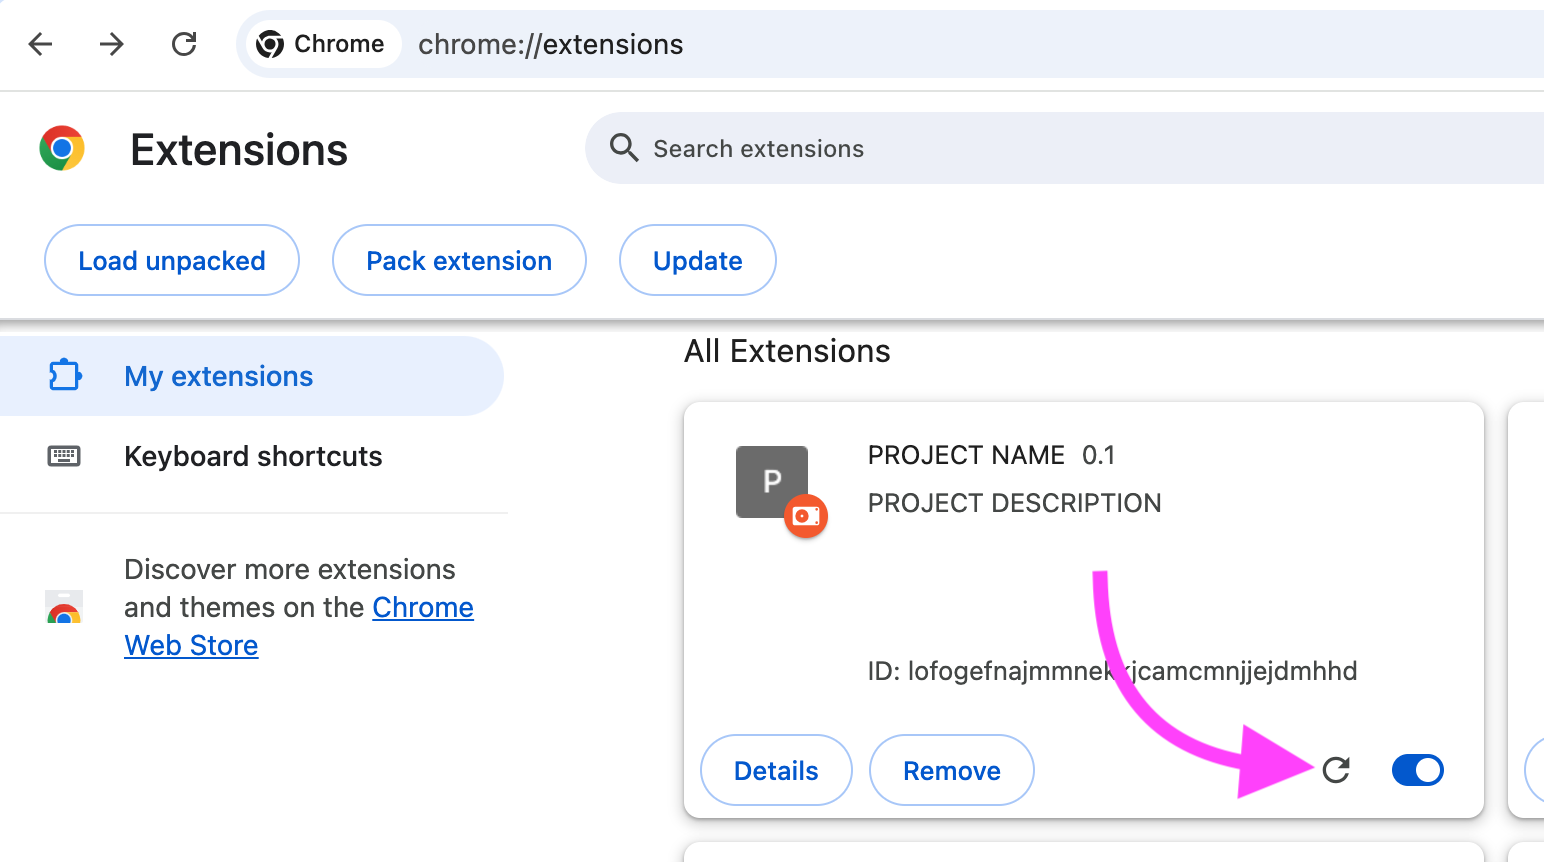
You should now see the name, description, and version you just entered. This process of modifying code in VS Code, saving, and reloading the extension in Chrome are the steps that you will use to work on this project.
(jump back up to table of contents)03.d. Working with content_scripts
The extension we're currently working on has all of it's code in
a file called content.js. This filename
is not a special keyword — I could have called
it spaghetti.js or anything I wished as
long as it ends with the JavaScript file
extension .js and we tell Chrome where
our code is, which is another use
of manifest.json.
In this file, the content_scripts field is used to
indicate a code file (or files) when you want your extension to
run this code to modify the content of the
current webpage.
The value of this field is actually a list, as indicated by the
blue symbols below, which we call square
brackets [ ]. We refer to the left and
right brackets as open
and close square brackets,
they must always come in pairs, and we say that any text in
between them is inside the brackets.
  "content_scripts": [
    // ...
  ]
The // characters indicate
a comment. The computer will ignore everything
after these symbols in a line of code.
In many programming languages like Python and
JavaScript, square brackets usually indicate a
list, and the items inside the brackets are separated by
commas. In manifest.json we write these
on separate lines, but often in program code you will see lists
used like this:
names = [ "Gritty", "Youppi", "Nordy" ]
(In this short list example, all my code is on one line. In our JSON file, the list is spread out over several lines. This is because JSON ignores whitespace. As long as you get the punctuation syntax correct, you can add spaces and line breaks however you like to make your code more readable to you.)
In our extension, each item of the content_scripts
list is specified with the { } characters, which we
refer to as curly braces. Like square
brackets, these also must always come in pairs of left
and right curly braces which we
call open and close braces,
and we say the text in between them is inside
the braces. Each pair of curly braces defines
one content script object.
If our extension had multiple content scripts, we would specify them like this. Notice how the pairs of curly braces are separate by a comma:
  "content_scripts": [
    {
      // define one content script in here
    },
    {
      // define a second content script in here
    }
  ]
But our script currently only has one content script. So
the content_scripts list contains one item, i.e.
one pair of curly braces, which defines a content script with
a series of key-value pairs:
  "content_scripts": [
    {
      "matches": [
        "*://*/*"
      ],
      "js": [
        "content.js"
      ],
      "run_at": "document_end"
    }
  ]
-
matchesspecifies a URL pattern. Notice how this sting of characters contains some parts of URLs likehttps://www.newschool.edu/lang/code-as-a-liberal-art/. The stars (*) in this pattern indicate that this content script should be run on any protocol, any server, and any pages on that server. But we could use this pattern to limit our content script to only run on certain types of web content: certain protocols, certain servers, or certain kinds of files. (Note that the value of this field is itself a list! We could specify multiple patterns for one content script.) -
jsspecifies the name of the Javascript files to run. This should match whatever name we have given to our.jsfile. (Note again that, likematches, the value of this field is also a list, meaning we could have multiple files within this one content script object.) -
run_atspecifies when the browser will run this script. Keep in mind the various parts of the HTTP protocol that we spoke about last week. Valid values for this field are:document_idle,document_start,document_end. Late you may want to use other values here depending on your case.
You can read
the Chrome
documentation on content_scripts online, and
specifically, the values
for run_at.
With all that covered, let's try to understand
what content.js is doing in the
extension we're working on, and what the extension actually
does.
04. Detour: HTML overview
Since this extension is going to modify the content of a webpage, in order to understand how it works, you have to understand a little bit about how web pages are built. What follows is a brief detour offering a crash course in HTML and how it is used to build webpages. If you've done HTML & CSS before, hopefully this review will strengthen the fundamentals of your understanding. If you've never done HTML & CSS before, hopefully this brief intro offers a solid foundation to start with.
HTML stands for hypertext markup language, and it is the language used to construct web pages.
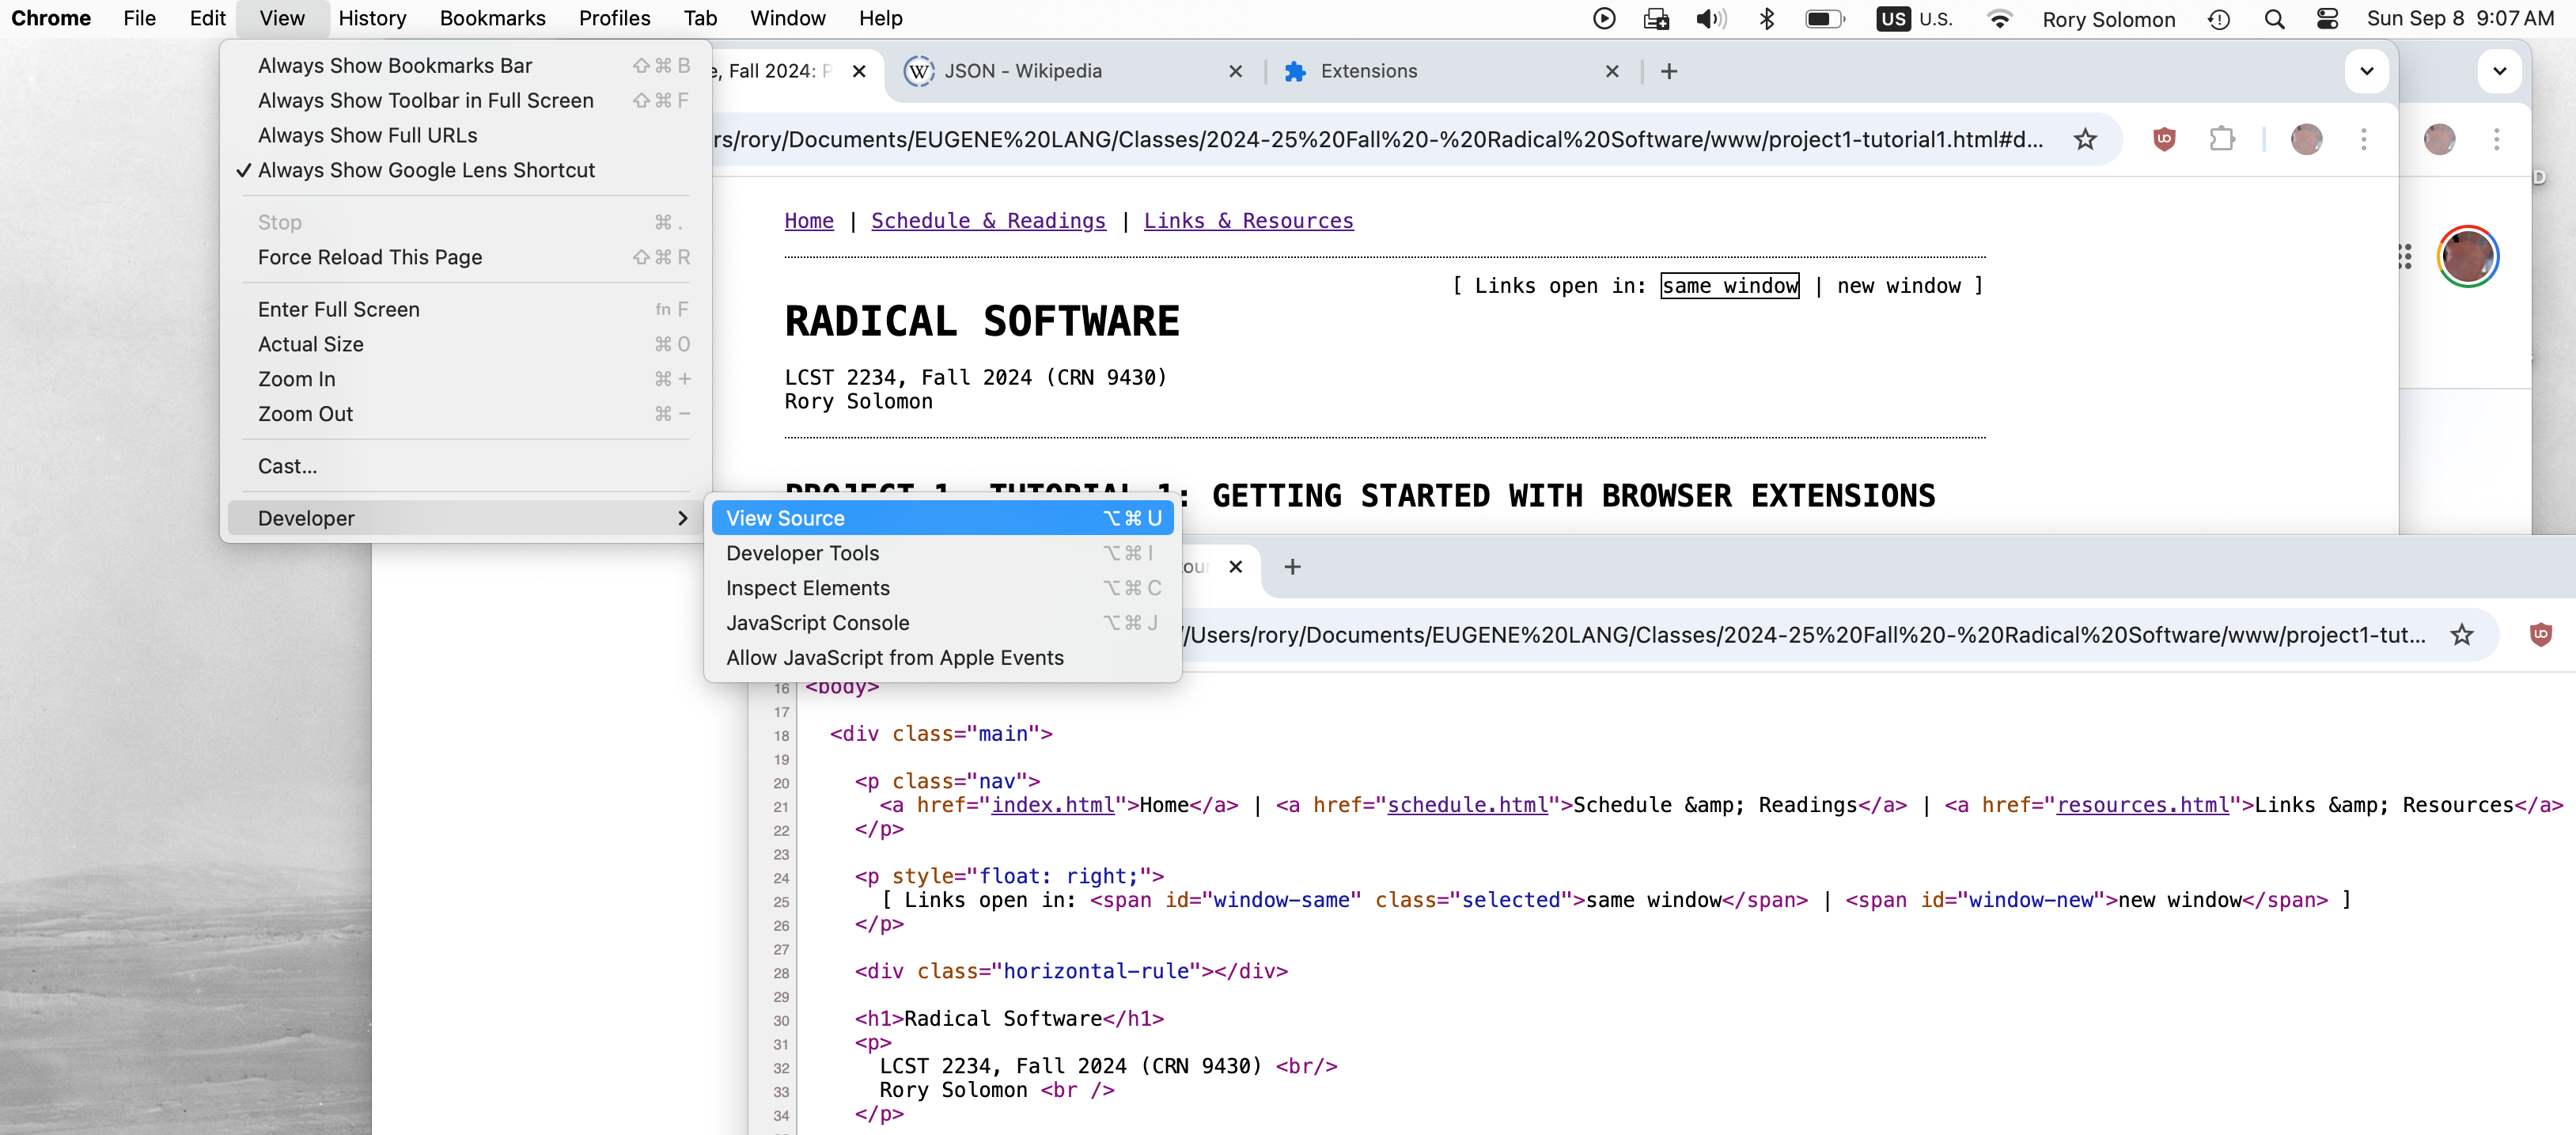 In any browser, you can always view source
to investigate the HTML that was used to construct the page you
are viewing. In Chrome, that is in the menu under View >
Developer > View Source. Note in this image how, even if you
know no HTML, you can start to see the relationship between the
source code and the visual presentation of this page. (Click to
enlarge.)
In any browser, you can always view source
to investigate the HTML that was used to construct the page you
are viewing. In Chrome, that is in the menu under View >
Developer > View Source. Note in this image how, even if you
know no HTML, you can start to see the relationship between the
source code and the visual presentation of this page. (Click to
enlarge.)
04.a. HTML syntax: open and close brackets and tags
HTML is comprised of elements,
or tags. You define tags
with brackets: <
and >, i.e. the "less than" and "greater than"
symbols. Like the square brackets for lists in
Python and Javascript, these brackets in HTML
also must always come in "less than" / "greater than" pairs,
which we call open and close
brackets. Any text in between these we say
is inside the brackets.
A pair of brackets indicates an HTML tag. There are many, many different HTML tags, and you define which one you are using with a keyword inside the brackets. For example:
<hr />
This is an hr tag, which stands for "horizontal rule". It creates a horizontal line on the page.
Most HTML tags come in pairs that we call
open and close tags. Close
tags are indicated with a forward slash / at the
beginning. For example:
<p>
  Hello
</p>
This is a p tag, which stands for "paragraph". It creates an organizational unit within the page called a paragraph, and the text "
Hello" is said to
be inside the tag, also referred to as
the content of the
tag. The content of a tag can be plain text (as
in this case) or more HTML tags. When text (plain or HTML) is
inside a tag, whatever properties that tag indicates is applied
to all text and elements within it.
(Note that in my <hr /> example above, there
is a forward slash (/) inside the tag. When a tag
exists by itself, without needing a corresponding close tag, we
put the forward slash in the tag before the closing bracket.)
There are many, many different HTML tags. We will go over a handful of them together, but more exist than we will have time to talk about together in class. There are many useful resources out there where you can learn more to supplement what we cover together. I can recommend W3 Schools as a pretty reliable resource.
(jump back up to table of contents)04.b. Structure and content, versus appearance
Some HTML tags affect the appearance of your content. For
example the content of an <h1></h1> tag
(which stands for "header 1") will be large and bold, while the
content of an <em></em> tag (which
stands for "emphasis") will be italicized.
Other tags at first glance don't really seem to have any visual
effect. For example <p> tag that we have already seen, or
the <div></div> tag (which stands for
"division").
HTML was invented as a markup language for desrcibing documents and multimedia content. It was never really intended initially as something to implement very complicated user interactions and visual interfaces. Over time those features came to be added in, and initially they were added with new features of HTML itself, but people found this to be frustrating and inadequate.
Over time, CSS was introduced, which stands for cascading style sheets, as a way to manage the appearance and user interface in a way that was separate from HTML, which was then made to focus on the content and structure of a webpage.
By structure I mean any of the components of a document that may have semantic or organizational significance. Think about a newspaper, for example: it has a title, a main headline, secondary headlines, articles with body paragraphs, maybe smaller blocks containing excerpts or teasers of other articles, etc. Or to take a simpler example, a basic report or article may contain: a title, a subheader, a byline, and sub-sections, each containing a section title and body paragraphs — perhaps the article also starts with a listing of all these sub-sections. A body paragraph may contain a list, or maybe an outline composed of a list where each item also contains its own sub-list.
In all of these examples, I am describing the structure of a document. And remember that because HTML tags can contain other HTML tags, this structure can be hierarchical, made of components and subcomponents. We call this hierarchical structure a tree.
(jump back up to table of contents)04.c. Example of HTML as structure
Here's an example of a snippet of HTML code that demonstrates
this. It shows how you might use tags to create a document
structure, and the default appearance for this HTML code as
defined by your browser. This code also introduces
the <ul> and <li> tags,
which indicate an unordered list and
a list item, respectively. In an unordered
list, items are indicated with bullets. (HTML also offers
an ordered list, <ol>, which
defaults to list items being displayed with numerical
indicators.)
Notice that I am using three <div> tags here
that are not visible on the right, but they are contributing to
defining the structure of this document.
<div> tags are used to indicate blocks, or
sections of content. In a minute we'll see how these can
function as things whose appearance you can control with CSS.
<body>
<h1>Autobiography</h1>
<h2>By Gritty Monsteur</h2>
<div>
  <h3>Past</h3>
  <p>
    I was born thousands of years ago
    in Monsterville.
  </p>
  <p>
    I come from a long line of monsters.
  </p>
</div>
<div>
  <h3>Present</h3>
  <p>
    I like:
    <ul>
	<li>ice skating</li>
	<li>the color orange</li>
	<li>doing pranks</li>
    </ul>
  </p>
</div>
<div>
  <h3>Future</h3>
  <p>
    One day I hope to be a hockey player.
  </p>
</div>
</body>
Autobiography
By Gritty Monsteur
Past
I was born thousands of years ago in Monsterville.
I come from a long line of monsters.
Present
I like:
- ice skating
- the color orange
- doing pranks
Future
One day I hope to be a hockey player.
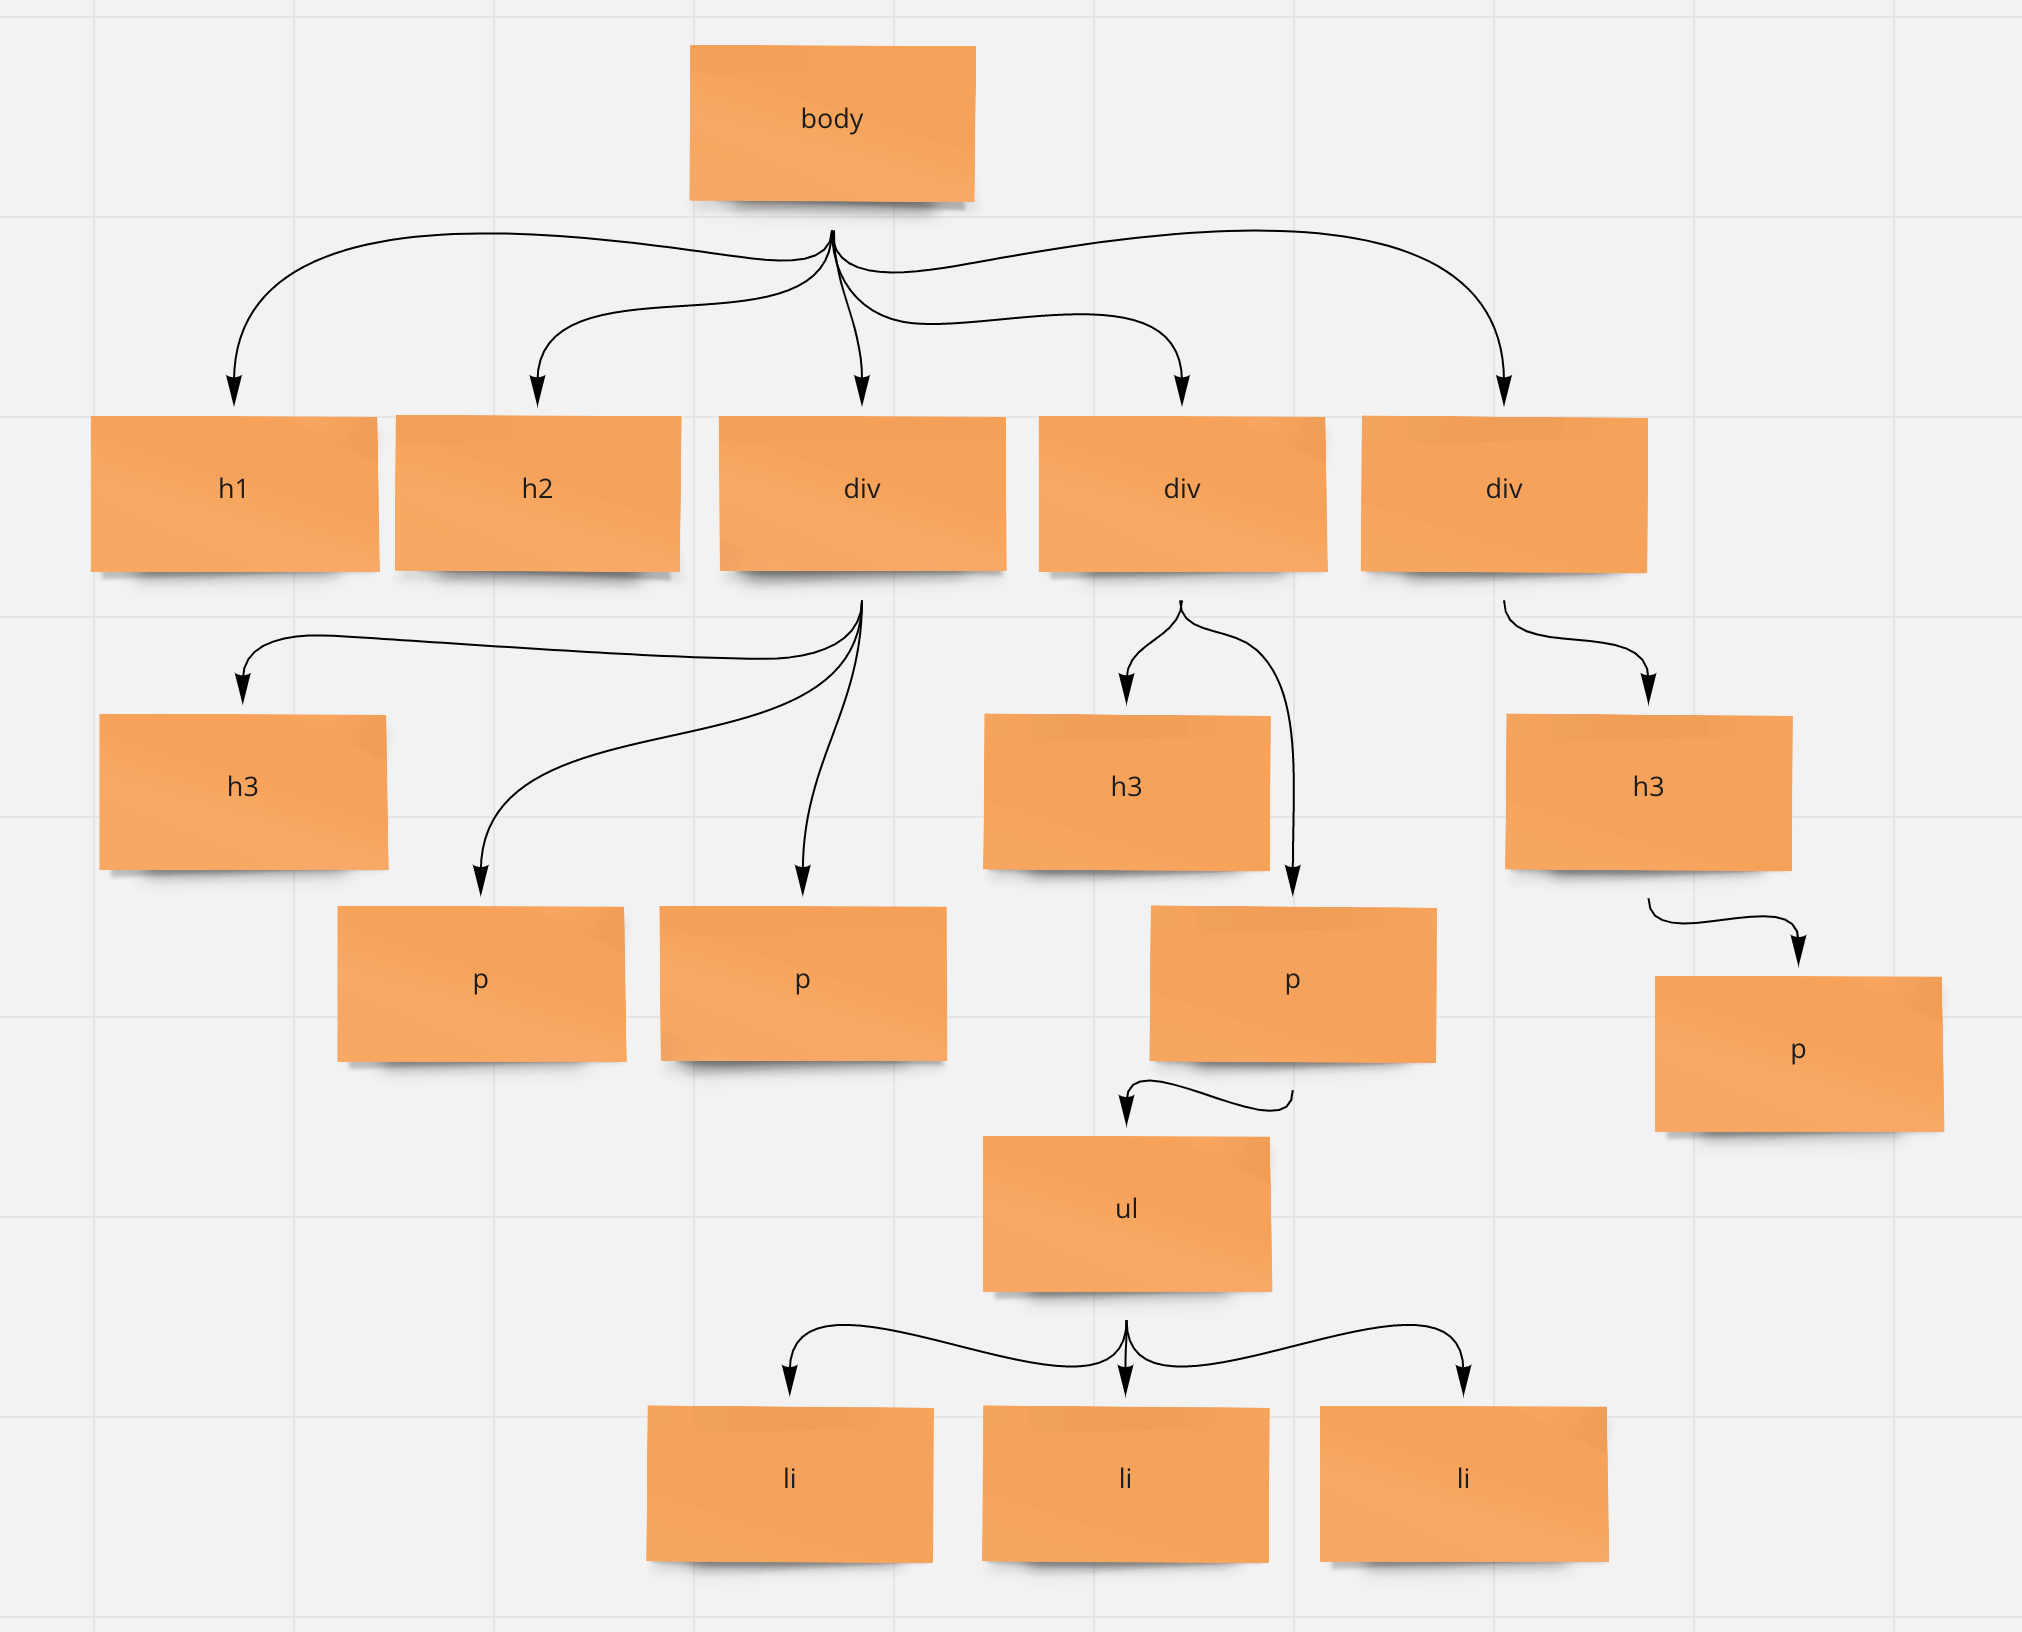 The internal DOM tree structure of this HTML snippet.
The structure of an HTML document can also add semantic
significance to its contents. Web developers typically use
HTML tags that specify structure as ways to indicate the
semantic meaning of a document. And that means that the code
that we write to analyze web pages can do the same. For
example, something in an <h1> will likely
be a title or other important keywords for the page,
while <li> tags will likely indicate some
kind of listed information which, depending on other context,
could be names, dates, prices, etc.
For today, the important thing to understand about this is that the browser processes the HTML and uses it to build this tree structure called a DOM, which stands for Document Object Model. It is referred to as a tree, even though more accurately we might see it as an upside-down tree — or, given the etymology of our class title, maybe we could view it as a tree's root structure.
(jump back up to table of contents)04.d. Examining a web page with the browser extension tool
One way to learn about the internal structure of a webpage, as well as other behaviors and properties, is with the browser inspect tool.
 Right-click on any element on the page and click "Inspect"
to open the Chrome developer tools pane. From there you can
mouse-over any HTML element and see it highlighted on the
page. Click on any element and Chrome will tell you what CSS
properties have been assigned to it.
Right-click on any element on the page and click "Inspect"
to open the Chrome developer tools pane. From there you can
mouse-over any HTML element and see it highlighted on the
page. Click on any element and Chrome will tell you what CSS
properties have been assigned to it.
To think of this as an example of radical software, sometimes we can use some tricks within this tool to do things like circumvent paywells by tweaking HTML & CSS properties within the structure of a page. Another good trick is to modify the content of a webpage to create a believable spoof which you could then screenshot and circulate. Folks like The Yes Men have done this kind of media activism very effectively.
Keep in mind that these changes you are making are only having an effect locally, in the version of the page that your browser is showing you, a kind of local copy. You are not modifying the page on the server, because you do not have access to that computer. You cannot share these changes with others to see because you can't control how these other web servers deliver HTML and CSS data.
(jump back up to table of contents)05. Our first browser extension technique: modifying CSS properties
Today we only had time for one actual browser extension technique.
What we ended up with modified the web page as being displayed to the user by adding a thin red border to
The starting point of the content.js
file in your extension code looked like this:
var elements = document.getElementsByTagName('p');

for (var i = 0; i < elements.length; i++) {
   var element = elements[i];
}
What that code does is select (or
"target")
every <p> tag on the page, and save those
into a list in a variable that this code
calls elements. (This is an arbitrary name and not
a keyword. We could have called this
variable spaghetti.) Then the
code loops over each item in this list, and for
each one, runs some code. To start, that code did nothing. It
simple accessed each item of the list in turn and assigned it a
variable called element. (Again, an arbitrary
name.) Now let's see how we can do something with that.
The object called element has some
properties and functions we can access. One of these is
called style, which represents all the CSS
properties that have been assigned to this element. (We'll
talk more about CSS next week.)
There is a function called setProperty() that we
can use to modify these CSS properties. To start, let's set
a red border on each <p> element. That code would look
like this:
var elements = document.getElementsByTagName('p');

for (var i = 0; i < elements.length; i++) {
   var element = elements[i];

   element.style.setProperty('border','solid 1px red');

}
(Throughout my class notes this semester, when working through a coding example, I will indicate new code in blue with a box underline. I will indicate modified code in orange with a thin underline. If I can ever make these styles more visible or accessible to you, please don't hesitate to ask.)
Now if you save this code and reload your browser extenstion, you should see a thin read border on any web page that you visit.
If you ever get sick of this behavior, remember that you can
always go back to the Extension Manager page
(chrome://extensions) and flip the switch to turn
this extension off.
05.a. Two loop styles: for and while
In class we talked about that for loop syntax and
tried to unpack exactly what is going on there. I explained that
for some folks it might be easier to conceptualize the
iterating, repeating behavior of a loop by examining a different
syntax which is functionality equivalent: the while
loop. Re-writing the above example using a while
loop would look like this:
var i = 0;
while (i < elements.length) {
   var element = elements[i];

   element.style.setProperty("border","solid 1px red");
   i = i + 1;
}
Note how all the same syntax elements are there: var i =
0, i < elements.length, and i = i
+n 1 (which is the same as i++, but arranged
in code slightly differently.
Personally I find while loops much clearer to
read. You can step through it from top to bottom and see how the
code will create a new temporary variable i, set it
to an initial value (0), then as long as that
condition is true (while it is true), repeat the
code inside that block (in between the curly
braces { }). Within that block, some code is run,
and each time, the temporary variable is increased
by 1, meaning that eventually the looping condition
(i < elements.length will no longer be true and the
loop will stop repeating.
You can use whichever form of loop you wish this
semester. Advanced programmers tend to prefer the compactness
of for loops, but beginners tend to prefer the
clarity of while.
06. Conclusions & lab notebook entries
Your only homework for this week is to make sure you can get this all to work and try some oteher similar experimentation. You may want to consult the W3 Schools CSS tutorial for some ideas of other CSS properties you can try modifying.
Can you use the technique I demonstrated above and try to modify
the background color of various elements on the page? Perhaps
you could try to select <div> elements
instead of or in addition to <p>s.
For your lab notebook, respond to the prompts that I have posted above, note down any challenges you faced in getting this to work and how you solved them, and offer some comments about your efforst to experiment with this technique to go further in some direction.
We'll talk about some other more interesting browser extension techniques next week!