[ Links open in: same window | new window ]
Radical Software
LCST 2234, Spring 2026 (CRN 16616)
Rory Solomon
Project 1, Tutorial 2: CSS and text modification with a browser extension
In our tutorial last week we got started on this project, downloaded some source code as a starting point, and got setup with the basic structure of your browser extension. This week we are going to talk about functionality we can start adding to your extension to allow it to intervene in a web user's browsing experience by modifying the HTML page currently being displayed.
In order to understand how this works, we need to take a bit of a detour into the world of CSS and it's relationship to HTML.
Table of contents
- Review: HTML and CSS as structure vs content
- Introducing CSS
- Inspecting the structure & apperance of an HTML page
- Extension technique: Search-and-replace text to modify page content
- Extension technique: Highlighting text
 The artist Gordon Matta Clark would often work by removing
the façades of structures in the built environment, presenting
structural features as aesthetic objects. Today we'll be mucking
around with the structure and "façade" of HTML documents. This
piece is called "Bingo" (1974) on view here
at MoMA.
The artist Gordon Matta Clark would often work by removing
the façades of structures in the built environment, presenting
structural features as aesthetic objects. Today we'll be mucking
around with the structure and "façade" of HTML documents. This
piece is called "Bingo" (1974) on view here
at MoMA.
01. HTML and CSS: Structure and content versus appearance
Last week I gave
a brief overview
of HTML: its basic syntax of open and close
braces < > to define tags
(a.k.a. elements), the way that tags often come
in open and close pairs (like <p>
</p>), and the way that HTML is generally used to
specify the semantics or organization
structure of webpages, like paragraphs, headings,
lists, etc.
That leaves CSS to control the appearance of webpages as determined by the structure of HTML.
(jump back up to table of contents)(Throughout my class notes I will use bold to indicate key technical jargon that is important for you to understand. Learning to code is not just about learning programming language syntax, but also includes learning how to speak about programs with other programmers. The technical vocabulary of these bolded terms will help you do that, and it is as important to practice using as the specific code commands we'll be working with.)
For your lab notebook. Try looking through the notes for the technical tutorials so far and make note of the bolded terms and their definitions.
01.a. A sample HTML file to work with
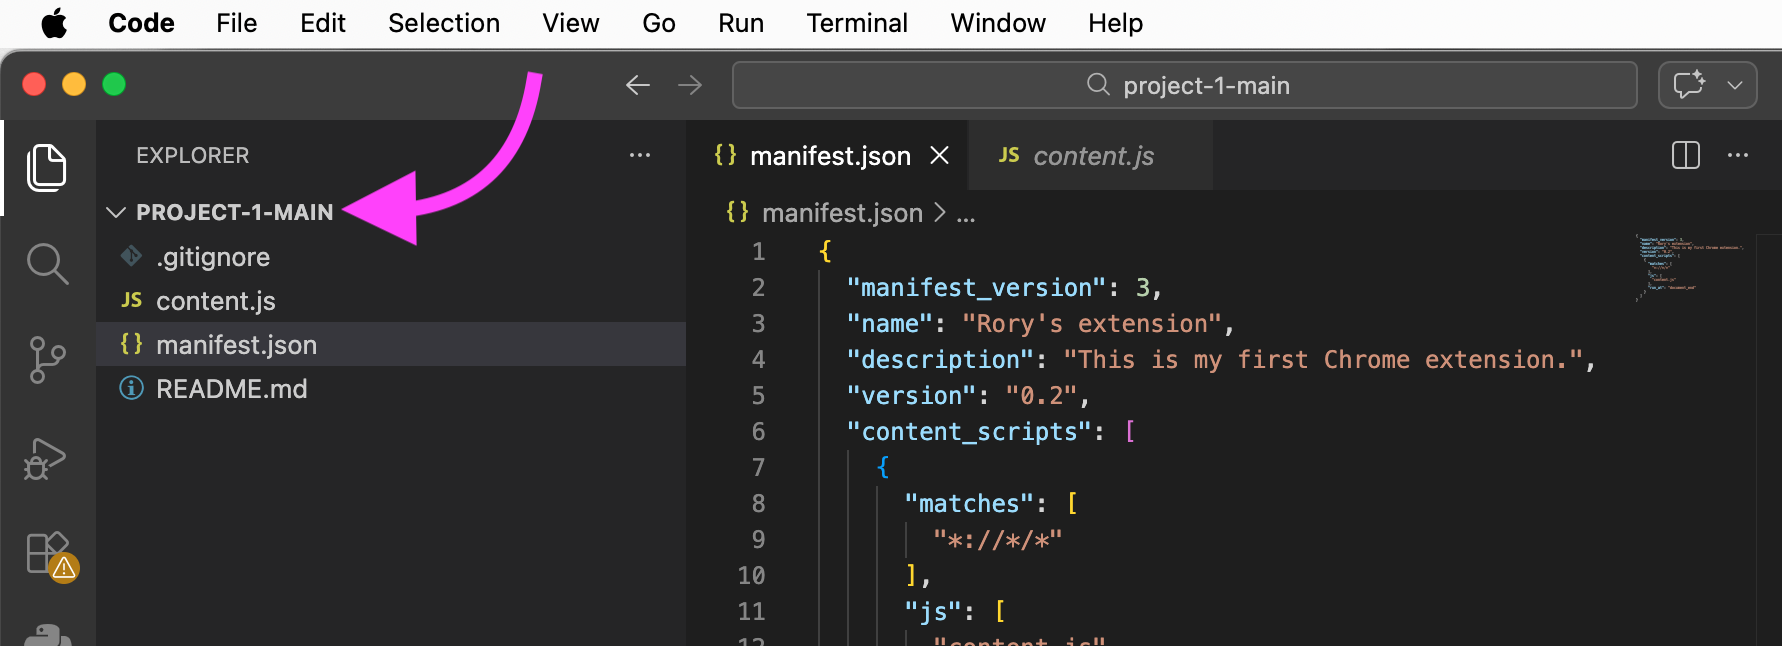
Let's make a sample HTML file to work with for today. Open
VS Code and make sure that you have
your project-1-main fiolder a the root
folder of your VS Code workspace. Your window should look
something like the below. If you don't
see PROJECT-1-MAIN in
the EXPLORER pane, open a new VS Code
window and drag that folder into it.
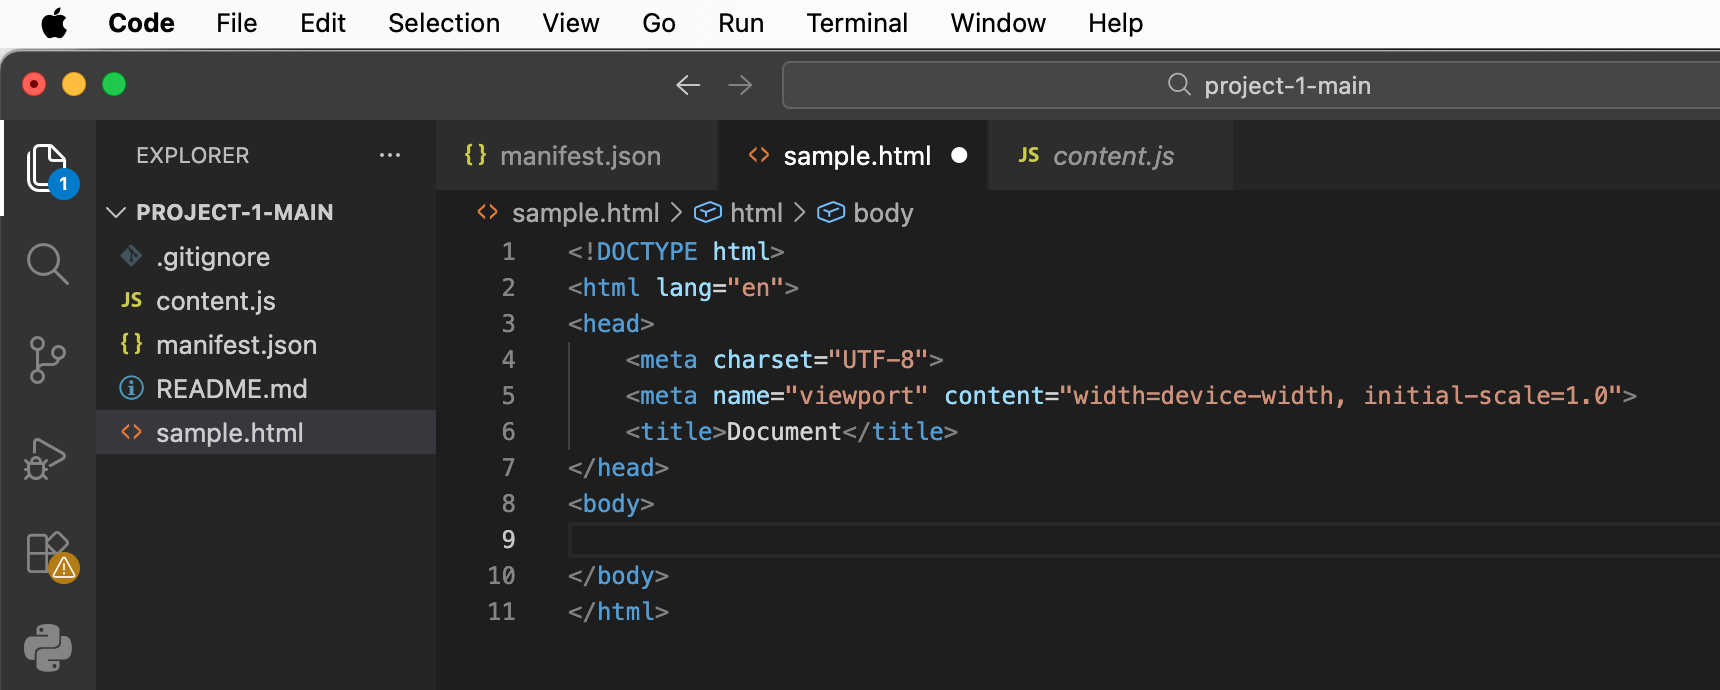
In VS Code, select File > New File, name
it sample.html and save it into
your project-1-main folder. Now let's
add the basic starting code for a web page. Start by
typing html. VS Code should give you some
autocomplete options. Select html:5 and press
ENTER. That should give you HTML boilerplate,
which is a term for the basic code that you should add to begin
any HTML file. It should look like the below. For some versions
of VS Code, I've been told you can add the HTML
boilerplate by typing ! (SHIFT and 1) and
hitting ENTER. If you do not see that, you may need to mess
around with VS Code settings for something called "Emmet
abbreviations".
More
info here.
Now let's start by copy/pasting the sample HTML code that
we were looking at last week, taking care to put
this in the <body> element (i.e. in
between the open and close <body> tags). Your
code should then look like this:
<body>
<h1>Autobiography</h1>
<h2>By Gritty Monsteur</h2>
<div>
  <h3>Past</h3>
  <p>
    I was born thousands of years ago
    in Monsterville.
  </p>
  <p>
    I come from a long line of monsters.
  </p>
</div>
<div>
  <h3>Present</h3>
  <p>
    I like:
    <ul>
	<li>ice skating</li>
	<li>the color orange</li>
	<li>doing pranks</li>
    </ul>
  </p>
</div>
<div>
  <h3>Future</h3>
  <p>
    One day I hope to be a hockey player.
  </p>
</div>
</body>
02. Introducing CSS
Now we can get started molding this HTML structure into the
layout that we're working toward. We do this with CSS, which
stands for Cascading StyleSheets. Where HTML
specifies the structure and semantics of a document, CSS is
added to control the visual display of that structure. As
we've seen so far, most HTML tags have some kind of default
appearance (<h1> tags are larger, bolded
text; <li> tags have small bullets, etc). CSS
can be used to change and override any of these visual
aspects. Any display properties that are not explicitly
modified by your CSS code will fall back on the default
properties for each tag, which are specified by your browser,
and sometimes slightly different from one browser to another.
We won't be writing too much CSS code together for this project, and instead we will be more focused on writing JavaScript code to modify CSS. But there may be some parts of your project that will require CSS, and in any case in order to write code that modifies CSS, it is a pretty good idea to have a solid foundation for how it works.
CSS code is comprised of a series of rules. The basic structure of a CSS rule is as follows:
and rounded corners.)
p {
  color: red;
}
There are four main components to each rule:
-
The selector (in this
case,
p): This targets which parts of your HTML document this rule will apply to. In this case, it will apply to allptags. -
The property (in this
case
color): This specifies the visual quality that is being affected by this rule. This rule is setting the color of the content of all thosepelements. - The curly braces. These must always come in pairs.
-
The value (in this
case
red): Each different property has its own valid values. For things related to size, these are usually pixel values and are appened withpx, like this:width: 400px;For color properties, CSS includes some predefined words that you can use, such as
red,blue, etc. But you can specify any color you'd like using RGB notation with values from 0-255, like this:color: rgb(155,155,255). Or you can use 6-digit hexadecimal notation that indicates the red, green, and blue components as:#RRGGBBwhere each character here can be a value between 0-9, or a-f. a=10, b=11, c=12, etc, up to f which equals 15. From 0 to 15 is 16 values, hence the name hexadecimal. (Think "hexagon".) If this is confusing, you can use a color chooser tool to select a color and copy/paste the hexadecimal (or just "hex") value.
Some other syntax rules:
- Like HTML, CSS ignores whitespace, so you could write rules all on one line if you wish, or space them out in a way that makes them more readable to you.
-
Comments are added with this notation:
/*
	  */
. This punctuation must also always come in pairs, can span multiple lines, and can be placed anywhere within your CSS code. For example:/* This is a multi-line comment about my first CSS rule. */ p { color: red; /* And this is a single-line comment. */ } -
One rule may specify multiple properties & values for a
given selector, in which case they each must end with a
semi-colon (
;). For example:p { color: red; border: solid 1px; }
We can't possibly go over every available CSS property and all
their valid values. Perhaps if this were a web design course,
we'd spend a few weeks doing so. For our class, I'm only going
to show a you a couple, and offer you some pointers to where you
can look for more reference documentation about how CSS
works. Probably the best guide I can recommend is from the
Mozilla Developer Network (MDN). Here is their CSS tutorial:
MDN CSS Tutorial
Notice the column on the left side with a long list of different topics. Click on each of those to learn more. Particularly useful I think are "Box Model," "Color," "Display," "Fonts," and "Images."
(jump back up to table of contents)02.a. Attaching CSS to an HTML page
CSS rules are sort of "attached" or connected to the page structure of an HTML document by including the CSS code in the HTML. There are three main ways to include CSS in an HTML page:
-
Inline. For any HTML tag, you can include an
attribute named
style, which can include CSS code. For example:<body> <h1 style="color: red;">Autobiography</h1> <h2>By Gritty Monsteur</h2>As above, you can specify multiple properties / values separated with semi-colons:<body> <h1 style="color: red; border: solid 1px;">Autobiography</h1> <h2>By Gritty Monsteur</h2>In this case, these rules will apply only to this one specific<h1>tag. No others.This is, in general, considered the worst way to apply CSS rules to your HTML. It is not general in any way, so if you wanted to create a consistent "look and feel" for a page by applying similar styles to different tags, you would have to copy/paste a lot of CSS code. Sometimes in limited cases though it can be a useful shortcut. But if you find yourself including a lot of CSS this way, switch to one of the below methods.
-
Internal. A better way is to include a big
chunk of CSS rules at the top of your document, in
the
<head>section using a<style>tag, like so: (This HTML is a snippet from the complete HTML file above, as indicated by the jagged border.)<head> <meta charset="UTF-8"> <meta name="viewport" content="width=device-width, initial-scale=1.0"> <title>Document</title> <style> p { color: red; border: solid 1px; } </style> </head>
This method is a little better than inline. It helps separate your tags specifying the structure of the document and the rules for how it is displayed. And the rules that you specify here will apply to all HTML elements on the page that match the selectors that you are using.
-
External. This is probably the best
method. With this technique, you place all your CSS code
in a separate file, which you reference from your HTML
file.
To do this, create a new subfolder called
cssin your project folder, and within that, create a new file. I like to call my CSS filestyle.css, but you can call it anything you'd like, just make sure it ends in.css.Now, place your CSS rules in this file, and save it. The modify the
<head>section of your HTML file like so:<head> <meta charset="UTF-8"> <meta name="viewport" content="width=device-width, initial-scale=1.0"> <title>Document</title> <link rel="stylesheet" href="css/style.css"> </head>
03. Inspecting the structure & appearance of a web page
Last week I mentioned the browser inspect tool twice: here, and as a debugging tool using the console here.
This is a great tool to explore how a webpage is built, and also to learn HTML and CSS syntax.
As I also mentioned, you can also use the inspect tool to have some fun modifying the structure and apperance of an HTML page, but keep in mind that these changes you are making are only having an effect locally. You cannot share these changes with others to see because you can't control how these other web servers deliver HTML and CSS data.
But, what you can do however is create a browser extension that makes these changes in an automated way, then share that browser extension with others. In this way, anyone who installs your browser extension will see modifications that you have done. Of course, this entails figuring out how to automate these changes, by running code to run in someone else's browser. For that we'll be using JavaScript.
(jump back up to table of contents)04. Extension technique: Search-and-replace text to modify page content
Let's look at a new browser extension technique that can modify page content beyond just modifying CSS properties.
To start, rename content.js
to content-tutorial1.js. Create a new
file called
content-tutorial2-04.js (since we are
working on part 04 of this
tutorial). Modify manifest.json to
specify this filename in the js field
of content_scripts.
Let's pause for a moment and think about how we might implement text replacement ...
We might think that it should be as simple as replacing all instances of a word or phrase with another word or phrase within the entire textual content of the HTML page.
However, we can't simply do that in an HTML file because it could mess with the structure of the code. It could inadvertently replace HTML tags, alter CSS classes, or otherwise just do things we don't want. (Of course, if you're interested in intentionally breaking and glitching things, perhaps this may be an effect that you're interested in. What if you search-and-replaced all instances of one tag with another for example? Or swapped CSS classes just to see what you'd get ...)
For the technique I want to demonstrate today, we only want to do search-and-replace within the text nodes of the DOM. Remember this?
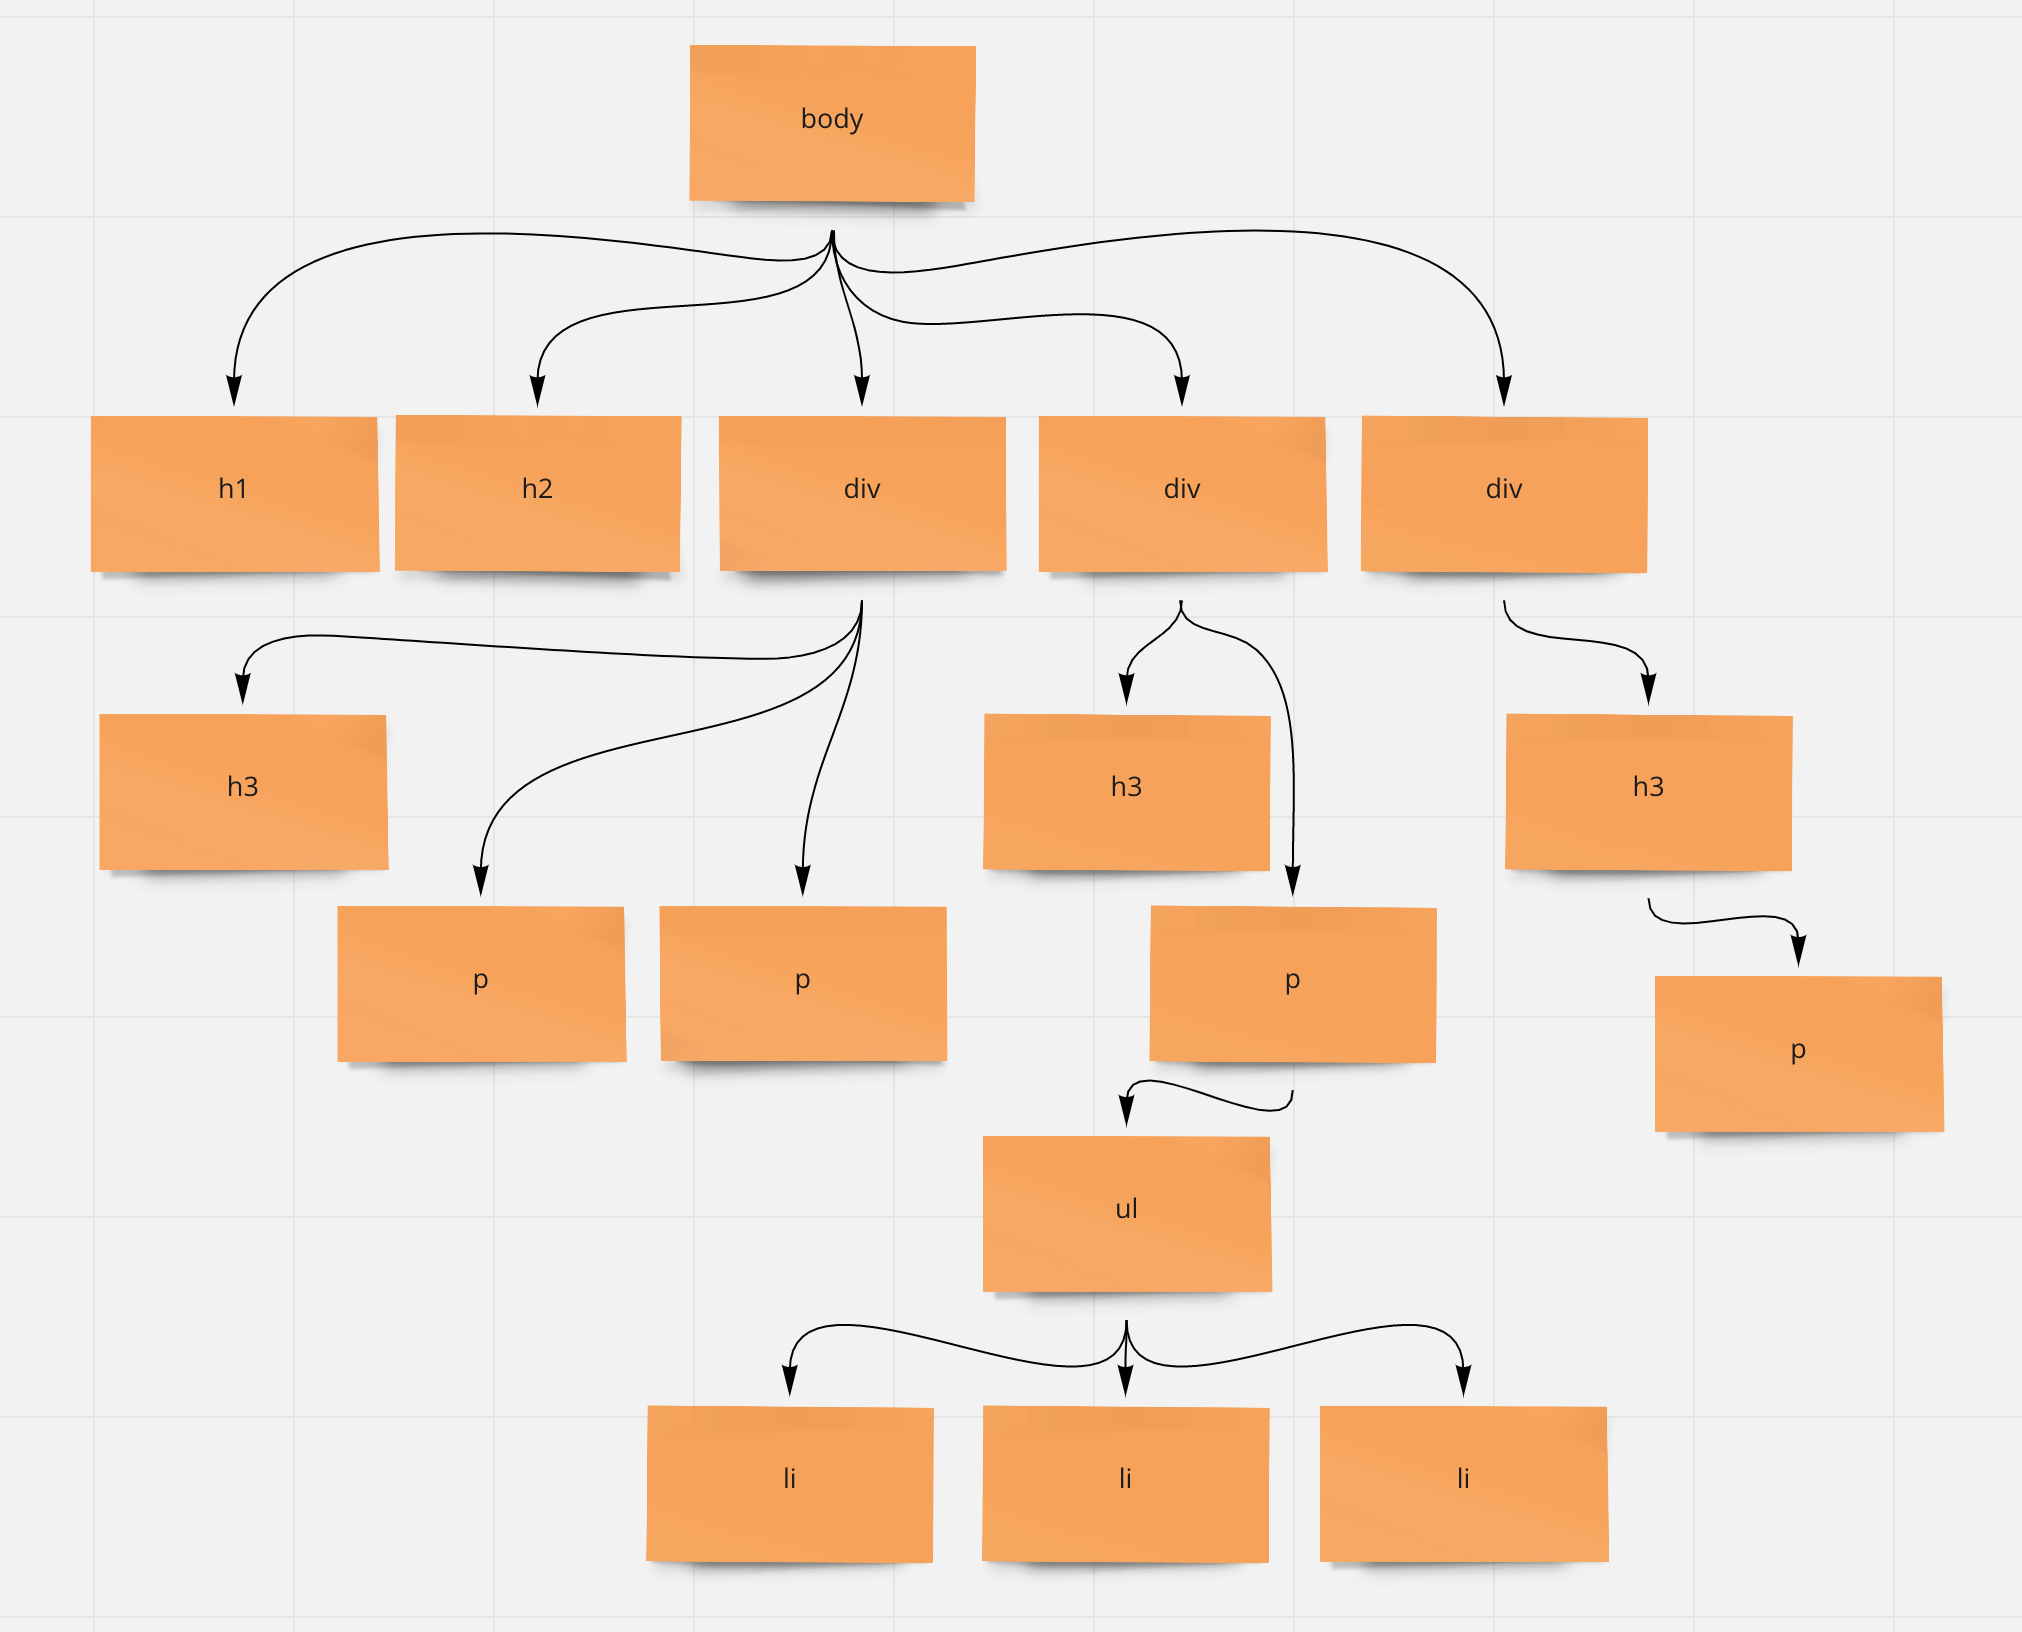 Remember this from last week? The internal DOM tree structure
of this HTML snippet.
Remember this from last week? The internal DOM tree structure
of this HTML snippet.
Let's step through this example:
var html = document.querySelector('html');
var walker = document.createTreeWalker(html, NodeFilter.SHOW_TEXT);
var node;
while (node = walker.nextNode()) {
    node.nodeValue = node.nodeValue.replace(/SEARCH/gi, 'REPLACE');
}
Replace the orange SEARCH text with
the word or phrase that you want to search for (make
sure you include the forward slashes / before and
after), and replace the
orange REPLACE text with the word
or phrase that you want to swap in (making sure you include the
single quotes ' on either side).
Documentation for querySelector()
Documentation for createTreeWalker()
The forward slashes / / indicate that this argument
is something called a regular expression. This
is a special string used to match, search, and replace other
string patterns. Regular expressions are a
powerful idea in computer science and the basis of much text and
language processing. This is a very simple regular expression
that just searches for any text that matches the word or phrase
between forward slashes. The gi at the end stands
for "global" and "insensitive", meaning that this will match all
instances of this pattern (sometimes regular expressions will
find the first match and then stop) and it will match in a case
insensitive manner (by default regular expressions are case
sensitive). You can read more about regular expressions in the
Mozilla documentation here:
Regular
expressions
05. Extension technique: Highlighting text
The above example only modifies the textual content of some HTML tags. What if we wanted to modify the actual HTML itself? This is almost the same approach, but with some slight adjustments. As an example, let's look at how we could add some highlighting to certain phrases.
To start, let's again create a new JavaScript file. This
time let's call it
content-tutorial2-05.js (since
we're now working on part
05). Modify manifest.json to specify
this filename in the js field
of content_scripts.
var html = document.querySelector('html');
var walker = document.createTreeWalker(html, NodeFilter.SHOW_TEXT);
var node;

while (node = walker.nextNode()) {

  if ( node.nodeValue.includes("paragraph") ) {
    newNodeValue = node.nodeValue.replace(/paragraph/gi,"<span style='border: solid 1px red;'>paragraph</span>");
    newElement = document.createElement("template");
    newElement.innerHTML = newNodeValue;
    node.before(newElement.content);
    oldNode = node;
    node = walker.nextNode();
    oldNode.remove();
  }
}
Change the orange words above to be whatever word or phrase you want to highlight. And change the blue text above to be any other CSS styling that you'd like to use to highlight that word or phrase. For example, you could try this to style it as a traditional yellow highlight:
background-color: yellow;