Code as a Liberal Art, Spring 2021
Unit 2, Exercise 3 lesson — Wednesday, March 10
Trees
Today we are going to talk about the data structure known as trees. A tree is a specific type of graph. Remember from our discussion about distant reading in class on Monday (slides PDF) that a graph is comprised of a collection of nodes, connected by links called edges.
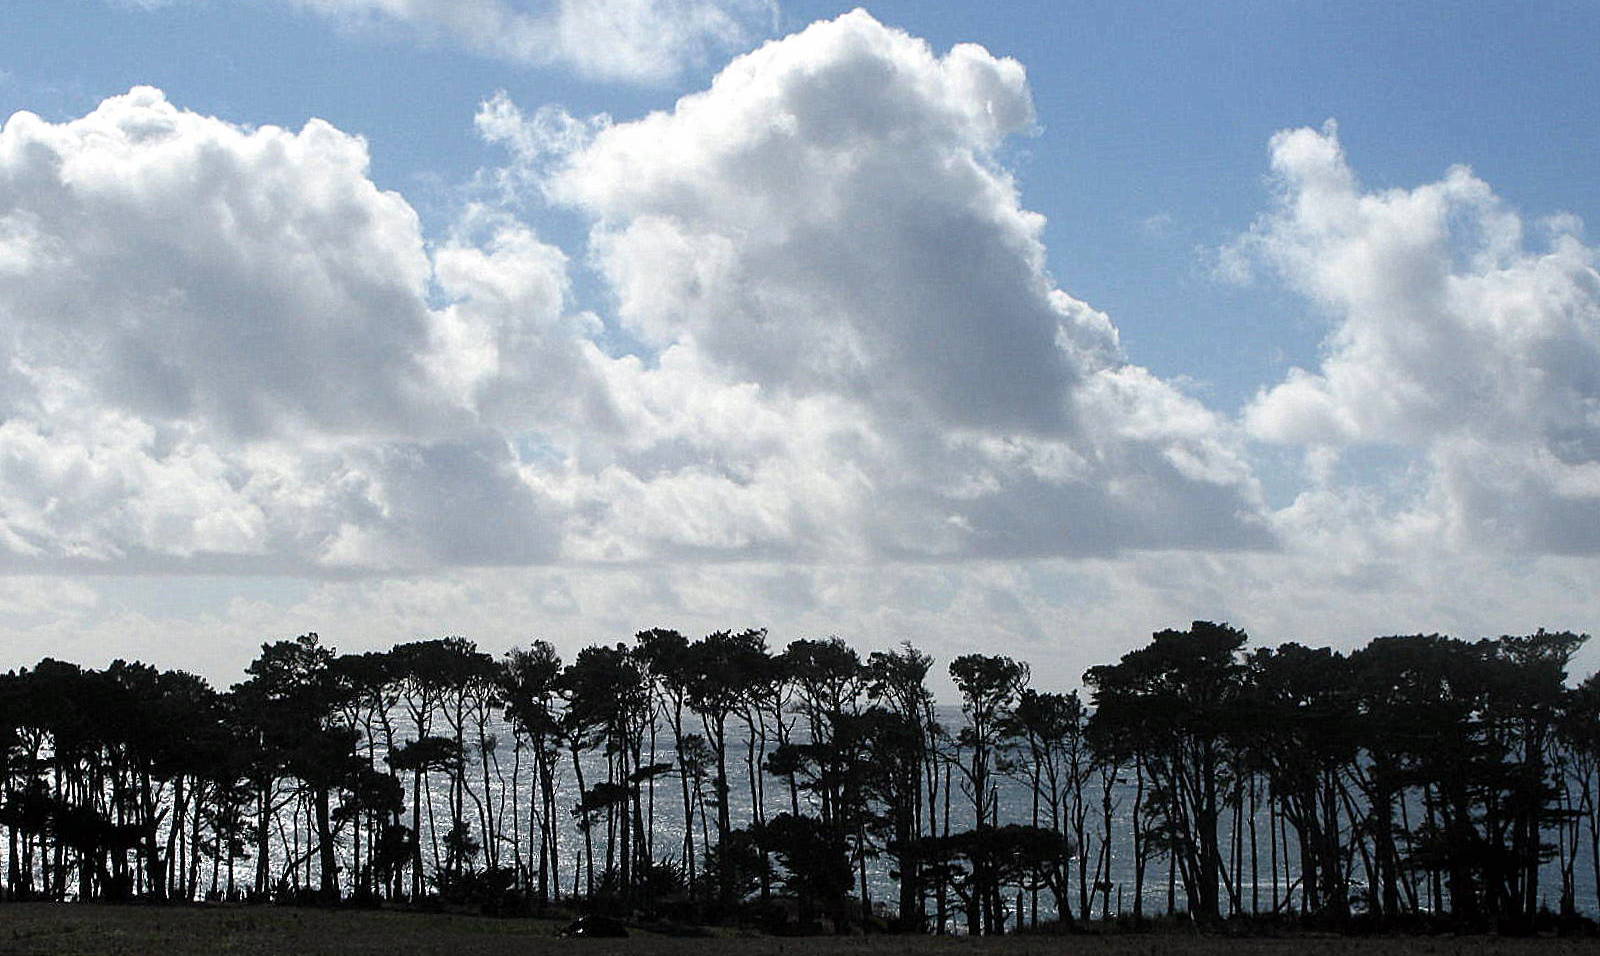 A stand of trees in California viewed from a distance, by
twitter
user vermillion
baby
A stand of trees in California viewed from a distance, by
twitter
user vermillion
baby
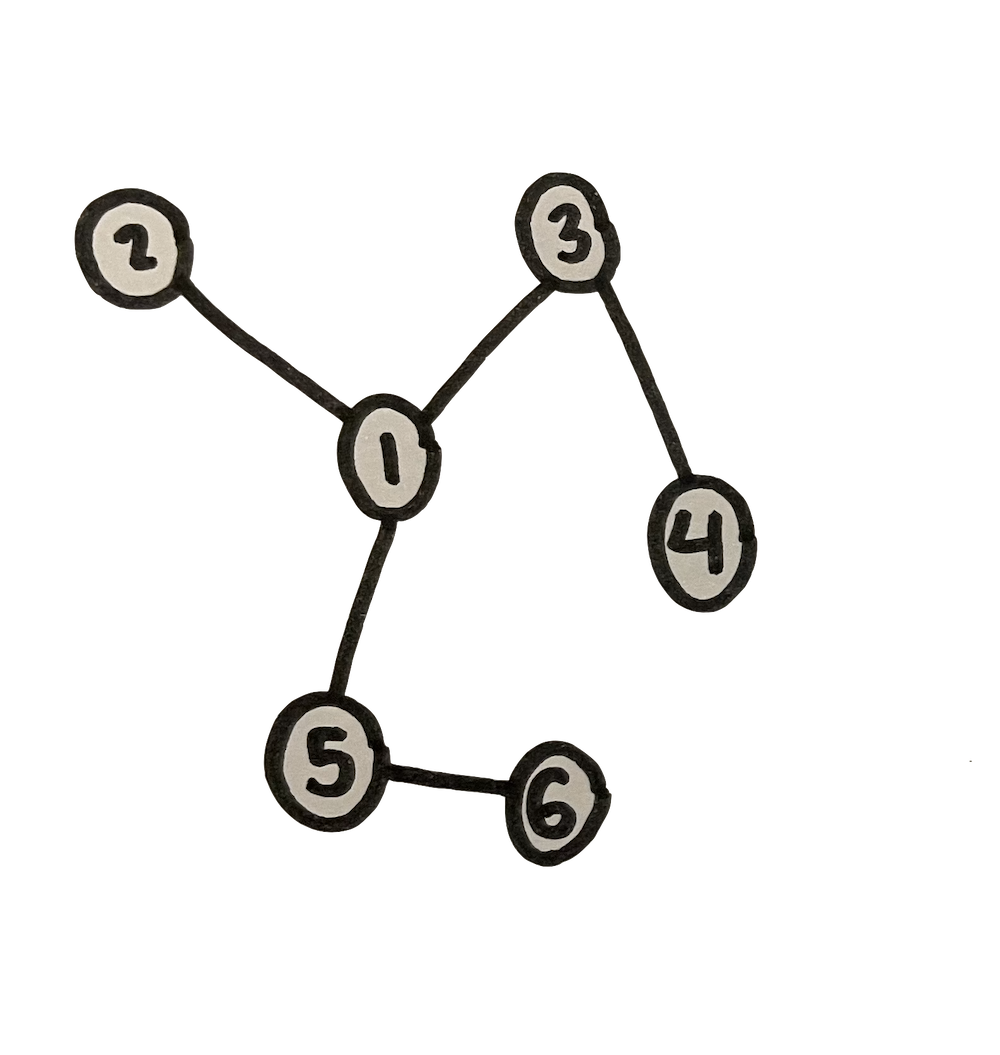
In graph theory, a cycle (or loop) is any collection of one or more edges which will lead you from a node back to itself. In the image below on the left, hopefully you can see how the edge 2-3 would form a cycle, as would 2-5, 1-4, or 4-6.
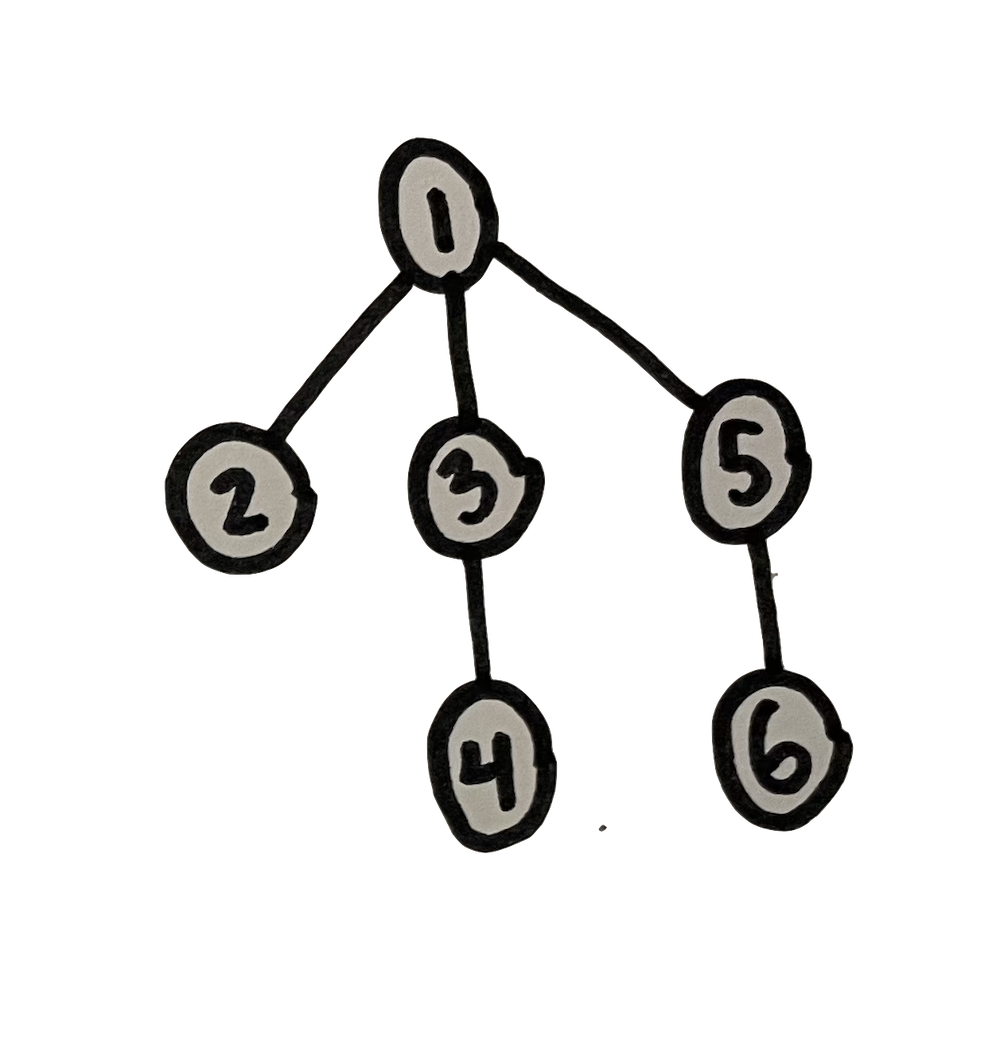
A tree is defined as a graph with no cycles. This means that there is exactly one path (or route) from any node to any other node. As an implication of this, we can designate one node as a kind of base node, or a starting point to the tree. This is called the root. We usually then depict trees as oriented in a manner that fans out from the root, often arranged vertically, with the root at the top or bottom (usually at the top). Hopefully you can see how the below two graphs are structurally identical, with the one on the right merely rendered vertically, in the common manner of a tree.
Trees are great for representing hierarchy. Think about the org chart of a company — the structure of who reports to whom. The terminology of trees aligns with this aspect of hierarchy. We often refer to adjacent nodes in a tree as either parent or child nodes, in accordance with their position in the vertical representation. Each node in a tree (except the root node ) has precisely one parent, and zero or more children. When a node has no children, we can say that it is a leaf node. In other words, it is at the end of one branch. If two nodes share the same parent, we might also say that they are sibling nodes, that they are at the same level in the tree hierarchy, or that they are at the same depth in the tree.
Trees are used for many things in computer science.
-
They can be used as the basis for more efficient searching and sorting algorithms.
-
They are commonly used for parsing language — both human languages and computer programming languages. In these cases, we commonly refer to a parse tree as the tree structure representing chunks of language. Think for example about how English can be divided up into sentences, each one subdivided into a noun phrase and verb phrase, each of which can be further subdivided. Or in a computer program, code might be divided up into blocks, each comprised of statements (lines of code), each subdivided further into expressions comprised of variables and operators. In both cases, these languages could be parsed into a tree data structure.
-
A file system on a computer is usually represented as a tree. Finder on Mac and Explorer on Windows are GUI programs for visually representing this tree structure: each folder is a like a node, it can contain other folders or files, and the files are leaf nodes.
-
A highly structured essay, book, or other text can often be thought of as a tree. Think of the outline you might create to plan or dissect a text. We'll return to this idea in Unit 3 when you'll be creating essayistic work in a hyperlinked context, meaning you'll break up your piece into interlinked pages.
-
The web pages of web site can often be thought of as a tree, commonly called a sitemap, which you've been working with over the past week. However the pages of a web site might be linked together in a way that creates loops, in which case the sitemap would not be a tree in the strict sense.
-
Also, as we'll see today, the HTML structure of a single web page is usually represented as tree.
A tree is what we might call an abstract data structure: it is a data structure in the sense that it is a diagrammatic form, or a model for organizing data, but it is abstract in the sense that it can be implemented in many different ways using other more primitive data structures like lists and dictionaries. Python does not have a tree data structure built-in as it does lists and dictionaries. But you can implement a tree in different ways using those built-in data structures.
We've already talked about some ways you could implement a tree. In the case of a dynamically-generated sitemap, we talked about how you could use a dictionary to represent pages, with each one stored with its URL as a key pointing to a list of other URLs corresponding to linked pages.
Homework review: Absolute URLs versus relative URLs
Before going further I want to clarify a detail that I glossed over in last week's homework which tripped some people up. To explain this issue, I need to offer some context.
Many of the topics today will be relevant to Unit 3 of our class when we'll examine code as a form of communication and argumentation in the context of hypermedia texts, multimedia, and web publishing. Some principles of web scraping can be confusing without pausing to consider these, so we'll introduce these ideas here in the context of data, data structures, and web scraping, and keep in mind that we'll be referring back to them in a few weeks.
In the earliest days of the worldwide web, web sites were simply comprised of files in a file system. Files were arranged in folders which a web server could access, and URLs corresponded to this file tree. Things have changed quite a bit with more advanced web development techniques, but the conceptual idea of organizing a web site in this way, as defined by a hierarchy of URLs, has more or less persisted.
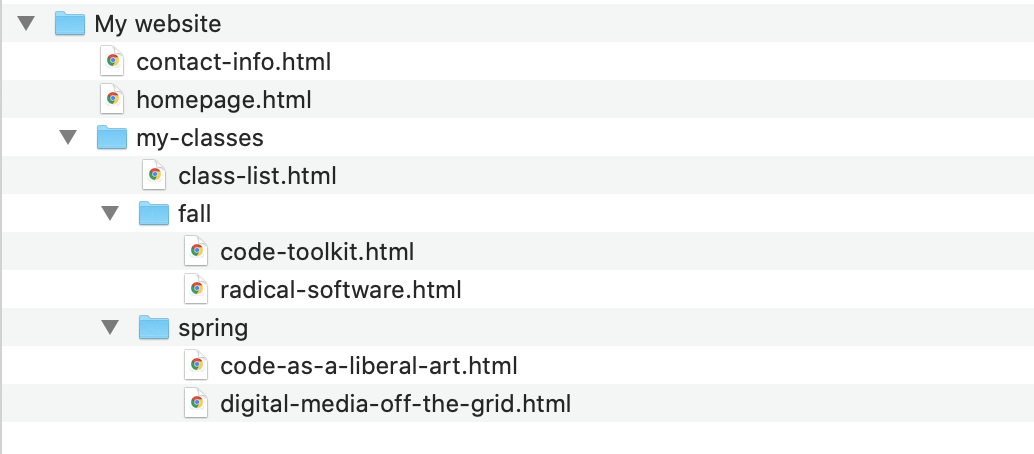 A very corny example of files and folders arranged as for a
website.
A very corny example of files and folders arranged as for a
website.
For example, if the above files and folders were the basis for a
simple website, and this website was installed on a server with
the domain name
of http://rorysolomon.com, some of the URLs of this
site would be:
-
http://rorysolomon.com/homepage.html -
http://rorysolomon.com/my-classes/class-list.html -
http://rorysolomon.com/my-classes/spring/code-as-a-liberal-art.html
Notice how a URL is essentially a single-line of text representing a path in a tree from root to leaf.
As we considered briefly last week (and will elaborate on in
Unit 3), to create a link from one web page to another, you use
an HTML element called an <a> tag, with
an href attribute that includes the URL you are
linking to. For example if I wanted to link from one page in my
site to another, I could do it like this:
Inside homepage.html:
<a href="http://rorysolomon.com/contact-info.html">click here for my contact info</a>
This is called an absolute URL because it specifies the complete information to tell a browser how to access this page. Another way to specify this link would be with a relative URL, which would look like this:
Inside homepage.html:
<a href="contact-info.html">click here for my contact info</a>
Since no domain name is specified, the
browser infers the location of this linked file based
on the URL of the file containing the link. In this case, the
browser would infer that contact-info.html is also
located at http://rorysolomon.com, and that it is
also in the root directory /. This would work
because homepage.html
and contact-info.html are in the same folder.
However, if I added this link in homepage.html, it
would break:
Inside homepage.html (error):
<a href="class-list.html">click here for my classes</a>
because these files are not in the same folder.
To fix this error, I would have to specify
the path from homepage.html
to class-list.html in terms of any subfolders
that class-list.html is contained
in. You do that like this:
Inside homepage.html:
<a href="my-classes/class-list.html">click here for my classes</a>
Similarly, if I was working in code-toolkit.html
and I wanted to link to another class in that same folder, I
could specify a relative URL like this:
Inside code-toolkit.html:
<a href="radical-software.html">click here for Radical Software</a>
You specify multiple subfolders by concatenating them together
with / like this:
Inside homepage.html:
<a href="my-classes/fall/radical-software.html">click here for Radical Software</a>
And if you ever need to go "up", to a parent folder, you can do
that with the funny notation .., like this:
Inside class-list.html:
<a href="../homepage.html">click here for the homepage</a>
or to go up multiple levels:
Inside code-toolkit.html:
<a href="../../homepage.html">click here for the homepage</a>
Why am I explaining all this?!? Becuase it can cause major headaches when web scraping — problems I think several of you were encountering this week. In the example from last week's class notes, I was using the New York Times website, which specified absolute URLs, so I was able to simply add each URL to my list. But in many of your programs, for example when working with Wikipedia, the HTML specifies relative URLs. Trying to process those later will give an error because only a relative URL with no domain name will not be a well-formed HTTP request.
The solution is to check if the new URL that you are adding is relative or absolute, and if relative, add on the necessary parts to make it into an absolute URL. Have a look at the modified example from last week to see what I mean. (Changed portions are in blue.) Note that this code is not a perfect solution. This kind of work can get complicated and this code will need to be tested in your particular case before assuming it will work smoothyl. Feel free to ask me for guidance.
Navigating a parse tree
Another part of the homework that was causing people troubles, and which can be clarified by thinking about trees, is the work of parsing HTML with Beautiful Soup.
We'll go into more detail about how to write and work with HTML in Unit 3, but for now, let's focus on some techniques to read HTML: in particular, the tree aspects of HTML and how an understanding of this can help with the work of data scraping.
Hypertext Markup Langauge (HTML) is comprised of tags. Each tag is written as a pair of less-than and greater-than signs, which we call left and right angle brackets or braces:
< >These must always appear in pairs. We call the left brace open and the right one closed, so we can say they must always appear as open-and-closed pairs.
We say the stuff in between the braces is inside the braces. The stuff inside braces determines an HTML tag. The first bit of text after the open brace specifies which HTML tag this is. There are many (many) HTML tags. Again we'll learn more about these and how to use them in Unit 3, and today will focus on how they create a tree structure that you can navigate with code.
Anatomy of an HTML tag. As an example, let's consider a tag that we've already been looking at:
<a href="http://nytimes.com" id="link1" class="some-style">click here</a>In this case, the first character after the open brace indicates that this is an
a tag, the
type of tag used to create hyperlinks. Other parts of this tag:
-
The other text after the
aand before the closing brace>are called attributes. In this case we have three attributes:href,id, andclass. Attributes are generally specified as key-value pairs, which you are familiar with from dictionaries, but here the keys are called attributes, and their values are indicated by equal signs (=).-
As we've already discussed, the
hrefattribute indicates the URL to which this bit of text is linked. -
An
idattribute will uniquely identify a tag on the HTML page. In other words, the value of anidtag must be unique. -
A
classtag describes some property of the tag which it probably has in common with other tags. This is used to style the tag (to control its appearance withCSS) which we'll talk about in Unit 3. Classes often indicate something about how this tag should look or how it fits in to the structure of the page. For example:class="main-content". A given class value will likely be applied to many tags on a page. Also, a tag can have more than one class, in which case they will be separated by spaces. For example:class="main-content large left-side".
-
As we've already discussed, the
-
Notice that this tag is followed by some text ("
click here") and another tag</a>. Because this tag begins with a forward slash (/), it is a closing tag. Most (but not all) HTML tags come in pairs of open and closing tags. We say that the text between the open and closing tags is in the tag, or we can say it is the content or the body of the tag.
In the above case, the content of
that <a> tag is only text. But the content of
tags can include other tags. This is where we start to see the
tree structure of HTML emerge.
Let's consider the following snippet of HTML code:
<html>
  <head>
    <title>Basic webpage</title>
  </head>
  <body>
    <div>
      <h1>Hello</h1>
      <div>
        <p>A paragraph</p>
        <p>Another paragraph</p>
      </div>
    </div>
  </body>
</html>
This example contains seven different tag types, and nine tags
total. Notice how
the <title>, <h1>,
and <p> tags contain textual content, while
the other tags contain other tags. For example the
second <div> contains
two <p> tags.
The computer program code that is a web browser parses this text and represents it internally as a tree. We call this tree of HTML a DOM, which stands for Document Object Model.
The above HTML would be represented by the following tree:
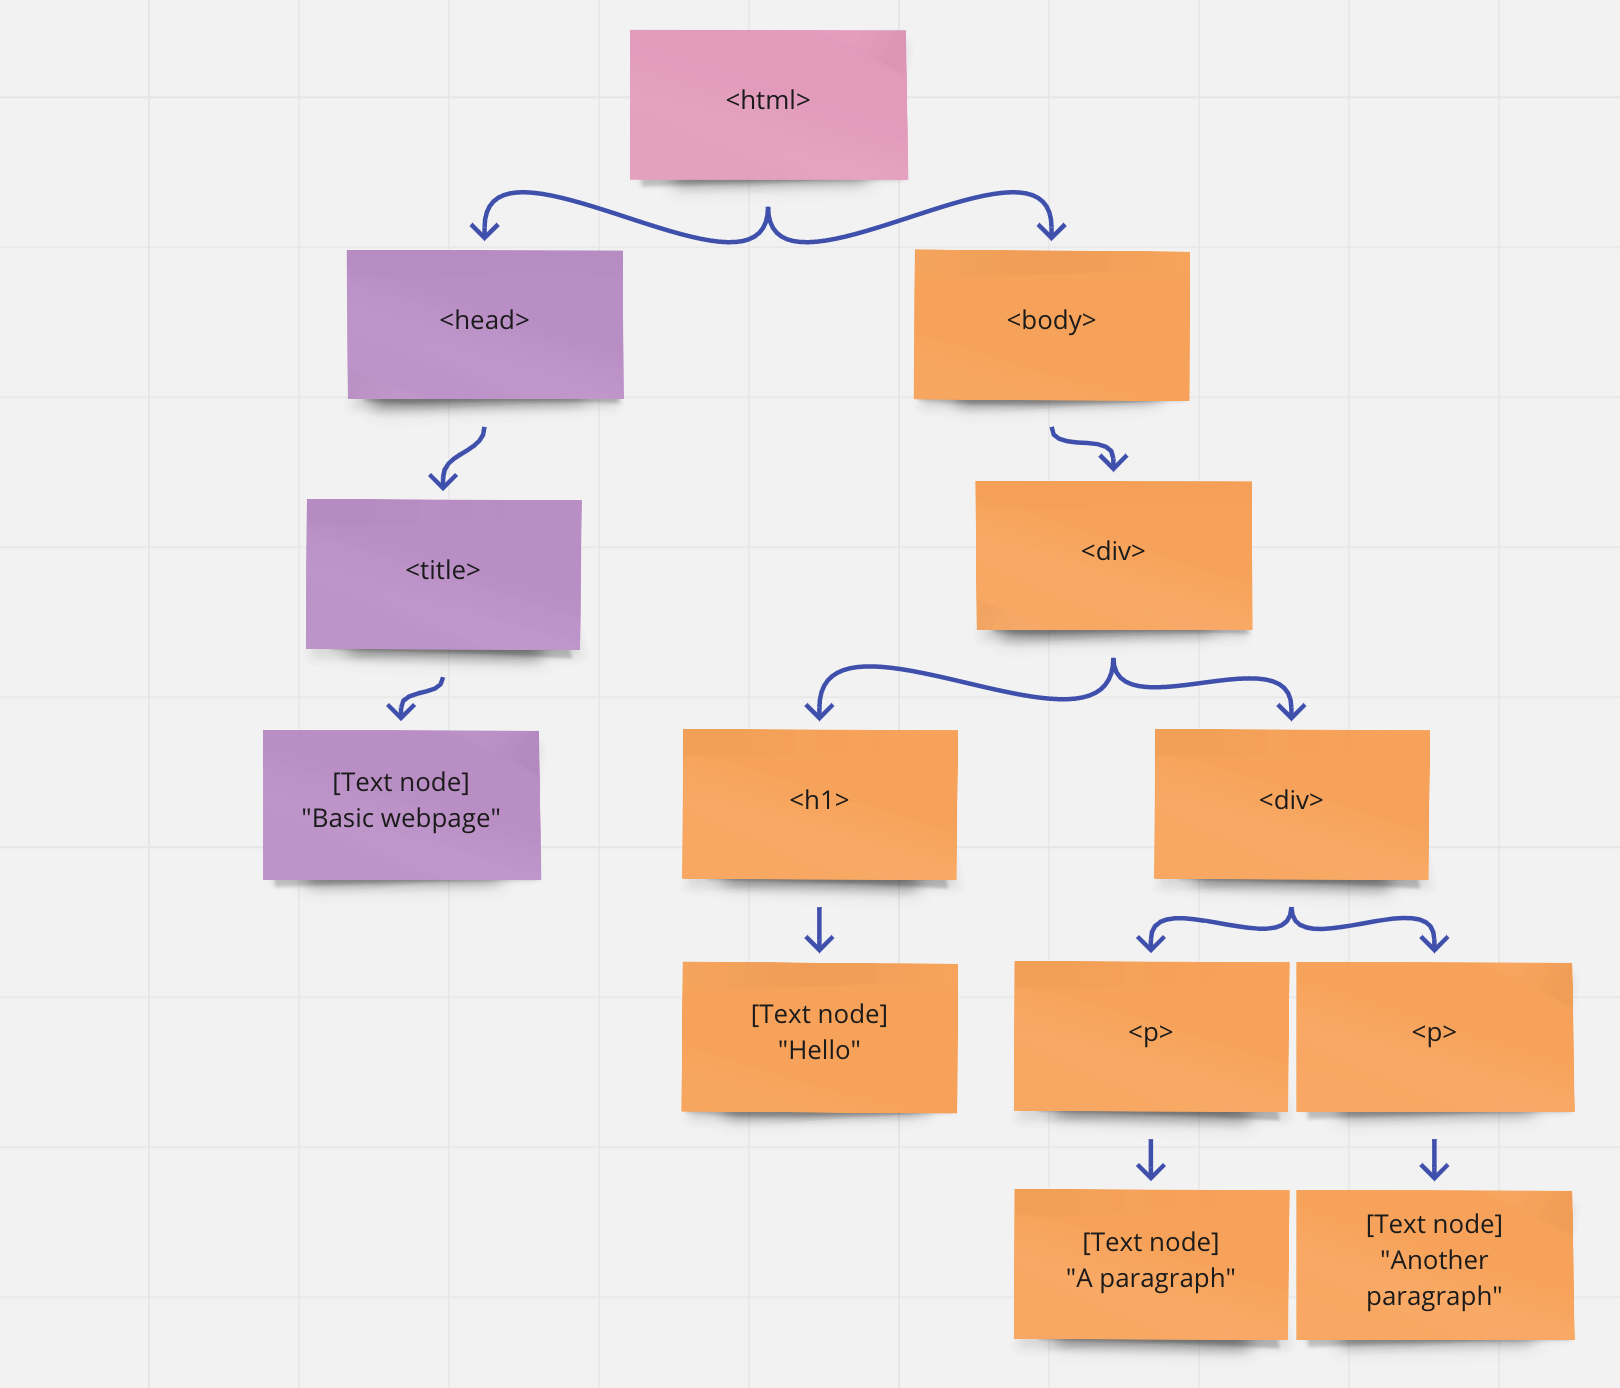
Owing to this tree structure, when an HTML tag contains other tags, we say these are its children.
The four leaf nodes in this case are not actually HTML tags at all, but they are still nodes in the DOM: they are text nodes.
Beautiful Soup
Hopefully this already has started to give you some greater understanding into how Beautiful Soup works.
Create a new file in Atom, copy/paste the above HTML code into
it, and save it. You can call it whatever you like, but make
sure it ends with .html. I'll call my
file basic-webpage.html. Now, open
Terminal, cd to the directory/folder
containing this file, run Python, and let's start to experiment
with Beautiful Soup interactively in the shell.
First, let's open the file in Python, and use it to create
a BeautifulSoup object:
>>> from bs4 import BeautifulSoup
>>> file = open("basic-webpage.html","r")
>>> soup = BeautifulSoup(file, "html.parser")
>>> soup
<html>
<head>
<title>Basic webpage</title>
etc ...
This opens the HTML file as textual data, and passes that data
in to a new BeautifulSoup object. The Beautiful
Soup library gives us a bunch of ways to programmatically
nagivate the DOM and to use Python code to search through the
various HTML tags that comprise this document. We access all
that through this BeautifulSoup object, which I've
called soup, but you can call whatever you'd like.
The Beautiful Soup documentation can start being very useful to you here, in particular the section titled "Navigating the tree".
As the documentation explains, we can start by using dot
notation to access various HTML tags as properties of
the soup object:
>>> soup.head
<head>
<title>Basic webpage</title>
</head>
>>> soup.body
<body>
<div>
<h1>Hello</h1>
etc ...
>>> soup.body.div
<div>
<h1>Hello</h1>
etc ...
>>> soup.body.div.div.p
<p>A paragraph</p>
Analagous to how a URL is a textual representation of a path in a file system, this dot notation is one line of Python code that corresponds to a path in the DOM.
Note that on the last line, I've referenced
the <p> child of
that <div> and what was displayed was the
first tag, even though there are two <p> tags
in that <div>. If you want to actually access
all the children of a tag, you can use the
Beautiful Soup property named .contents:
>>> soup.body.div.div.contents
['\n', <p>A paragraph</p>, '\n', <p>Another paragraph</p>, '\n']
Note those funky
\n characters. That is a control
character that indicates a newline, i.e. a line
break. Every bit of text in the DOM is a node. So even the line
breaks between tags get return to us as their own small text
nodes.
Also, notice that this is returning something enclosed in square
brackets [ ], indicating that this has returned a
Python list. Remember that just like with any
list, you can reference these items now by
numerical index. (Keep in mind that this list
also contains some \n characters.)
>>> soup.body.div.div.contents[0]
'\n'
>>> soup.body.div.div.contents[1]
<p>A paragraph</p>
>>> soup.body.div.div.contents[3]
<p>Another paragraph</p>
And you can loop over a list in Python with a
for
loop. This code loops over all the children of
the inner <div> and prints each to the shell:
>>> for node in soup.body.div.div.contents:
...   node
...
'\n'
<p>A paragraph</p>
'\n'
<p>Another paragraph</p>
'\n'
This can be useful, and for a small HTML document like this, maybe even sufficient. But this is very different from the kind of web page that you would typically encounter, which would normally be full of many, many more HTML tags. For this you will find it useful to search the tree.
Searching the DOM
Probably the most powerful, effecitve, all-purpose tool that
Beautiful Soup offers you for searching the DOM is
the find_all()
command. (Docs
here.)
This command is very flexible and takes several possible
arguments. The first argument corresponds to the name of an HTML
tag, and it will return all instances of that tag in
the DOM. So the following code will return
a list of all <div> tags:
>>> soup.find_all("div")
You can also search the DOM for any tags matching a specific class or id.
Let's make some additions to our HTML code:
<html>
  <head>
    <title>Basic webpage</title>
  </head>
  <body>
    <div>
      <h1 id="node-1">Hello</h1>
      <div class="cool">
        <p>A paragraph</p>
        <p class="cool">Another paragraph</p>
      </div>
    </div>
  </body>
</html>
You'll need to reload this to see these changes if you're
working in the shell:
>>> file = open("basic-webpage.html","r")
>>> soup = BeautifulSoup(file, "html.parser")
And now we can search using find_all() targetting
tags based on class or id in the
following way:
>>> soup.find_all(id="node-1")
[<h1 id="node-1">Hello</h1>]
>>> soup.find_all(class_="cool")
[<div class="cool">
<p>A paragraph</p>
<p class="cool">Another paragraph</p>
</div>, <p class="cool">Another paragraph</p>]
You can also combine these criteria in many ways. So now this code gets tags with the class
cool,
but only the <p> tags:
>>> soup.find_all("p",class_="cool")
[<p class="cool">Another paragraph</p>]
Note that these are all returning Python lists. So
you can then loop over them or index them numerically.
If you are trying to search for a tag and you only want one, you
can use the find() command, which takes essentially
the same arguments. Note that this returns
the <h1> as before, but it returns one single
element, not a list of length one:
>>> soup.find(id="node-1")
<h1 id="node-1">Hello</h1>
This gets even more powerful because you can
call find_all() and find() on specific
tags within the DOM, not only on the root object
itself, what I've called soup. This will only
search the descendents (children, children's
children, etc) of the object you're calling find()
on. For example, this code gets the <div>
with the class cool, and then
searches within that tag for any other tags with
class cool:
>>> d = soup.find_all("div",class_="cool")
>>> d
[<div class="cool">
>>> d[0].find_all(class_="cool")
[<p class="cool">Another paragraph</p>]
This is so powerful because now you can find()
or find_all() a specific element within the DOM,
and then only search for a given tag within that. For
example, you can search for a <div>
or <span> tag with a given class
or id, and then retrieve an <a>
tag within that. This may help you find a URL or piece of data
that you are looking for that may not be easily targetted
directly, but may be inside the DOM within a different tag that
you are able to target.
I hope that this technique of combining
multiple find()s or find_all()s will
be super useful as you work
through the homework for
this week, including taking some time to improve on your
work from last week.