Code as a Liberal Art, Spring 2024
Unit 3, Lesson 1 — Thursday, April 25
Table of contents
Table of contents for the topics today: (Click to jump down to the corresponding section.)
- Introduction: The hyperlink, HTML, and CSS
- Background terms and context
- Intro to HTML syntax
- Template for an empty HTML page
- Writing HTML Code
- Sitemaps and wireframes
- Homework & wrapping up
I. Introduction: The hyperlink, HTML, and CSS
In this final unit of the semester, we've been talking about hypermedia (a.k.a hypertext — I will use these terms basically synonymously) and non-linear versus linear modes of constructing texts.
For our technical work we'll experiment with these techniques by creating hypermedia websites comprising HTML pages, CSS stylesheets, JavaScript code, and multimedia elements. Altogether, I'll call this an exercise in digital publishing: presenting texts and other cultural objects within digital media.
Hypermedia can mean many things but as we've been discussing, we can define it simply as: documents that contain an assemblage of multimedia objects connected together via clickable links. By multimedia here I'm referring to text, images (photos or others graphics), sounds, videos, and even games or other interactive elements. Today we will learn the basics of working with hypermedia by working with HTML & CSS.
As we've seen there have been many other forms of hypermedia in the past (Engelbart's NLS, Apple's HyperCard, CD-ROM interfaces), and even pre-digital projects to which we might apply the term hypermedia as a backformation — such as the work of Oulipo, Aby Warburg, and Paul Otlet, as we saw in our Miro board work. There are also other media today that we might classify as hypertexts (one could argue that many different video games are their own kind of hypermedia interfaces) or personal knowledge management frameworks like Zettelkasten or Compendium. But by far the dominant, ubiquitous form of hypermedia today is the HTML & CSS that exists on the web.
As a human being in the 21st century with access to technology, you are of course already well-versed in what HTML & CSS are, how to use them, and the basics of how they work. Many of you have already built websites using platforms like Wordpress, Squarespace, or Wix, and many of you have already hand-coded HTML pages yourselves. As with earlier parts in the semester, I hope that our technical work in this unit offers an opportunity for defamiliarization: to reconsider something that you may already knew but in a new way, to create some distanciation between us and our assumptions about these objects and how they work, to situate them within historical contexts so we can recognize their contingencies and think about how they could have been done differently, and to develop a deeper understanding of the mechanics of how they work.
 Screenshot of Douglas Engelbart working with
nonlinear text during "The Mother of All Demos", 1968.
Screenshot of Douglas Engelbart working with
nonlinear text during "The Mother of All Demos", 1968.
II. Background terms and context
HTML and CSS are the main languages of the World Wide Web (a.k.a. the web, a.k.a. WWW). The web is infused with metaphors from publishing. We usually describe it as comprised of pages. These pages are simply files stored on servers around the world. We've seen several types of files this semester (images, Python code files). As files, pages on the web are plain text that you can edit with VS Code (or your editor of choice).
The web is basically everything that you view in your browser. The web is not computer programs or applications that you download and run on your computer, nor is it the apps that you download and run on your phone. Although, some apps on your phone are web-based, in that they operate like little browsers that just view web pages.
We will start this unit by creating web pages as files that you will save and view only on your computer without using any other computers or any networking. This is often called working locally. Next lesson, we will learn how to upload these files to other computers called servers. Servers are computers. They are just like ours, except that they exist physically in data centers, they are generally always on and connected to the internet, they usually don't have any screens and can only be accessed remotely by typing instructions into a command line interface, and if you upload your files to a server, they are able to be viewed by other people any time. This is how web sites are made.
HTML stands for "Hypertext markup
language", and CSS stands for
"Cascading Stylesheets". Together, these two
languages comprise almost all of the files on the world wide
web. HTML and CSS are usually created in separate files. Just
like with the other various files we've been working with this
semester, these files are indicated by file
extension: the characters that come after the dot (the
period) in a filename. When working with HTML and CSS, as with
Python and other coding work, you have to be careful about your
filenames. HTML files will end
with .html, for
example rory-page.html; and CSS files
will end with .css, for
example rory-styles.css.
Important rule: When naming your files for this unit, including all multimedia files, use only lowercase letters, numbers, hyphens (-), and underscores (_), and always make sure your text filenames end with either ".html", ".css", or ".js", and that any multimedia files have the appropriate extension, such as ".jpg" or ".png". Do not use spaces in filenames, and do not use capital letters. Filenames for this unit will be case sensitive. That means if you use any capital letters in your filename, you will get errors and your site will not work.
Since the "ML" in "HTML" stands for "markup language", technically speaking we wouldn't say that HTML is a programming langauge. Rather it is a language that describes the structure and content of documents, and together with CSS, they describe the appearance of documents as well.
As we've been discussing, within hypermedia pages are connected together via hyperlinks often just called links. One point of emphasis here is that links already implement a kind of basic user interaction. We often think that user interaction on the web comes from more advanced coding techniques like JavaScript, and that is true, but already with simple links you have a kind of interactivity that is as powerful as it is simple. We often take for granted the user action or gesture of clicking on a link, but keep in mind that a link is a bit of text that responds to some user input in a way: it responds to a mouse click by calling up a different document for display. I've had students create games of many different forms simply out of pages and links.
The link is the fundamental element that stitches together the web: the primary technique that allows users (variously also called viewers or readers) to navigate a collection of documents in a nonlinear way.
Links also introduce the the nonlinear aspect of the web in that a webpage can (and usually does) contain links to more than one other webpage. This means that you can use hypertext to construct branching and forking narratives, can allow a user to click directly in to references or citations or support materials, or can present an argument as an overview with links drilling down into specific substories or subarguments
Today we will start with the basics of HTML and how to create HTML files (pages), how to create links between them, talk about some basic tags, learn how to control the visual appearance of these elements with CSS, and then learn how to include image files and how to make links. Next week we'll learn about controlling the appearance of these pages with CSS and adding other mutimedia, and learn how to upload these files to a server so that others can view your work. After that we'll introduce Javascript and implement some more sophisticated user interaction.
Let's get started. Create a new folder for this lesson, and in
it, create a new folder called site.
 (Click to enlarge.)
Open a new VS Code window and drag
this site folder into it. (Click "Yes"
that you trust the authors, and close the Welcome screen.)
III. Intro to HTML syntax
In our data scraping work this semester we've already talked a bit about the textual structure of HTML code. For a review of the anatomy of an HTML tag you can review this section from Unit 2, Lesson 2, section III.
HTML is made up of elements
called tags. An HTML tag is
specified by the characters <
and >, called open and close
braces. The text in between these characters is said
to inside the braces, and this text specifies
what the HTML tag is.
There are many, many (many!) HTML tags. We will learn a few in this unit. As a way to learn more, and as a great reference, I can recommend the W3 Schools "HTML Tutorial" as a pretty decent resource.
A note on formatting. As before, I will format
these class notes so that bolded terms indicate
technical jargon needed to speak about these topics with
others; black text indicates command
line commands and things like filenames; and blue
text is valid program code, in this case HTML. When
working through an example, new syntax
will be indicated with a dotted blue underline,
and changed syntax will be
indicated with a thin orange underline. To distinguish HTML from
CSS, I will indicate the latter as green
text with rounded corners to indicate CSS code. By the
way, if you ever want to view the CSS
code that I've used to create this formatting please
feel free. (Bootstrapping!)
IV. Template for an empty HTML page
Let's create our first HTML page. I've created an HTML template here that you can use as the starting point for all your HTML files for this unit:
<!DOCTYPE html>
<html>
<head>
  <title></title>
  <link rel="stylesheet" href="">
</head>

<body>
</body>
</html>
As you can see, that HTML snippet contains 10 tags. We'll talk about what each of these do in a moment.
You can click on that link and then click File > Save in
your browser, or CONTROL-click that link and select "Save Link
As", then in the filename box (where it says "Save as") type
index.html exactly as I have here,
lowercase, no spaces, with the filename extension, then
navigate to the folder you created above and click Save. You
can also create a new file in VS Code, copy/paste the above
code, and then click File > Save and save the file as
index.html (all lowercase, no spaces)
into the folder you created above. You have just created your
first HTML file. (Or at least, our first HTML file of this
unit.)
Cool shortcut: VS Code offers us a way to enter
a code snippet similar to the above when starting a new HTML
page. Click File > New, name your file something that ends with
.html, and in that blank document start
typing html:5, as you type it should autocomplete
to a shortcut labeled "html:5" which you can use your down arrow
key to move to and press ENTER. This will fil the document wtih
code similar to the above. This is actually my preferred and
recommended method for creating new HTML pages when doing your
work this semester.
Now, if you go into Finder, navigate to the folder where you just saved that file, and double-click on the file, it should open up as a blank page in Safari (or your browser of choice). If you see this, it means all is working properly. If you don't, it means there is an issue. Please read over the above instructions carefully and double-check your filename.
Leave this web page open in your browser. We will come back to it and reload as we add more HTML.
Note that double-clicking on any .html
file will almost certainly open that for viewing as a page in
your default web browser. If you are instead trying to
edit the HTML of this page and don't already have
it open in VS Code, you can CONTROL-click on the file (or
right-click) and select "Open with" (or the equivalent term in
Windows), and select VS Code.
 (Click to enlarge.)
V. Writing HTML Code
The code snippet above (the empty HTML template) contains four tags that we'll talk about now:
- an
<html>tag - a
<head>tag - a
<title>tag - a
<body>tag
(Let's ignore the <link> tag. We'll come back
to that next week.)
(Our snippet also contains a single DOCTYPE
tag. You don't have to worry about that beyond making sure to
always include it as the first line of your HTML files. That
simply tells our web browser what type of document this is. In
this case, HTML.)
Most (but not all) HTML tags come in pairs that we call
open and close tags. Close
tags are indicated with a forward slash / at the
beginning. In the above code snippet, four HTML tags come as
open and closed
pairs: <html>, <head>, <title>,
and <body>; while two do
not: <DOCTYPE>
and <link>.
When an HTML tag has a corresponding close tag, we say that any text in between the open and close tags is inside the tag. This can be plain text or additional HTML code. When there is text inside a tag, it means that text is positioned relative the enclosing tag, and that the appearance and other many properties of the parent tag apply to that text.
a. <h1> and <p>
Let's add some new tags and textual content to our first web page.
<!DOCTYPE html>
<html>
<head>
  <title></title>
  <link rel="stylesheet" href="">
</head>

<body>
  <h1>Hello</h1>
</body>
</html>
I have just added a new tag called an <h1>
tag. As you can see, it comes as a pair of open and close
tags, and each tag is written with a pair of open and close
braces.
In this case I have added the
word Hello inside my <h1> tag.
Save your file, go back to your browser, and click File > Reload, or you can type ⌘R on Mac. You should see the word 'Hello' in your browser.
Some other tags that you can play with are <h2>,
<h3>, and <h4>
tags. These all add "headings" of various sizes. You can also
create a <p> tag and
a <div> tag. This creates a
"paragraph". This will not look different right now, but in
the coming lessons you will see why they are useful. Try
playing around by adding a few other tags with some additional
text inside them. Make sure all your new additions are inside
the <body> tag. Save your work, go back to
your browser, and click File > Reload (⌘R on
Mac) to see your work.
At this point your file might look something like this:
<!DOCTYPE html>
<html>
<head>
  <title></title>
  <link rel="stylesheet" href="">
</head>

<body>
  <h1>Hello</h1>
  <h2>This is my first webpage</h2>
  <p>Here is a bunch of text in a paragraph.</p>
</body>
</html>
b. Adding hyperlinks
OK! We're finally ready to add a hyperlink.
To do this, we first need to create a second page to link
to. In VS Code, click File > New File (⌘N on Mac). You can
copy/paste the code
from the empty HTML
page template that I provided, copy paste the following
code, or use the VS Code shortcut by
typing htmlk:5 into a
new .html file.
<!DOCTYPE html>
<html>
<head>
  <title></title>
  <link rel="stylesheet" href="">
</head>

<body>
</body>
</html>
In general, whenever you start a new page, you should start with this and add any new markup inside the
<body> tag. Add some other content to
this file. I'll add some text like this:
<!DOCTYPE html>
<html>
<head>
  <title></title>
  <link rel="stylesheet" href="">
</head>

<body>
  <h1>This is my second webpage!</h1>
</body>
</html>
Then save the file. Click File > Save (⌘S on Mac), browse
to the folder where you have been working, type a filename and
click Save. You can name your file whatever you'd like. I'll
call mine page2.html.
Now let's go back to index.html
and add a link. We do this with an <a> tag,
which stands for
"anchor". The anchor element
always comes as a pair of open and close tags, like this:
<a href="page2.html">click here</a>This introduces a new bit of syntax called an attribute. An attribute specifies a key-value pair defined by an equal sign
=. An HTML tag can have
multiple attributes (and often does) but in
this case we have just one.
The attribute here is href,
which stands for hypertext reference, and its
value specifies the filename of a page that we will be
linking to. The text inside the open
and close tags specifies the clickable text that the user will
see.
Add that to your file somewhere — anywhere inside
your <body> element is fine — and you
should have something like this:
<!DOCTYPE html>
<html>
<head>
  <title></title>
  <link rel="stylesheet" href="">
</head>

<body>
<h1>Hello</h1>
<h2>This is my first webpage</h2>
<p>Here is a bunch of text in a paragraph.</p>
<a href="page2.html">click here</a>
</body>
</html>
Save this file, go back to your browser, reload, and try
clicking on your link! You can use your brower's Back
button to go back to the previous page.
Now try adding a link from page2.html that points
back to index.html
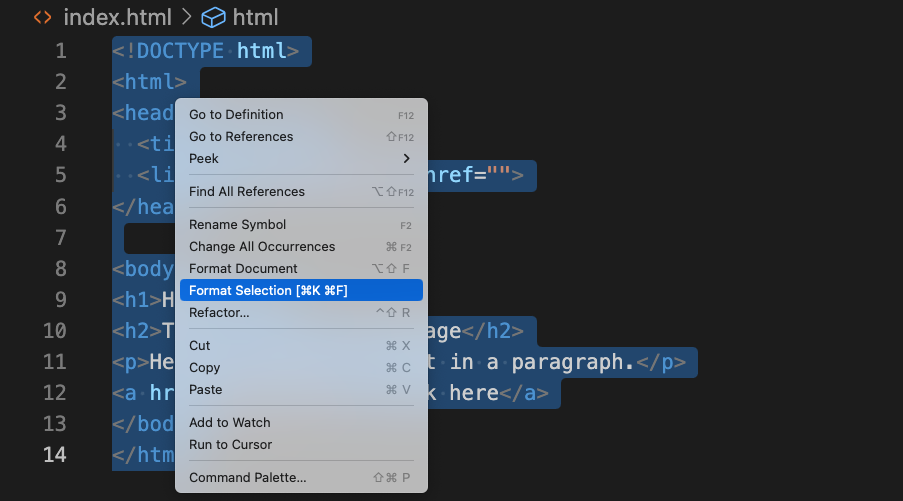
Useful tip: When you are working doing HTML coding (or any kind of coding) you should use your text editor to auto-indent frequently. In VS Code, you do this by selecting all the text (Edit > Select All or ⌘A on Mac), and then right clicking your mouse (or two finger tapping on a trackpad) and click "Format Selection" (or type ⌘K ⌘F on Mac - Can anyone tell me the keyboard shortcut on Windows?). Do this frequently! It will help you see what tags are inside what other tags. Like so:
c. Adding images
The next principle we'll look at is how to include multimedia within a hypermedia page.
Let's start with images. Syntax for
the <img> tag, which (predictably) stands for
"image", looks like this:
<img src="filename.jpg" />Note the slash before the closing brace.
<img> tags do not come in pairs. They
do not have a closing tag. Instead, they have this slash to
indicate there is no other closing tag.
This tag has one required attribute, src, the value of which ...
is "filename.jpg". Any given HTML tag can
potentially have many attributes. In fact you
can think of the attributes as our old friend from Unit 2:
the key-value pair. In HTML,
the key-value is indicated with an equal
sign =. You can probably see here how if you were
implementing a web browser in Python, you might use a dictionary
to implement all the key-value pairs for a
given HTML tag.
This particular attribute, src, is used to indicate
the path and filename for the image that you want to embed in
your page here.
Make a new subfolder within the folder you're working with and
call it images. Now, move or copy an image into
that new folder (if you need to, make sure to rename it to
remove any spaces and uppercase letters in the filename), and
type the filename exactly as it is into the attribute,
making sure to specify the subfolder name first, followed by a
slash. For example:
<img src="images/engelbart.jpg" />
You can add this to your HTML file anywhere inside
the body tag. I'll put mine here:
<!DOCTYPE html>
<html>
<head>
  <title></title>
  <link rel="stylesheet" href="">
</head>

<body>
  <h1>Hello</h1>
  <h2>This is my first webpage</h2>
  <p>Here is a bunch of text in a paragraph.</p>
  <img src="images/engelbart.jpg />
</body>
</html>
Save your file, return to your browser, and reload to see your
image.
If your image is too large, you can resize it with some additional attributes like this:
<img src="kite.jpg" width=600px height=600px/>
Note that if you specify both width
and height, and if the ratio of width to
height is not the same as the original image, you will get
some stretch or distortion in the way the image is
displayed. As a solution, you may use
only width or height, which
will set that dimension of the image, and automatically scale
the other dimension proportionally to the original, without
distortion.
(jump back up to table of contents)
VI. Sitemaps and Wireframes
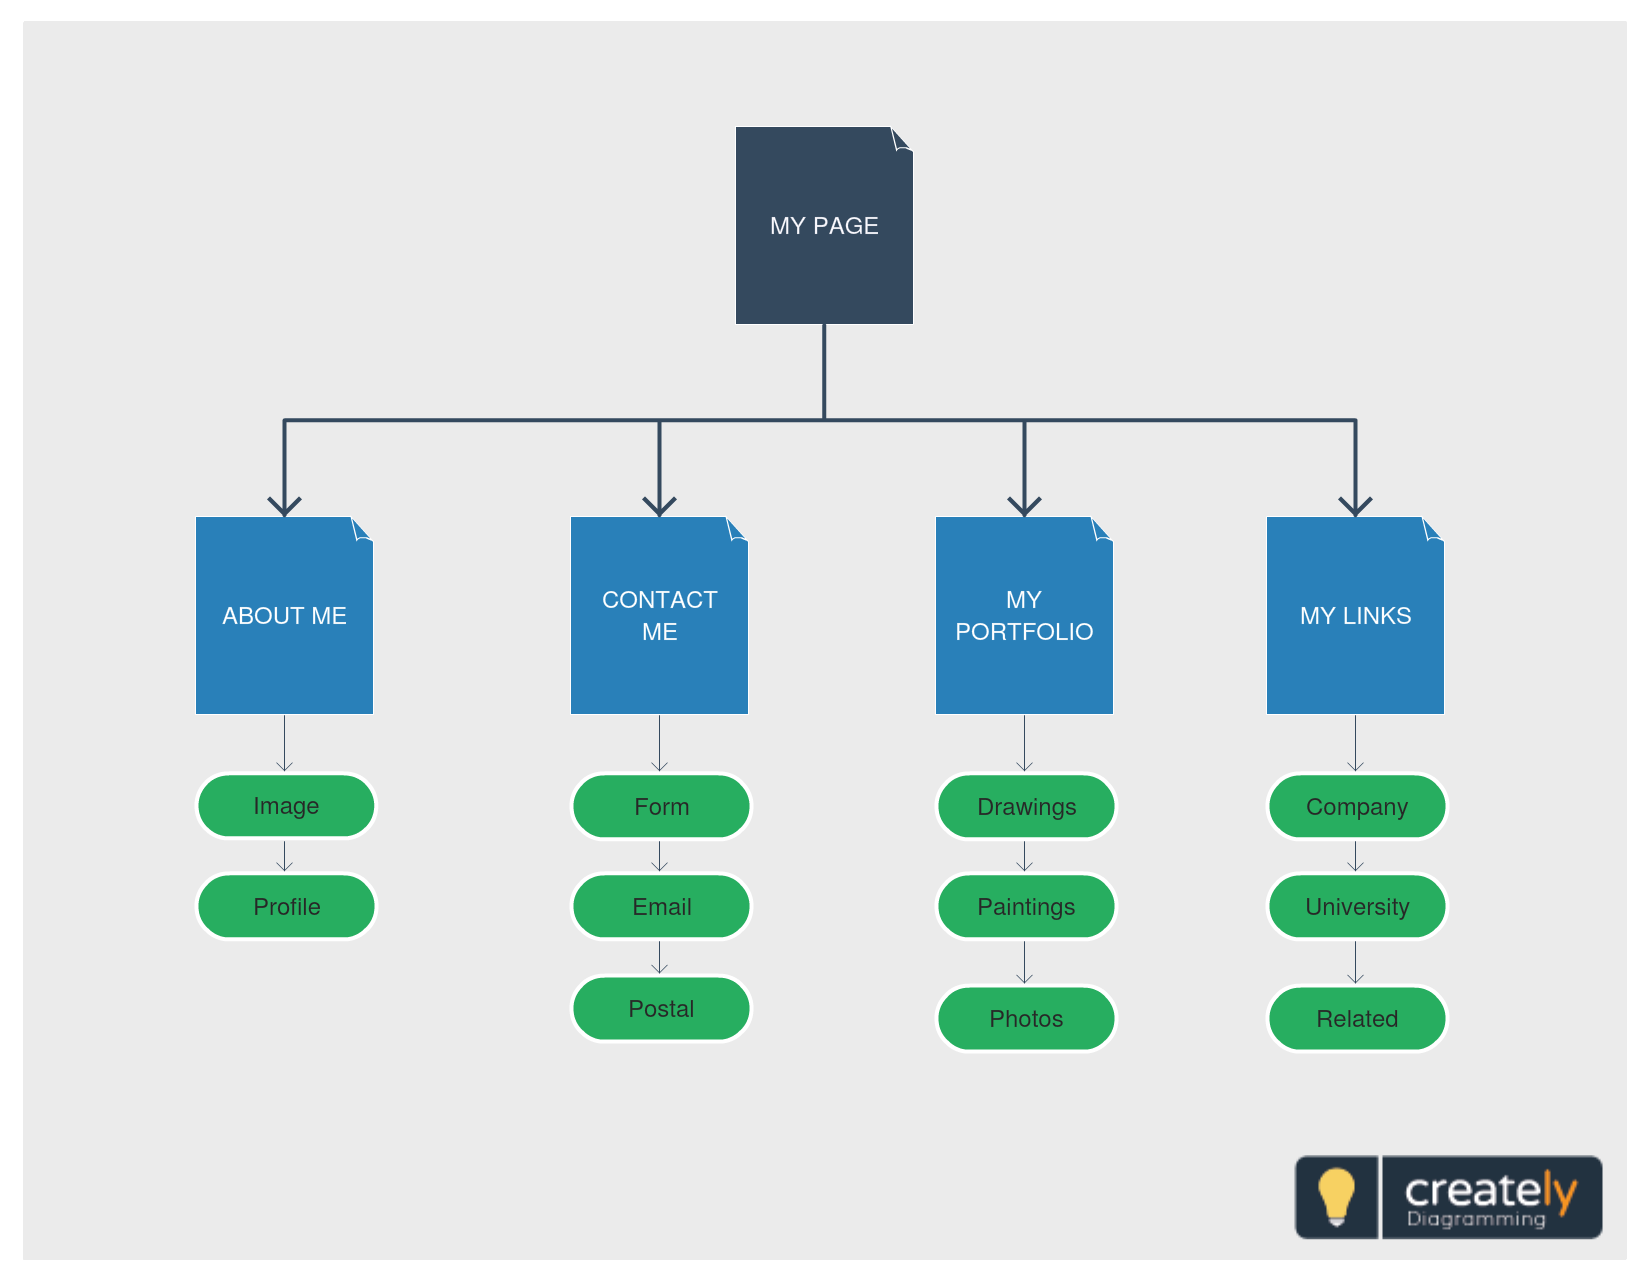
We've already seen one instance this term of something like a sitemap: they were the network diagrams that I demonstrated how you could algorithmically generate with your web scraping / web crawling code.
In this unit, sitemaps will be less something to reverse engineer from an existing website, but rather something that you will generate in creating a web of relations in the nonlinear presentation that you will be crafting.
In this register, a sitemap is a technique of planning, like an outline for an essay: a practice of analytical diagramming that creates a visualization of the link structure of the content of a website. A sitemap will typically represent each page as a simple square or rectangle, and links will be represented as lines, with lines connecting which pages link to which others. Sometimes these lines can be pointed arrows, indicating which way the link goes.
Miro can actually be an excellent tool for building these.
Here are two examples:

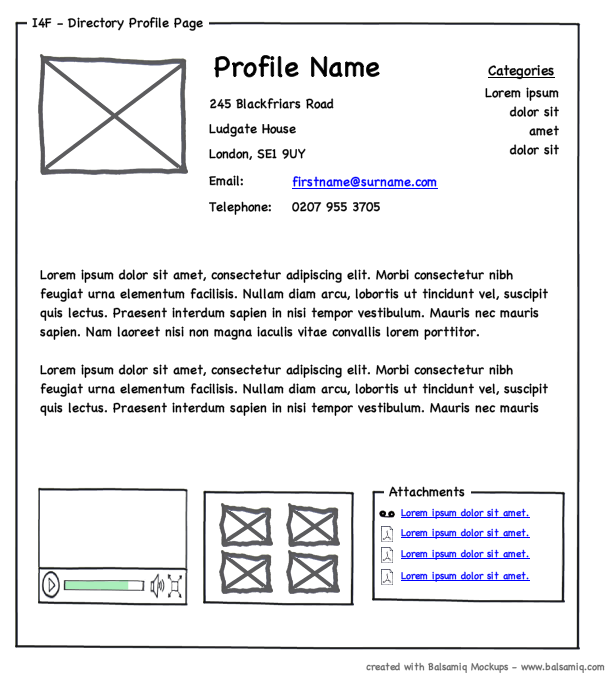
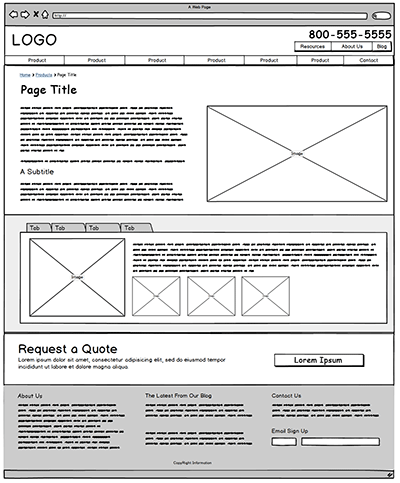
A wireframe is a different type of diagram for analyzing and planning websites and something we have not talked about yet. A wireframe is typically a design tool: a way of sketching the layout for one single page. A wireframe is like the skeleton of a webpage that works to help plan where the main components will go without worrying about the details of those components. Images are typically represented as boxes with "X"es in them. Text can be Lorem ipsum, squiggles, or just lines. Here are two examples:
VII. Homework & wrapping up
The homework for this week asks you to make a simple site of at least 5 interlinked pages. You don't need to make a wireframe for planning this, since we haven't yet talked about how to build the layout of a webpage — that will come with CSS. You also needn't make a sitemap for the HW, but if you'd like to that would be a great exercise.