Code Toolkit: Python, Fall 2025
Week 14 — Wednesday, December 3 — Class notes
Continuing our text-based game in Flask
Today we looked at how to continue working with Flask to create an interactive experience, like a choose your own adventure game. We looked at fixing a bug that arose in the code of the class notes from last week, and looked at how to add images and other multimedia to this project.
Table of contents
(The above links jump down to the various topics in these notes.)
I. Fixing a bug in the template code from last week
When we were working this week on the code
from last week, we encountered an
error. It arose in several situations, but you can reproduce it
by clicking on any state that has less than three choice
options. For example, in the first state, try clicking on the
choice I called "Phone a friend". That should give you
an Internal Server Error message in
your browser, and at the command line, you should see this
error:
jinja2.exceptions.UndefinedError: 'dict object' has no attribute 'C'
127.0.0.1 - - [08/Dec/2025 02:09:29] "GET /game/phone-outside HTTP/1.1" 500 -
That might look confusing, but I would say that is actually a
pretty good and informative error. It's telling us that we
have a dictionary, and we are trying to access
a key 'C', but that key is
not in the dictionary. Scanning up a bit, you should
also see something like this:
File .../templates/main.html", line 17, in top-level template code
    <li><a href="/game/{{ choices[c][1] }}">{{ choices[c][0] }}</a></li>
That is telling us exactly where this error is happening. So
let's go to our template code and find that
line. In the
template code we created last week (the file that I
called main.html), we had the following
lines:
    <ul>
        {% for c in ["A","B","C"] %}
        <li><a href="/game/{{ choices[c][1] }}">{{ choices[c][0] }}</a></li>
        {% endfor %}
    </ul>
Note that this code is looping through three
values "A", "B", and "C",
and for each one is using that as a key in
the choices dictionary. Well in the case that
caused the error, we did not have three
choices "A", "B", and "C"
— we only had two choices.
Remember that Python has an in command, which
let's us check if any key is in a
dictionary. Fortunately the Flask templating language also gives
us access to this Python command. So what we will do is, for
each value that we are looping through, simply check if that
value is in the choices
dictionary before trying to access it. Like this:
    <ul>
        {% for c in ["A","B","C"] %}
        {% if c in choices %}
        <li><a href="/game/{{ choices[c][1] }}">{{ choices[c][0] }}</a></li>
        {% endif %}
        {% endfor %}
    </ul>
That should fix the problem. Add those lines, save the file, quit and restart your server, and reload the page. Remember, the command to start your development server is:
$ python3 -m flask --app haunted_mansion run --port=5000(jump back up to table of contents)
a. Adding additional choice options
By adding the code of this simple {% if %}
statement above to our template, it actually allows you to have
more options for your choices, and a greater variability to the
number of choices. By letting us have only two choices, it also
lets us have more than three. You could modify the {% for
%} line like this:
{% for c in ["A","B","C","D","E"] %}
Add however many choices here are the maximum that you use in your JSON game structure. This code allows you to use up to five choices.
Then in your JSON code now you can have some states that use any number of options up to five, and the game should be able to dynamically handle that without crashing.
(jump back up to table of contents)II. Adding images (and possibly other multimedia)
After reviewing the code from last week and fixing the above bug, we spent most of our time looking at how to add images to your game.
As I explained in class, the easiest way to do this is probably to download a bunch of images and name them all using a precise pattern, based on the unique identifier for each game state, then in your Flask template code, reference each image using that filename pattern which is based on the unique state identifier.
Here is a zip file of all the images that I quickly downloaded
during
class: week14-flask-images.zip. Download
that, double-click to open, and move all the files into your
Flask project folder, into a subfolder
called images, within your folder
named static.
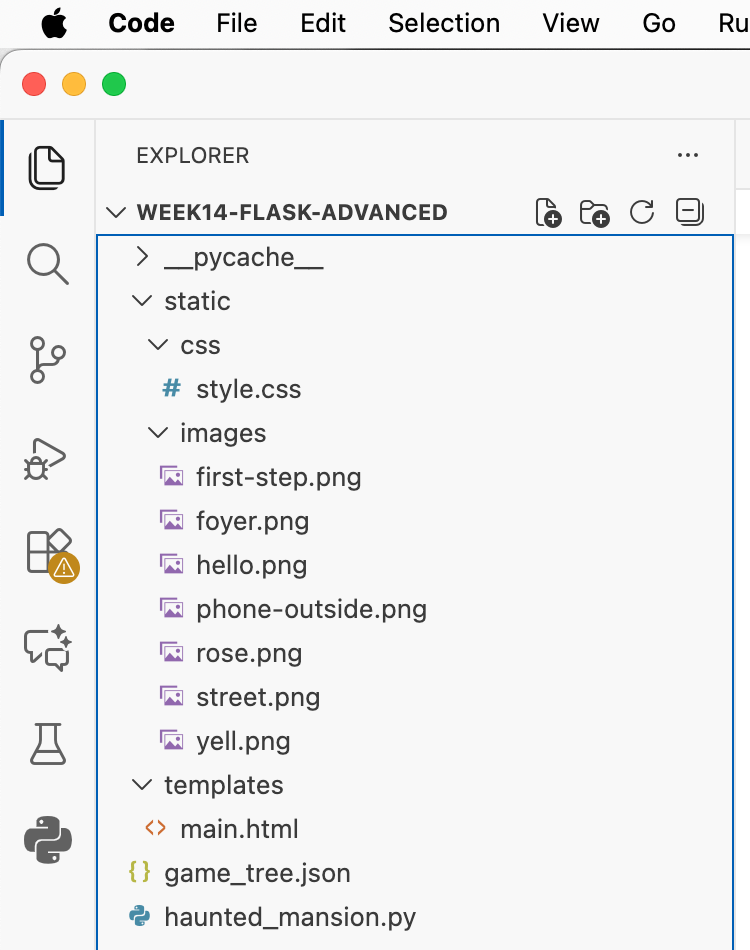
At this point, your VS Code project should look like this:
You can use your own images of course. But note here that I am
following a precise filenaming pattern here for all images. Each
image file is named _____.png, where
the blank is filled in with the unique identifier of each game
state. Note that all my filenames match up precisely with the
identifiers for my game states in my JSON file. Everything is
lowercase, and there are no spaces or other
punctuation. Precisely following this strict naming scheme will
be crucial for this to work.
Next, let's modify our template code to include the
image. Remember (and for those who have not worked much with
HTML before) that a basic HTML tag to include an image is this:
<img src="_____"
      alt="_____" />
Where the first blank is the
image filename, and the second blank is the "alt" text, which is
used to give the user a textual description of the image for
people with disabilities.
What we will do is use the Flask template
function url_for, which we used last week to
include CSS, and now use it to specify our image filenames. Like
this:
<img src="{{ url_for('static', filename='images/'+image) }}" alt="Image" />
You can put this anywhere you'd like. I put mine after
my <ul>, which was on line 23. So the
template code looks like this, at the end of my file:
            {% endfor %}
        </ul>

        <img src="{{ url_for('static', filename='images/'+image) }}" alt="Image" />

    </div>

</body>
</html>
But we're not quite done. The variable image
does not yet exist in our template. We have to pass that in from
our Flask Python code. So let's go back to that, into the
file that I
called haunted_mansion.py. And add the
following code:
@app.route("/game/<game_state>")
def game(game_state="hello"):

    state = game_tree[game_state]

    msg = state["message"]
    ch = state["choices"]
    image_filename = game_state + ".png"

    return render_template("main.html",image=image_filename, message=msg, choices=ch)
Note here that I have generated a string representing the image
filename for the current state using the same pattern I used to
name my files: the unique game state identifier, concatenated
to .png. I called that
variable image_filename, which I then passed in to
the template as a template variable that I
called image. (The only reason I used different
filenames here is to help you understand the syntax. I could
have used the same names for the variable here and the template
variable.)
And that's it! You should be able to kill your server, re-run it, and reload your pages to see the images included on each.
You could use this same scheme if you wanted to include other multimedia like video or audio files. (Check something like the Mozilla Developer Network for resources on what HTML to use for these other formats.)
(jump back up to table of contents)a. Another approach to adding images
While the above approach works well, and is proably the quickest way to get this implemented with the smallest amount of new code required, there are some shortcomings.
What if you wanted to have more than one image for each game state? This might make that more tough. Or what if you wanted to add alt text for each image to better comply with accessibility? This would not really make that possible.
A different approach that is probably more robust would be to include the image as an additioinal property in your JSON code. Modifying your JSON file like this:
One way you could do that would be by adding a new property to
each state. I'm calling this property image,
and it points to a dictionary, which itself has two
keys: filename, and alt. You would
need to add this to each state. You can see an example of this
for one state here:
{
    "hello": { "message": "You are standing in front of \na haunted mansion with an old door.",
              "choices": { "A": ["Open the door", "foyer"],
                          "B": ["Run away", "street"],
                          "C": ["Phone a friend", "phone-outside"] },
                "image": { "filename": "hello.png",
                           "alt": "Haunted mansion with an old door" } },
    "foyer": { "message": "You are standing in a grand foyer. There is a marble table ...
    ...
Now you would need to modify your Flask Python code to access this new property and pass it in to the template, like this:
@app.route("/game/<game_state>")
def game(game_state="hello"):

    state = game_tree[game_state]

    msg = state["message"]
    ch = state["choices"]
    im = state["image"]

    return render_template("main.html",image=im, message=msg, choices=ch)
Now, image is a variable that we can use in our
template. The value of this variable will be the entire new
dictionary that we defined in our JSON above, consisting of two
keys: filename and alt. We can use
those in our template by modifying the <img>
line like this:
<img src="{{ url_for('static', filename='images/'+image["filename"]) }}" alt="{{ image["alt"] }}" />
This method is a little more robust because now that you have an
additional property in your JSON datastructure, you could modify
it arbitrarily complicated ways, like to add a list of images,
or to add additional properties for each image. I have shown
that here with the alt text, but you could specify
CSS properites like size or border color, or other properties
that you might use in your markup somehow.