Code Toolkit: Python, Spring 2026
Week 8 — Wednesday, March 11 — Class notes
- Review: lists
- Background & overview: Timing and state
-
Timing: a numeric timeline with
millis() - State: a new way to use variables
- Functions: project planning, reusability and modularity
- Wrapping up and homework
I. Review: lists
Last week we talked about lists, an example of a data structure.
To review that, we looked at Ava's homework (in Google Drive here).
The first thing I did was remove some
extra append() commands, which were causing
the x and y lists to be of different
lengths. This would probably be considered a bug, although it
did not create any noticeable problems in the way this code was
running.
But we realized that by removing those, it removed an effect
that Ava was going for in which the circles she is drawing were
intended to be spread out at different vertical locations. My
solution was to import
the choice() command from the Python
library random. (Please
note: I have included this here in these notes in
slightly different way than I did in class. I think the method
here is more clear because it only imports
choice(), which means we do not have to change all
the places that Ava using already using the
Processing random() command.)
In the below code, both lists will always be of the same length:
from random import choice
y =[]
x = []
number_of_things = 100
def setup():
    size(500, 500)
    rectMode(CENTER)

    i = 0
    while i < number_of_things:
        x.append(i*10)
        y.append(250)
        y.append(100)
        y.append(400)
        y.append( choice([250,100,400]) )
        i = i + 1

def draw():
    background(255,255,255, 10)

    i = 0
    while i < number_of_things:
        circle(x[i], y[i], random(10,50))
        fill(i*100, random(0,i*20) , 150)
        if dist(mouseX, mouseY, x[i], y[i]) > 10:
            x[i] = x[i] + random(-5,5)
            y[i] = y[i] + random(-5,5)

        i = i + 1
Ava's primary question was how to do part two of last week's homework.
To achieve that, I removed the loop with
the append() commands inside def
setup() and set number_of_things to
zero. The effect of this will be that when the program starts
running, there will be no circles drawn to the screen. That
looks like this:
from random import choice y =[] x = [] number_of_things = 0 def setup(): size(500, 500) rectMode(CENTER) i = 0 while i < number_of_things: x.append(i*10) y.append( random.choice([250,100,400]) ) i = i + 1 def draw(): background(255,255,255, 10) i = 0 while i < number_of_things: circle(x[i], y[i], random(10,50)) fill(i*100, random(0,i*20) , 150) if dist(mouseX, mouseY, x[i], y[i]) > 10: x[i] = x[i] + random(-5,5) y[i] = y[i] + random(-5,5) i = i + 1
To finish part two of the homework, we want to make sure that whenever the user presses the mouse, a new circle is created. To achieve that, add the following block at the bottom of the code:
def mousePressed():
global number_of_things
x.append(number_of_things*10)
y.append( choice([250,100,400]) )
number_of_things = number_of_things + 1
Now, whenenver the user clicks the mouse, we will append one
value to x and one value to y, and
also increment
the number_of_things variable, which will effect
how many times the while loop runs.
I also talked about the len() command
(introduced last week), which
returns the length of a list. Using this, we can actually get
rid of the number_of_things variable entirely:
from random import choice y =[] x = [] number_of_things = 0 def setup(): size(500, 500) rectMode(CENTER) def draw(): background(255,255,255, 10) i = 0 while i < len(x): circle(x[i], y[i], random(10,50)) fill(i*100, random(0,i*20) , 150) if dist(mouseX, mouseY, x[i], y[i]) > 10: x[i] = x[i] + random(-5,5) y[i] = y[i] + random(-5,5) i = i + 1 def mousePressed(): global number_of_things x.append(len(x)*10) y.append( choice([250,100,400]) ) number_of_things = number_of_things + 1
Next I showed how you could add some additional properties to
the circles — in this case, a size and color. Here, the
size and color of each circle will still be randomly generated,
like Ava originally did, but they will be fixed for each circle,
with random() called when the circle is being
created rather than every frame. This will create a less
frenetic effect, which may or may not be what you are going for!
from random import choice y =[] x = [] sz = [] c = [] def setup(): size(500, 500) rectMode(CENTER) def draw(): background(255,255,255, 10) i = 0 while i < len(x): circle(x[i], y[i], sz[i]) fill(c[i]) if dist(mouseX, mouseY, x[i], y[i]) > 10: x[i] = x[i] + random(-5,5) y[i] = y[i] + random(-5,5) i = i + 1 def mousePressed(): x.append( len(x)*10 ) y.append( choice([250,100,400]) ) sz.append( random(10,50) ) c.append( color(len(x)*100, random(0,len(x)*20) , 150) )
Finally, Maya asked a great question: Is there a way we could do this without having to manage four separate lists? Can we think of these circles (or "creatures") more as objects?
This is a great question and the answer is yes! Object-oriented programming is an approach to how to think about code that uses concepts like classes and objects to model data and algorithms. (I have another comment about this below.) True object-oriented programming requires some new syntax that we will not be covering this semester. But we can simulate an object-oriented approach to this example.
The below code creates just one big array to hold all the
circles which I call creatures. Then, every time we
are creating a new "creature", we make a small array of 4 items,
and add that array to the creatures list. So we
have a list of lists ...
from random import choice creatures = [] def setup(): size(500, 500) rectMode(CENTER) def draw(): background(255,255,255, 10) i = 0 while i < len(x): c = creatures[i] circle(c[0], c[1], c[2]) fill(c[3]) if dist(mouseX, mouseY, c[0], c[1]) > 10: c[0] = c[0] + random(-5,5) c[1] = c[1] + random(-5,5) i = i + 1 def mousePressed(): c = [ len(x)*10, choice([250,100,400]), random(10,50), color(len(x)*100, random(0,len(x)*20) , 150) ] creatures.append(c)(jump back up to table of contents)
II. Background & overview: Timing and state
We've already seen how to draw shapes and make them move on their own. This motion would typically start when the program started running and continue forever. Or maybe it would be triggered or changed by user interaction in some way. Today we are going to talk about timing: how to create motion that is in some way scheduled, chorreographed, triggered with some delay, or that repeats at some interval.
The term time-based media is often used to describe work in primarily in sound and the moving image, although digital media like video games and motion graphics are also included. Today we will see some coding techniques to implement time-based behavior in interactive computer programs of the sort we've been working on. The goal of today will be to think about how to work with the domain of time in ways that are analagous to how we have so far been working within the domain of space.
a. History and inspiration
 Oskar Fischinger
One incredible example of early time-based media is the work of Oskar Fischinger. Fischinger was an artist in the first part of the 20th century and a pioneer in animation and motion graphics. A classic example of his work is the animated film Studie nr 8, 1931.
You might be inclined to think that historically, animation must have preceded cinema, but in fact there is a case to be made for understanding these in the opposite order. Several modern artists and illustrators in the early 20th century were inspired by cinema to create animation, and used the principle of cinema — a continuous strip of film, divided into cells of static imagery that flicker by the viewer's eyes — to create early animation and motion graphics. In fact, many of these innovators actually worked on film strips, drawing and etching into the cells by hand. See for example Jonathan Crary's Techniques of the Observer or Gregory Zinman's Making Images Move for deeper discussion of this history.
Fischinger actually contributed to Disney's Fantasia but quit uncredited because of creative differences. In 2012, the Whitney museum showed an exhibition of his artwork called "Space Light Art". There is great documentation for this show online and I highly recommend taking a look!
III. Timing: A numeric timeline with millis()
-
Toward the end of the day back in week 4 ("Making Things Move") we saw how you could use variables and some basic arithmetic to make things move "on their own".
We looked at this pattern:
circleX = 300 def setup(): size(600,600) stroke(50,50,150) fill(200,200,255) def draw(): global circleX background(255) ellipse( circleX,300, 50,50) circleX = circleX + 1That draws a single circle, and to make the circle move horizontally, it create a variable which gets used to specify the x position of the circle. The value of this variable is then changed a little every frame, by incrementing or decrementing the variable.We expanded on this example using conditionals to ask questions about the position of the circle, and changed its movement based on that. For example:
circleX = 300 def setup(): size(600,600) stroke(50,50,150) fill(200,200,255) def draw(): global circleX background(255) ellipse( circleX,300, 50,50) circleX = circleX + 1 if circleX > width: circleX = 0 -
Today we are going to build on this, but instead of using conditionals to ask questions about movement in space, we're going to use them to ask questions about time.
Unlike other digital time-based media tools — like Adobe Premiere, After Effects, Audacity, or others — Processing does not give you an explicit, visual timeline. If you want to create timed events, you have to think in terms of numbers.
-
Processing gives us a command just for this purpose:
millis()(check the reference)This command returns a number that corresponds to the number of milliseconds since the program started running. A millisecond is one thousandth of a second, so 1000 milliseconds = 1 second.
millis()is like a stopwatch that starts when your program starts, and keeps running as long as the program is running. -
Even though this isn't a visual timeline, we can imagine a visual timeline in our thinking.
millis()returns a number that represents a playhead or a marker, moving along a timeline. Thus, we can use this like a variable to ask questions about the status of our sketch, similar tomouseXandmouseY. We can also use it to "save" or remember a position of this playhead on the timeline, which we'll see later.
This one basic command is enough to implement many different types of timed events, from simple things up to more complicated ones.
-
For example, think of this pseudocode:
Do something for the first three seconds my sketch is running
Picture what that would "look like" ifmillis()was a visual timeline:We could implement that with:
if millis() < 3000: # Do something -
Similarly, think about this pseudocode:
Wait three seconds, then do something for two seconds
And picture what that would look like on a visual timeline:Which we could implement with this:
if millis() > 3000 and millis() < 5000: # Do something -
What should
Do somethingbe in these cases? Well let's say we want to draw a shape and only have it move according to the above timing. We could combine movement and timing like this:circleX = 300 def setup(): size(600,600) stroke(50,50,150) fill(200,200,255) def draw(): global circleX background(255) ellipse( circleX,300, 50,50) if millis() > 3000 and millis() < 5000: circleX = circleX + 1 if circleX > width: circleX = 0Notice how now, the circle's position is being updated just like before, but only when that conditional aboutmillis()isTrue. In other words, only during the interval described by the Boolean expressionmillis() < 3000 -
We can get a bit more complicated by introducing variables to use for saving time values. For example:
circleX = 300 startTime = 3000 def setup(): size(600,600) stroke(50,50,150) fill(200,200,255) def draw(): global circleX background(255) ellipse( circleX,300, 50,50) if millis() > startTime and millis() < startTime + 2000: circleX = circleX + 1 if circleX > width: circleX = 0
When would this move the circle?Again, picture the timeline:
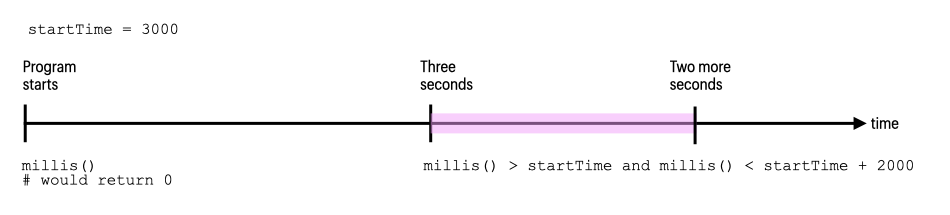
This might not seem any more interesting than the previous example since I'm setting the variable
startTimeto a hard-coded value. But because I am using a variable as a placeholder for that value, that means that the value could change. So now we can change that variable dynamically, based on some user input. -
Building on this, we can combine it with event
handling to let the user trigger the timing:
circleX = 300 startTime = 3000 def setup(): size(600,600) stroke(50,50,150) fill(200,200,255) def draw(): global circleX background(255) ellipse( circleX,300, 50,50) if millis() > startTime and millis() < startTime + 2000: circleX = circleX + 1 if circleX > width: circleX = 0 def keyPressed(): global startTime startTime = millis()Now when would this move the rectangle? Think about when thestartTimevariable gets set. When is that? Whenever any key is pressed. This means that whenever the user presses any key,startTimewill get set to whatever the current value ofmillis()is, and theifstatement will then beTrueorFalsebased on that value. It's almost like when the user presses a key, it marks where the playhead is on our imaginary visual timeline. Remember that each timedraw()runs, it checks if the current value ofmillis()is greater thanstartTime, and less thanstartTimeplus 2000, or two seconds.We could visualize it like this:
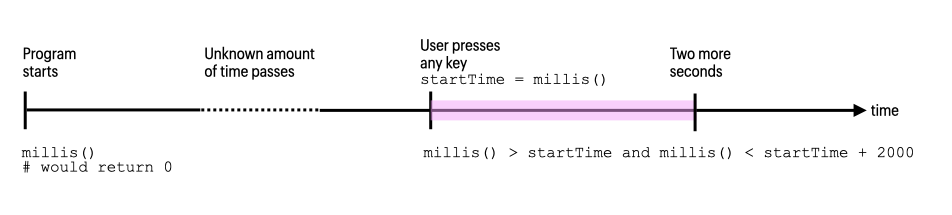
And in pseudocode we could say:
Every time the user presses any key, move a circle to the right for two seconds.A weird bug? Notice that whether or not the user presses a key, the circle still starts moving at 3 seconds and moves for 2 seconds. This is because the initial value of
startTimeis still 3000, carried over from the previous code snippet. This means that whenmillis()is greater than 3000, theifstatement isTruefor two seconds.What could you set the initial value of
startTimeto so that it would not appear like this? Think about when that conditional isTrueand what value would make it notTrue. Answer? -2000 would work. Any value smaller than that would also be fine. Here's the modified code:circleX = 300 startTime = -2000 def setup(): size(600,600) stroke(50,50,150) fill(200,200,255) def draw(): global circleX background(255) ellipse( circleX,300, 50,50) if millis() > startTime and millis() < startTime + 2000: circleX = circleX + 1 if circleX > width: circleX = 0 def keyPressed(): global startTime startTime = millis() -
The following three examples show how to do different
cases. Hopefully you can use these code snippets
as patterns for how to implement these
situations. Use them, combine them with other things we've
worked on, and build on them.
-
Wait a while, then do something forever
In this example we wait two seconds, and then start moving the square and never stopposition = 0 def setup(): size(600,600) smooth() stroke(50,50,150) fill(200,200,255) def draw(): global position background(255) ellipse(position,300,100,100) # wait two seconds, then move forever: if millis() > 2000: position = position + 1 -
Wait a while, then do something for a while, then stop
In this example we wait two seconds, then start moving the square, move the square for one second, and then stop.position = 0 def setup(): size(600,600) smooth() stroke(50,50,150) fill(200,200,255) def draw(): global position background(255) ellipse(position,300,100,100) # only increase the position if millis() is greater than two seconds but # less than three seconds if millis() > 2000 and millis() < 3000: position = position + 1 -
Do something for a little while, then stop Wait a little while and repeat the above
This example is similar to example 2 above, but it has a variable which gets added to the timing values. Then anotherifstatement periodically resets that variable. This causes the whole timing process to reset, doing this forever.position = 0 startTime = 0 def setup(): size(600,600) smooth() stroke(50,50,150) fill(200,200,255) def draw(): global position, startTime background(255) ellipse(position,300,100,100) # move for a little while, then stop if millis() > startTime and millis() < startTime + 500: position = position + 1 # wait a little while, then reset the startTime variable, # so the above timing starts over: if millis() > startTime + 2000: startTime = millis()Update: In class we discussed a different way of achieving this periodic behavior by using the modulo operator,%. The solution using that would look like this:position = 0 startTime = 0 def setup(): size(600,600) smooth() stroke(50,50,150) fill(200,200,255) def draw(): global position, startTime background(255) ellipse(position,300,100,100) # move for a little while, then stop if millis() % 2000 < 500: position = position + 1Thanks, Bibi, for this elegant solution!
-
IV. State: a new way to use variables
So far we have been using variables primarily for numeric things
(like shape sizes, positions, or colors), and also for
Boolean True/False values.
Today we saw how we could also use variables to keep track of time represented as a number — so another example of using variable for something numeric.
But what if we want the program to change over time in a way that is not explicitly tied to timing. For example, what if we wanted the program to be able to switch back and forth between two or more very different actions or operations, or if we want the program to operate in different phases or modes, maybe cycling or toggling between those in response to user input or something else?
In computer science, the term for keeping track of the status of the program is state. We might ask, what state or phase is the program in? This could be used to implement the levels of a video game for example.
The way to do this is by using variables. This is not very
different from anything that we have been doing so far. I just
want to show a few examples that emphasize how you can use
variables in some slightly different ways — ways that are
not strictly numeric in the ways we have been using them, but
also that keep track of state in way that
enables more options than simply True
/ False values.
Example: A light switch
-
Let's implement a bit of code so that when the user presses the
'n'key (for "oN") the light goes on, and when the user presses the'f'key (for "oFF") the light goes off. -
Let's start by simply drawing a window "with the light off"
(black screen):
def setup(): size(800,800) def draw(): background(0) -
How should we implement the "on" key? Well we could start by trying to use the
def keyPressed()block. That would look like this:def setup(): size(800,800) def draw(): background(0) def keyPressed(): if key == 'n': background(255,255,200)But that doesn't seem to work too well. Whenever the user presses the'n'key, the light flashes on for a split second but doesn't stay on. -
Could we improve on things by using the other mode of event handling, by using the Boolean
keyPressedvariable and anifstatement? That would look like this:def setup(): size(800,800) def draw(): background(0) if keyPressed and key == 'n': background(255,255,200)This is somewhat better, but still this, only works if the user is holding down the'n'key. What if we want this to work not like a button that must be held down, and more like a switch that can be flipped on or off? -
We need a way to keep track of whether the light has been pressed or not. In other words, we need to keep track of the state of the light switch. We'll do this with a variable. Since this variable will only have two values (on or off) we can use a Boolean variable for this purpose. Then, I will use an
ifstatement to draw the light when this variable isTrue, and to draw black when the variable isFalse. Initially I will set the variable toFalseto signify that the light is off.switchState = False def setup(): size(800,800) def draw(): if switchState: background(255,255,200) else: background(0)
But this is not doing anything yet. Why? Because I am not changing this variable anywhere! Let's try to change it. -
When the user presses the
'n'key, let's make the variableTrue:switchState = False def setup(): size(800,800) def draw(): if switchState: background(255,255,200) else: background(0) def keyPressed(): global switchState if key == 'n': switchState = TrueOK! This is getting is somewhere. Now when the user presses the'n'key,switchStateis set toTrue, and so the light will be drawn on. -
The last thing is to let the user turn it off. Have a look at this:
switchState = False def setup(): size(800,800) def draw(): if switchState: background(255,255,200) else: background(0) def keyPressed(): global switchState if key == 'n': switchState = True if key == 'f': switchState = FalseGreat! So now we have a variable (switchState) that keeps track of whether the user has pressed a certain key or not. In other words, it is keeping track of the state of the program. And we can useifstatements to change the value of that variable. -
Of course, we can create programs with even more states than just on / off. As a simple example, we could repeat the pattern from the above example to have several different on / off variables. Let's create a program that let's the user turn three shapes on or off:
rectOn = False
ellipseOn = False
triangleOn = False

def setup():
    size(800,800)
    rectMode(CENTER)

def draw():
    background(255)
    if rectOn:
        fill(255,155,155)
        rect(200,400,50,50)

    if ellipseOn:
        fill(155,255,155)
        ellipse(400,400,50,50)

    if triangleOn:
        fill(155,155,255)
        triangle(600,375, 625,425, 575,425)

def keyPressed():
    global rectOn, ellipseOn, triangleOn

    if key == 'r':
        rectOn = True
    if key == 'f':
        rectOn = False

    if key == 'e':
        ellipseOn = True
    if key == 'd':
        ellipseOn = False

    if key == 't':
        triangleOn = True
    if key == 'g':
        triangleOn = False
Notice that I've named my variables using the patterntriangleOn. This creates a nice way of reading your code so that you're looking at theifstatements, you can read it likeIf the triangle is on. -
What if we didn't want to have different keys for on and off, but instead wanted the same key to turn each shape on and off? We call this a toggle. And it looks like this:
rectOn = False
ellipseOn = False
triangleOn = False

def setup():
    size(800,800)
    rectMode(CENTER)

def draw():
    background(255)
    if rectOn:
        fill(255,155,155)
        rect(200,400,50,50)

    if ellipseOn:
        fill(155,255,155)
        ellipse(400,400,50,50)

    if triangleOn:
        fill(155,155,255)
        triangle(600,375, 625,425, 575,425)

def keyPressed():
    global rectOn, ellipseOn, triangleOn

    if key == 'r':
        rectOn = not rectOn

    if key == 'e':
        ellipseOn = not ellipseOn

    if key == 't':
        triangleOn = not triangleOn
Now, in thoseifstatements, I'm setting each variable to the opposite of whatever it currently is. This creates the toggle effect. -
Lastly, we can keep track state that is more than on / off. Have a look at this code:
dayEveningNight = 0

def setup():
    size(800, 800)

def draw():
    if dayEveningNight == 0:
        background(155,155,255)
    elif dayEveningNight == 1:
        background(25,25,75)
    elif dayEveningNight == 2:
        background(0)

def keyPressed():
    global dayEveningNight

    if key == 'q':
        dayEveningNight = dayEveningNight + 1
        if dayEveningNight > 2:
            dayEveningNight = 0
Here, I am using a variabledayEveningNightthat is holding the values1,2, or3. I am using anifstatement in thedraw()block that checks what the value of this variable is and draws something accordingly. And then, in thekeyPressed()block, I am incrementing that variable based on what the user has pressed. If the variable gets larger than3, I am reseting back to its initial value of1. -
You can use these same principles to keep track of many kinds of state within your program. For example, if a user is entering a password, or the levels of a game.
Sidenote. If you ever find yourself implemeting code that cycles through values in this way, you can use the modulo operator. Here's code equivalent to theifstatement above:x = x + 1 if x > 2: x = 0This is equivalent to the following:x = (x + 1) % 3The above snippet incrementsxby1, but whenxis incremented to3, it is reset to0, because 3 divided by 3 is 1, remainder 0.I advise you to use whichever logic is preferable to you.
V. Functions: project planning, reusability and modularity
Functions are a way to organize your code.
Now that you've started thinking about the midterm project, you will be working on a computer program that is a little bit longer and a little bit more complicated. You need a way to keep this organized and manageable. Functions give you a technique for how to do that.
(Another strategy for code organization involves a technique called object-oriented programming, which uses things called classes and objects. We might talk about this later in the semester if there is time and interest.)
A function takes any sequence of commands, groups them together into a block, and gives that block a name. Then, just by using that name, you can automatically run all those commands.
-
New syntax. Let's say I have this sketch I'm working on:
def setup():
    size(600,600)

def draw():
    # Pretend that in here
    # I have many many commands
    # to draw a landscape.
To use a function, I must first define it. I pick any name that I'd like (as long as it's not a special Processing reserved word) and then I create a new block like this:
def drawLandscape():
    # Pretend that in here
    # I have many many commands
    # to draw a landscape.
The termdrawLandscape()is arbitrary. I could have called itspaghetti(), but like with variables, I recommend that you use informative function names that describe what the function does and that will help you remember and understand later what the function is doing.This syntax is called the function definition or implementation, and this bit of code is described as defining or implementing a function.
Now you would use this new function simply by specifying its name like this:
drawLandscape()
This is referred to as calling or invoking the function. Now, just specifying this function name is equivalent to invoking all the commands contained within the function definition. -
If calling a function looks familiar to you, that is because nearly everything that you've been doing all semester has been calling functions. We just weren't refering to it that way. I've been referring to them as commands. All the commands that you have been using thus far are actually functions that Processing has already defined for you in advance.
For example,
rect(),background(), andmap()are all functions that Processing has defined for you, that you are able to use simply by calling. As another example, thelen()command is a function that Python defines for you.If you would like "proof" that these commands are all functions, we can take a look at the source code that implements Processing itself. First though, refresh your memory on the
square(),rect(),quad(), andbeginShape()commands in the Python Processing documentation. Now, let's take a look at the actual source code for Processing, specifically, clicking in to the definition ofsquare(). (Note that Processing is implemented in Java, so the syntax will be a little different than what we've been seeing in Python.) Notice that thesquare()command callsrect(), thenrect()callsquad(), andquad()in turn callsbeginShape(). Each command is a slightly more specific case of the next one. Each function specifies some parameters and then calls the more general function. Other functions also call the more general ones too. So for example, thecurve()function also callsbeginShape(), specifying its own parameters to it.Also, as you can see from the new syntax introduced above, the
setup()anddraw()blocks are also functions! But they are special functions that Processing requires you to define. When you run a sketch, the Processing system starts by first calling yoursetup()function, then calling yourdraw()function many times, as we talked about in week 3.It's not incorrect to refer to
setup()anddraw()as "blocks". Functions, likeifstatements,whileloops, and other things are blocks. But it would be more precise to refer to them as functions. I have not been calling them that so far because we have not yet talked about what functions are. But now you know! So from now on let's refer tosetup()anddraw()as functions. -
Putting all these pieces together, my initial sketch would now look like this:
def setup():
    size(600,600)

def draw():
    drawLandscape()

def drawLandscape():
    # Pretend that in here
    # I have many many commands
    # to draw a landscape.
Here you can see the definition and the invocation of this new function calleddrawLandscape(). -
Some notes on this new syntax:
-
You may be curious about why I am calling the function before (or above) where I am defining it. The order does not matter. When you run your sketch, Processing (and Python) looks through your entire program for all function definitions and stores them in memory, ready and waiting to be invoked. Only after all functions are defined does it then automatically invoke the
setup()function for you, starting your sketch running. In other words, functions can be defined in any order. -
But, make sure that all your functions are defined in global space. Functions cannot be defined inside other functions. (They actually can, but that is a more advanced topic that we will not touch on this semester. Javascript programmers might be familiar with this technique, as it is more common in that language.)
-
If you really want to keep your code organized and manageable, consider putting some functions in different tabs. You can make tabs with helpful and informative names, and then put different function definitions in them. Perhaps you have a tab called "User input" and a tab called "Draw code". Experiment with whatever works for you.
But please note: if you want to use multiple tabs, and include other code in your tabs like function definitions, you need to use the
importcommand in your main tab to be able to access those functions. Examples of how to use this is below.
-
-
This usage of functions is what is called modularity: breaking down a big task into smaller modules, that are themselves each more manageable. Remember that we read about modularity in the Lev Manovich chapter. You could imagine that I might continue expanding the above example with additional functions, and my
draw()block might look like this:def draw(): drawLandscape() drawClouds() drawCar() moveClouds() moveCar() }Looking at this code, we don't know what each of those functions does, but we can start to get an abstract, high level understanding of what is going on in this sketch. -
Functions can work really well with the topic of state variables discussed above. For example, if you were doing the game option for the midterm, you could implement your different levels like the below code. Note: Please pay attention to how I'm using the
importcommand in the main tab to import the function definitions from the other two tabs.# First, main tab from level_1 import * from level_2 import * level = 1 def setup(): size(800,800) def draw(): # ... other code here ... if level == 1: drawLevel1() elif level == 2: drawLevel2() # ... more code down here ...# Tab: level_1.py def drawLevel1(): # draw code goes here ...# Tab: level_2.py def drawLevel2(): # draw code goes here ...
Keep this in mind as you work on the midterm!
(jump back up to table of contents)VI. Wrapping up and homework
The homework for this week builds on all of the above.