Radical Software
LCST 2234, Fall 2021 (CRN 9430)
Rory Solomon
Project 2, Tutorial 2: CSS and text modification with a browser extension
In our tutorial last week we got started on this new project, and got setup with the basic structure of your browser extension. This week we are going to talk about functionality we can start adding to your extension to allow it to intervene in a web user's browsing experience by modifying the HTML page currently being displayed.
In order to understand how this works, we need to take a bit of a detour into the world of CSS and it's relationship to HTML.
Plan for today:
- HTML and CSS as sturcture vs content
- Introducing CSS
- Attaching CSS to an HTML page
- Inspecting the structure & apperance of an HTML page
- Extension technique: modifying CSS properties
- Extension technique: search-and-replace text
 The artist Gordon Matta Clark would often work by removing
the façades of structures in the built environment, presenting
structural features as aesthetic objects. Today we'll be mucking
around with the structure and "façade" of HTML documents. This
piece is called "Bingo", 1974, on view here
at MoMA.
The artist Gordon Matta Clark would often work by removing
the façades of structures in the built environment, presenting
structural features as aesthetic objects. Today we'll be mucking
around with the structure and "façade" of HTML documents. This
piece is called "Bingo", 1974, on view here
at MoMA.
I. HTML and CSS: Structure and content versus appearance
Some HTML tags (like <h1>
or <em>) affect the appearance of your
content. Other tags (like <p>
and <div>) don't really seem to have any
effect yet.
HTML was invented as a markup language for desrcibing documents and multimedia content. It was never really intended initially as something to implement very complicated user interactions and visual interfaces. Over time those features came to be added in, and initially they were added with new features of HTML itself. But people found this to be frustrating and inadequate. Recalling ideas from our Manovich, think about how digital media is so often biased toward modularity and reusability. People wanted HTML to implement these behaviors, so as HTML matured, with the adoption of CSS and HTML5, there has been development away from HTML tags that control the appearance of content, and toward these other types of tags that don't really seem to have any effect. You may ask: What is the purpose of an HTML tag that does not have any effect on the appearance of its content? The answer is that HTML tags are primarily used not for controlling the appearance of a document, but rather for specifying the structure of a document.
By structure I mean any of the components of a document that may have semantic or organizational significance. Think about a newspaper, for example: it has a title, a main headline, secondary headlines, articles with body paragraphs, maybe smaller blocks containing excerpts or teasers of other articles, etc. Or to take a simpler example, a basic report or article may contain: a title, a subheader, a byline, and sub-sections, each containing a section title and body paragraphs — perhaps the article also starts with a listing of all these sub-sections. A body paragraph may contain a list, or maybe an outline composed of a list where each item also contains its own sub-list. In all of these examples, I am describing the structure of a document.
II. Introducing CSS
Now we can get started molding this HTML structure into the layout that we're working toward. We do this with CSS, which stands for Cascading StyleSheets. Where HTML specifies the structure and semantics of a document, CSS is deployed to control the visual display of that structure. As we've seen so far, most HTML tags have some kind of default appearance. CSS can be used to change and override any of these visual aspects. Any display properties that are not explicitly modified by your CSS code will fall back on the default properties for each tag, which are specified by your browser, and sometimes slightly different from one browser to another.
CSS code is comprised of a series of rules. The basic structure of a CSS rule is as follows:
and rounded corners.)
p {
  color: red;
}
There are four main components to each rule:
-
The selector (in this
case,
h1): This targets which parts of your HTML document this rule will apply to. In this case, it will apply to allh1tags. -
The property (in this
case
color): This specifies the visual quality that is being affected by this rule. This rule is setting the color for all thoseh1elements. - The curly braces. These must always come in pairs.
-
The value (in this
case
red): Each different property has its own valid values. For color properties, CSS includes some predefined words that you can use, such asred,blue, etc. But you can specify any color you'd like using 6-digit hexadecimal notation that indicates the red, green, and blue components as:#RRGGBBwhere each character here can be a value between 0-9, or a-f. a=10, b=11, c=12, etc, up to f which equals 15. From 0 to 15 is 16 values, hence the name hexadecimal. (Think "hexagon".) If this is confusing, you can use a color chooser tool to select a color and copy/paste the hexadecimal (or just "hex") value.
Some other syntax rules:
- Like HTML, CSS ignores whitespace, so you could write rules all on one line if you wish, or space them out in a way that makes them more readable to you.
-
Comments are added with this notation:
/*
	  */
. This punctuation must also always come in pairs, can span multiple lines, and can be placed anywhere within your CSS code. For example:/* This is a multi-line comment about my first CSS rule. */ p { color: red; /* And this is a single-line comment. */ } -
One rule may specify multiple properties & values for a
given selector, in which case they each must end with a
semi-colon (
;). For example:p { color: red; border: solid 1px; }
We can't possibly go over every available CSS property and all
their valid values. Perhaps if this were a web design course,
we'd spend a few weeks doing so. For our class, I'm only going
to show a you a couple, and offer you some pointers to where you
can look for more reference documentation about how CSS
works. Probably the best guide I can recommend is W3
Schools. Here's their CSS information:
W3 Schools, CSS Tutorial
Notice the column on the left side with a long list of different
categories of CSS functionality. Click on each of those to learn
more about the specific CSS properties and values for a range of
CSS options, including: backgrounds, borders, colors, fonts,
margins, height/width, links, and lists, just to name a few
that I think might be useful.
III. Attaching CSS to an HTML page
CSS rules are sort of "attached" or connected to the page structure of an HTML document by including the CSS code in the HTML. There are several ways to do this. Three ways to include CSS in an HTML page:
-
Inline. For any HTML tag, you can include an
attribute named
style, which can include CSS code. For example:<h1 style="color: red;">Header</h1>
As above, you can specify multiple properties / values separated with semi-colons:<h1 style="color: red; border: solid 1px;">Header</h1>
In this case, these rules will apply only to this one specific<h1>tag. No others.This is, in general, considered the worst way to apply CSS rules to your HTML. It is not general in any way, so if you want to apply similar styles to different tags, you have to copy/paste a lot of CSS code. Sometimes in limited cases though it can be a useful shortcut. But if you find yourself including a lot of CSS this way, switch to one of the below methods.
-
Internal. A better way is to include a big
chunk of CSS rules at the top of your document, in
the
<head>section using a<style>tag, like so: (This HTML is a snippet from the complete HTML file above, as indicated by the jagged border.)<head> <title></title> <style> p { color: red; border: solid 1px; } </style> </head>
This method is probably a little better than inline. It helps separate your tags specifying the structure of the document and the rules for how it is displayed.
-
External. This is probably the best
method. With this technique, you place all your CSS code
in a separate file, which you reference from your HTML
file.
To do this, create a new subfolder called
cssin your project folder, and within that, create a new file. I like to call my CSS filestyle.css, but you can call it anything you'd like, just make sure it ends in.css.Now, place your CSS rules in this file, and save it. The modify the
<head>section of your HTML file like so:<head> <title></title> <link rel="stylesheet" href="css/style.css"> </head>
IV. Inspecting the structure & appearance of a web page
The browser's "inspect" tool
Can use to explore how a webpage is built, to learn HTML and CSS
Can also use it to have some fun modifying the structure and apperance of an HTML page. And can even use this (sometimes) to circumvent paywall blocks that are implemented with CSS changes. Is this "radical software"?
Keep in mind that these changes you are making are only having an effect locally, in the version of the page that your browser is showing you, a kind of local copy. You are not modifying the page on the server, because you do not have access to that computer. You cannot share these changes with others to see because you can't control how these other web servers deliver HTML and CSS data.
You can however create a browser extension that does this, and that way anyone who installs your browser extension will see modifications that you have done. However, that entails you figuring out how to automate these changes, to run in someone else's browser. For that we'll be using Javascript.
V. Modifying CSS properties with an extension
We saw a simple version of this last week (adding a red border to all <p> tags). Today let's try something else.
Let's walk through an
example. Rename content.js
to tutorial1-content.js. Create a new
file
called tutorial2-content.js. Modify manifest.json
to specify this filename in the js field
of content_scripts.
// Tutorial 2, content.js

// Technique 1
for (e of document.getElementsByTagName('*')) {
    var c = "rgb(" + Math.floor(Math.random()*255)
             + "," + Math.floor(Math.random()*255)
             + "," + Math.floor(Math.random()*255) + ")"

    // For testing:
    //console.log(e);

    e.style.setProperty('background-color',c);
}
Similar to last week's tutorial, this code snippet uses
getElementsByTagName(), which returns a list of all
the elements in an HTML document that match the tag
specified. Last week we said
getElementsByTagName('p') to retrieve a list of
all <p> elements in the document. In the code
snippet here, we're saying
getElementsByTagName('*'), which just returns
all HTML tags from the document.
The next line for (e of
document.getElementsByTagName('*')) { creates
a loop, which iterates over all the items in
the list returned by getElementsByTagName(). The
code inside the loop gets run on each item in
the list. In other words, the code in between the curly
braces { } in the above example gets invoked, once
per HTML element. Each time it gets invokved, the
variable e is set to be each successive item in the
list.
The last line (e.style.setProperty()) sets a CSS
property (in this case background-color) on an HTML
element. Which element? The one indicated by the
variable e. And which one is that? The
variable e is set to each element in the document,
every single one, taken one at a time.
So what this code does is randomly generate an RGB color, by
creating a string that looks something
like: rgb(155,155,255), then sets that RGB color
string as the value for the CSS
property background-color.
Remember to save all your code files and to reload the extension
in the extensions manager
(chrome://extensions). Then reload a web page and
see what this looks like.
VI. Modifying HTML content with an extension
Comment out all the above code and let's work on another technique involving replacing the textual content of a web page
Recall the text replacement that we did with tweets: simply replaced all instances of a word or phrase with another word or phrase in the text of a tweet. We can't simply do that here in an HTML file because it could mess with the structure of the code. It could inadvertently replace HTML tags, alter CSS classes, or otherwise just do things we don't want. (Of course, if you're interested in intentionally breaking and glitching things, perhaps this may be an effect that you're interested in. What if you search-and-replaced all instances of one tag with another for example? Or swapped CSS classes just to see what you'd get ...)
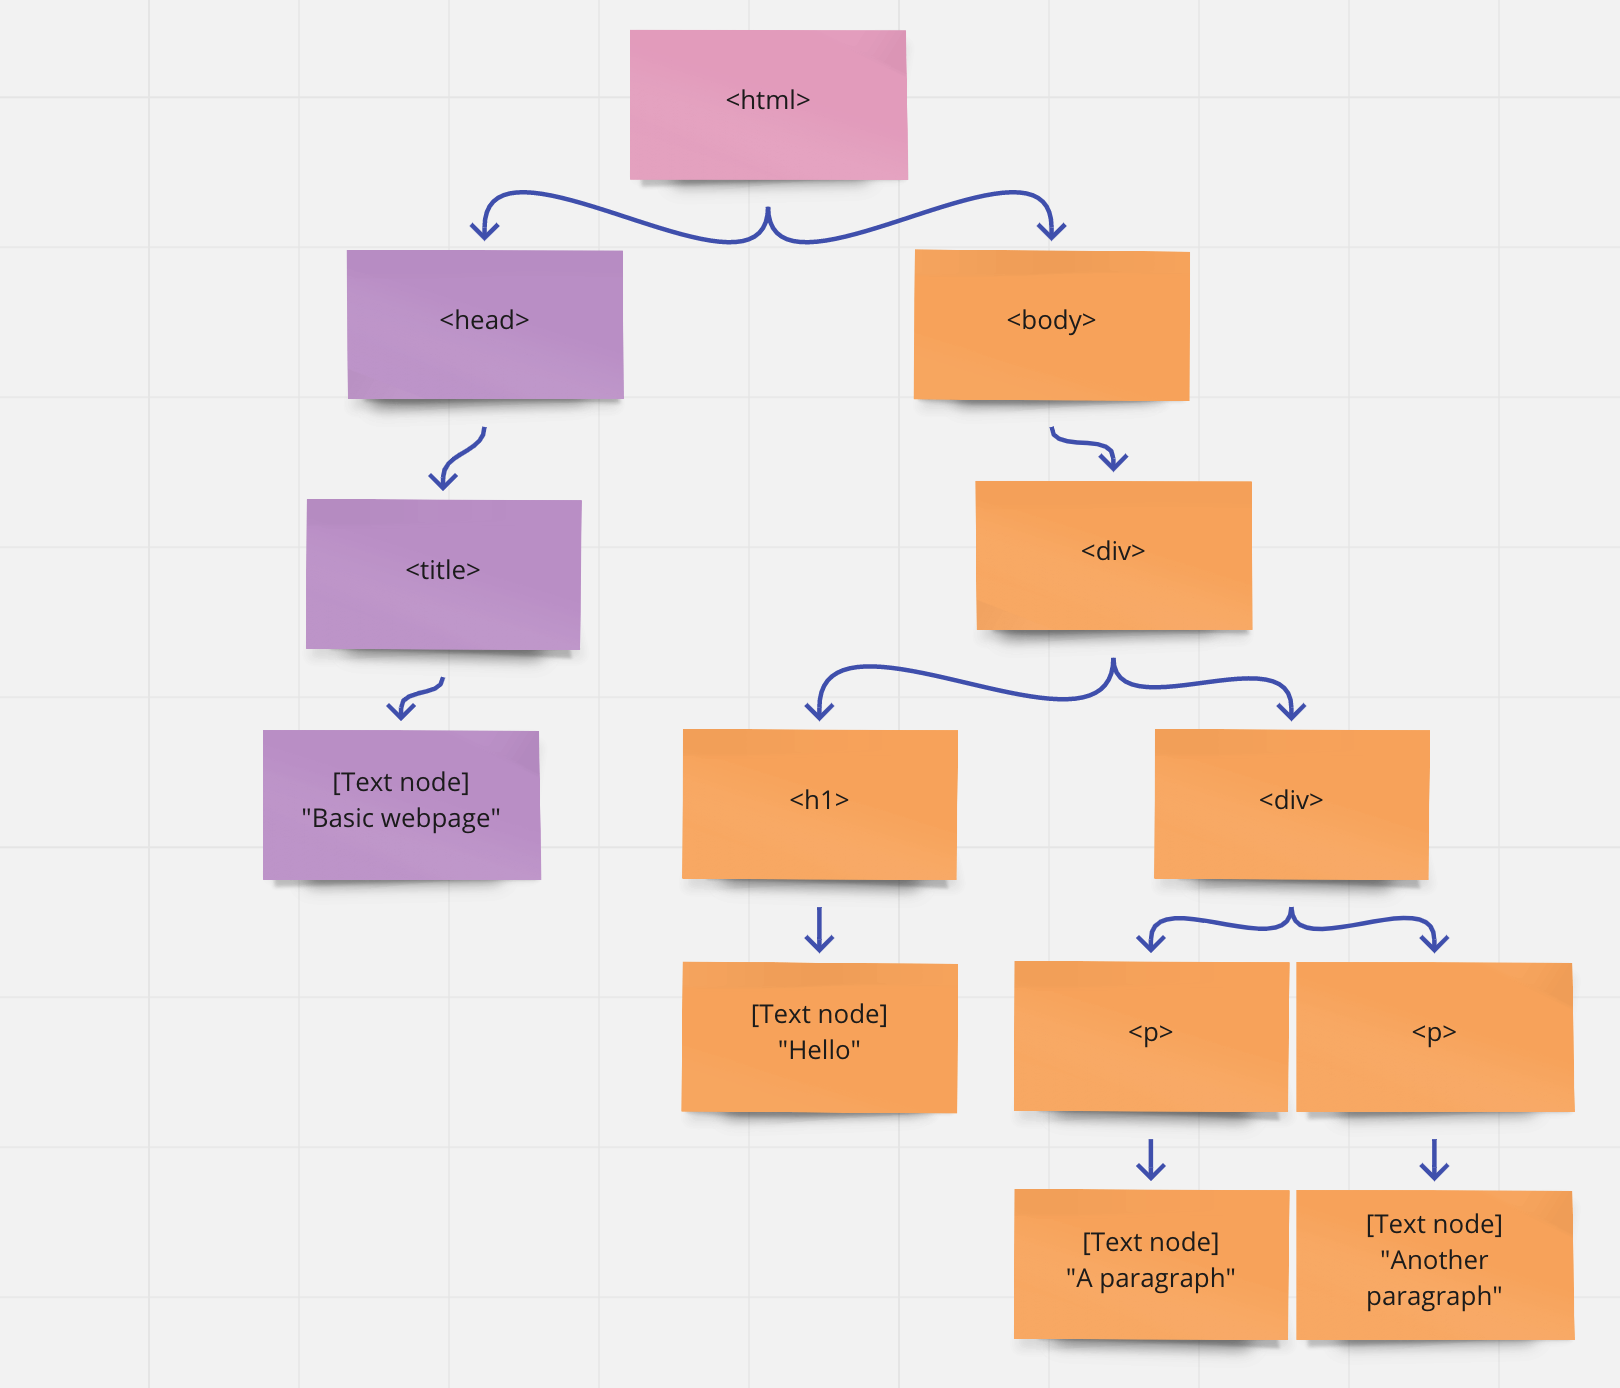
For the technique I want to demonstrate today, we only want to do search-and-replace within the text nodes of the DOM. Remember this?
Let's step through this example:
// Technique 2
var html = document.querySelector('html');
var walker = document.createTreeWalker(html, NodeFilter.SHOW_TEXT);
var node;
while (node = walker.nextNode()) {
    node.nodeValue = node.nodeValue.replace(/SEARCH/gi, 'REPLACE')
}
Replace the orange SEARCH text with
the word or phrase that you want to search for (make
sure you include the forward slashes / before and
after), and replace the
orange REPLACE text with the word
or phrase that you want to swap in (making sure you include the
single quotes ' on either side).
Documentation for querySelector()
Documentation for createTreeWalker()
The forward slashes / / indicate that this argument
is something called a regular expression. This
is a special string used to match, search, and replace other
string patterns. Regular expressions are a
powerful idea in computer science and the basis of much text and
language processing. This is a very simple regular expression
that just searches for any text that matches the word or phrase
between forward slashes. The gi at the end stands
for "global" and "insensitive", meaning that this will match all
instances of this pattern (sometimes regular expressions will
find the first match and then stop) and it will match in a case
insensitive manner (by default regular expressions are case
sensitive). You can read more about regular expressions in the
Mozilla documentation here:
Regular
expressions