[ Links open in: same window | new window ]
Radical Software
LCST 2234, Fall 2024 (CRN 9430)
Rory Solomon
Project 1, Tutorial 4: Some additional techniques
Some additional code snippets and techniques:
- Options page formatting
- Modifying HTML, can be used to create "popup" effects
01. Options page formatting
Several people were planning to add more to their options page by adding additional input fields. We didn't talk about how to format those nicely so I wanted to give an example of how to do that.
At the very least, if you want your
various <input> elements to appear each on
their own line, you could enclose each inside
a <p> tag. So building on where we left off
with options.html, you might add those
tags with the file looking like this:
Modifying options.html:
<body>
  <div>
    <p>
      From text: <input id="fromField" type="text" />
    </p>
    <p>
      To text: <input id="toField" type="text" />
    </p>
    <button type="button" id="button">Set text</button>
    <button type="button" id="clear">Clear text</button>
  </div>
</body>
Next, if you want to have more elements on the page and you want
to control their placement and spacing, you could include
groupings of HTML elements in <div>
elements. Like this:
Further modifying options.html:
<body>
  <div>
    <div>
      <p>
        From text 1: <input id="fromField1" type="text" />
      </p>
      <p>
        To text 1: <input id="toField1" type="text" />
      </p>
    </div>

    <div>
      <p>
        From text 2: <input id="fromField2" type="text" />
      </p>
      <p>
        To text 2: <input id="toField2" type="text" />
      </p>
    </div>

    <button type="button" id="button">Set text</button>
    <button type="button" id="clear">Clear text</button>
  </div>
</body>
Note that I have changed the id attributes for my
HTML <input> elements here. If you do this,
you'll need to go through your extenions
(your options.js file, and your content
scripts) and change any references to these
fields. So fromField should
become fromField1, etc. You should then push this
through so that all those fields end with ...1, and
if you want to access the other fields, they'll all end
with ...2 etc. After making the JS changes that
correspond to the above HTML
changes, options.js would look like
this:
Modifying options.js:
let fromTextElement1 = document.getElementById('fromField1');
let toTextElement1 = document.getElementById('toField1');
let fromTextElement2 = document.getElementById('fromField2');
let toTextElement2 = document.getElementById('toField2');
let setButtonElement = document.getElementById('button');
let clearButton = document.getElementById('clear');

setButtonElement.addEventListener('click', function() {
  chrome.storage.sync.set({
    fromStored1: fromTextElement1.value,
    toStored1: toTextElement1.value,
    fromStored2: fromTextElement2.value,
    toStored2: toTextElement2.value
  });
});

chrome.storage.sync.get({fromStored1: "", toStored1: "", fromStored2: "", toStored2: ""}, function(result) {
    fromTextElement1.value = result.fromStored1;
    toTextElement1.value = result.toStored1;
    fromTextElement2.value = result.fromStored2;
    toTextElement2.value = result.toStored2;
});

clearButton.addEventListener('click', function() {
  chrome.storage.sync.clear();
  fromTextElement1.value = "";
  toTextElement1.value = "";
  fromTextElement2.value = "";
  toTextElement2.value = "";
});
UPDATE. In class we talked about how adding an additional search/replace field like that will not have any effect on the behavior of your extension unless you also make corresponding modifications to the content script JavaScript file.
Going in the content script that we were working on last week, you could modify it to use these new form fields like this:
Modifying content-tutorial3.js:
chrome.storage.sync.get({fromStored1: "", toStored1: "",fromStored2: "", toStored2: ""}, function(result) {

    var html = document.querySelector('html');
    var walker = document.createTreeWalker(html, NodeFilter.SHOW_TEXT);
    var node;
    while (node = walker.nextNode()) {

        var re = new RegExp(result.fromStored1,"gi")
        node.nodeValue = node.nodeValue.replace(re, result.toStored1);

        var re = new RegExp(result.fromStored2,"gi")
        node.nodeValue = node.nodeValue.replace(re, result.toStored2);``
    }
});
Now, if you want to style those <div>s in
some way, you can add some CSS to control their appearance. See
my comments
in Tutorial 2,
part 02.a for three different ways of attaching CSS rules to
an HTML page. If there is a lot of styling that you want to do
to your options page, you should probably use
the external method of including CSS, as
explained in the class notes linked above. Refresher: you put
all your CSS rules in a separate CSS file, then link to that CSS
file from your HTML file. So, go into
your options.html file and add this:
Modifying options.html:
<html>
<head>
  <script src="options.js" defer></script>
  <link rel="stylesheet" href="css/options.css">
</head>
<body>
Then, create a new file in your css
subfolder called options.css and start
to add CSS rules to it. Here is some sample CSS that starts to
work on controlling the appearance of
this options.html code:
Creating css/options.css:
div {
  width: 250px;
  border: solid 1px #000;
  padding: 5px;
  margin: 5px;
}
If you do all that, and click in to your extenion's options page, you should see something that looks like this:

If you want to format the different <div>s
differently, you can add CSS classes, like
this:
Modifying options.html:
  <body>
    <div class="outter">
      <div>
Then modify your CSS file like this, adding a
new rule to target the
specific <div> indicated by
that class:
Modifying css/options.css:
div {
  width: 250px;
  border: solid 1px #000;
  padding: 5px;
  margin: 5px;
}

div.outter {
  width: 275px;
  margin: 25px;
  padding: 10px;
}
That should space things out a little better.
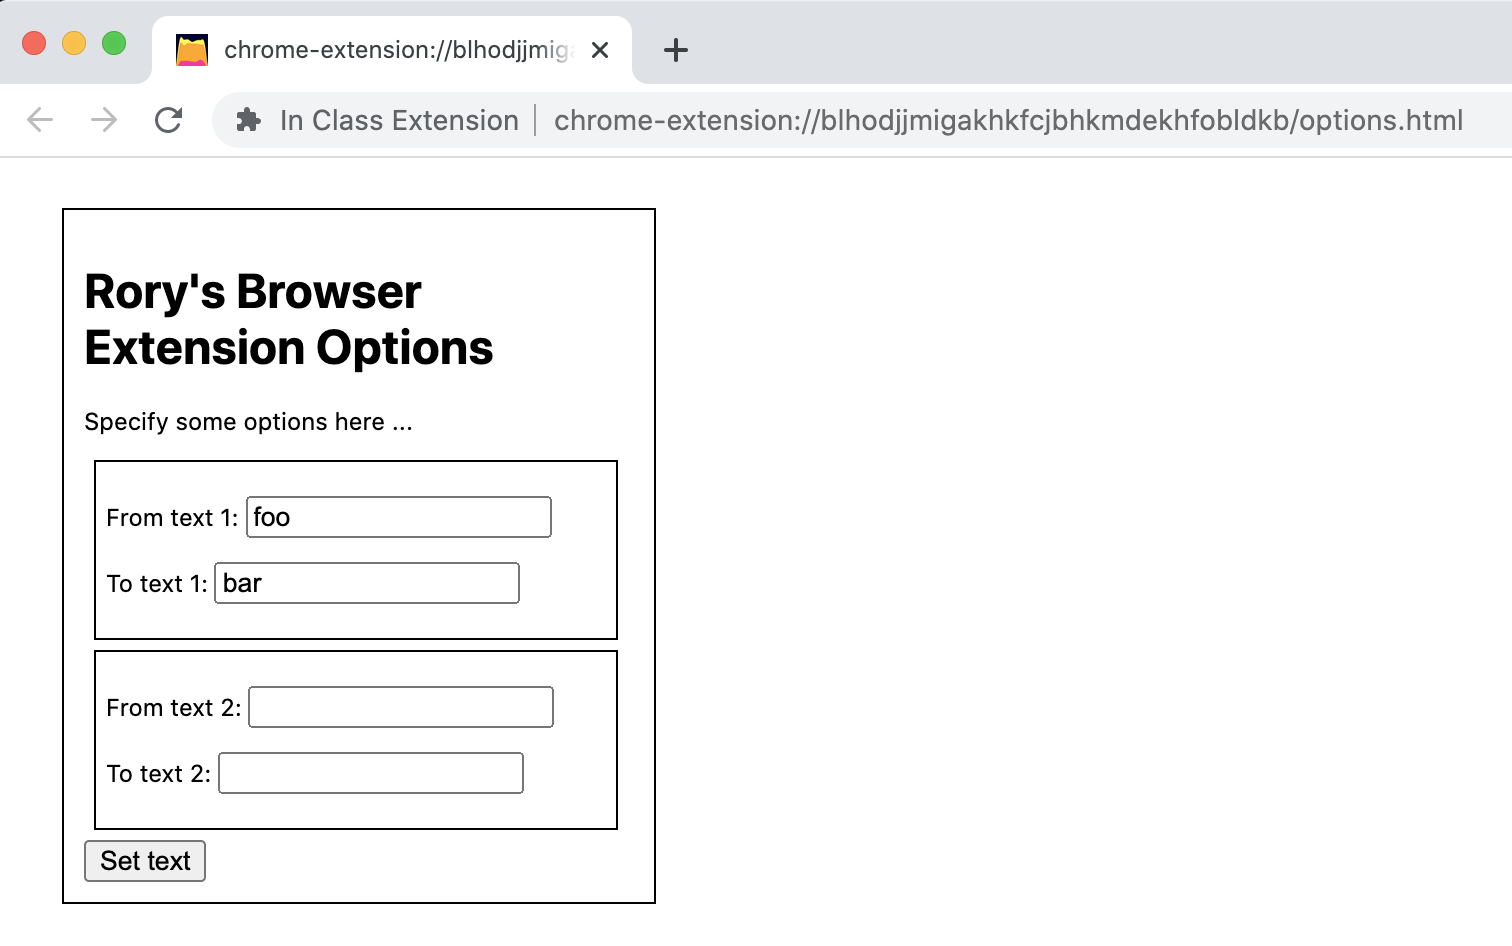
Then maybe you'd like to add some additional HTML and text to offer some context, explanation, or instructions to your user:
Modifying options.html:
    <div class="outter">
      <h1>Rory's Browser Extension Options</h1>
      <p>
        Specify some options here ...
      </p>
      <div>
If you do all that, you should be able to reload your extension and see something that looks like this:
Hopefully that's enough to get you started exploring further.
Remember, the Mozilla Developer Network has some great tutorials about other CSS properties you can explore. And you can also use the Chome browser's inspect tool to experiment with different CSS properties and their values.
(jump back up to table of contents)02. Modifying HTML & "popup" effects
Another technique people have asked about is how to create "pop-up" like effects. You do this by using Javascript code to add or modify HTML within the current page.
You can create a "pop-up" effect specifically by adding
a <div> to the page, specify its position,
dimensions, and appearance, and then when the user clicks
somewhere, delete it.
Let's start with the technique that we looked at in
Tutorial
2, part 05, modified slightly. To start, let's create a
new JS file
called content-tutorial4.js. Don't
forget to modify manifest.json to point
to this new file:
  "content_scripts": [
    {
      "matches": [
        "*://*/*"
      ],
      "js": [
        "content-tutorial4.js"
      ],
      "run_at": "document_idle"
    }
  ],
Then add the following code to this new file:
Creating content-tutorial4.js:
var html = document.querySelector('html');
var walker = document.createTreeWalker(html, NodeFilter.SHOW_TEXT);
var node;

while (node = walker.nextNode()) {

  if ( node.nodeValue.includes("paragraph") ) {
    newNodeValue = node.nodeValue.replace(/paragraph/gi,"<span class='click-me'>paragraph</span>");
    newElement = document.createElement("template");
    newElement.innerHTML = newNodeValue;
    node.before(newElement.content);
    oldNode = node;
    node = walker.nextNode();
    oldNode.remove();
  }
}
This is the same as the code snippet
from Tutorial
2, part 05 except that I've made a change to
the <span>. Instead of specifying
an inline style attribute with CSS
rules, it assigns a CSS class to that span.
The point of using a CSS class is that it makes it easier to use Javascript code to target all HTML elements that are marked with that class. In other words, using CSS classes, we can write Javascript code that is triggered by some user interaction event on any element with that CSS class.
So this finds all instances of the word "paragraph" on the page
and puts that word in a <span> element with
the CSS class click-me. (The
word click-me here is not a special
keyword in any sense. I could have used any word I'd like.)
This <span> does not have any CSS style rules
associated with it, so it will not appear as visible to the user
in any way. Let's add some style rules for this to signal
to the user that it is clickable. To add CSS from within a
content script, we have to
modify manifest.json like so:
Modifying manifest.json:
 "content_scripts": [
    {
      "matches": [
        "*://*/*"
      ],
      "js": [
        "content-tutorial4.js"
      ],
      "css": [
        "content-tutorial4.css"
      ],
      "run_at": "document_idle"
    }
  ],
Now, create this
file, content-tutorial4.css, and add
something like the following CSS rule to it:
Creating content-tutorial4.css:
.click-me {
  border-bottom: dashed 1px blue;
}
Now, to actually make these elements clickable, I'm going
to use
document.getElementsByClassName() to select a list
of all HTML elements with the click-me
class, and then use addEventListener() to add code
that responds to a click on each of those words. First
let's add some simple code just to test that the click
event handling is working:
Adding code to the end of content-tutorial4.js:
var clickableWords = document.getElementsByClassName('click-me');
for (var word of clickableWords) {
  word.addEventListener('click', function() {
    alert("An element was clicked!");
  });
}
Reload the extension, reload the page, and try clicking on one of the underlined elements.
Once you have that working, let's delete
that alert() code, and add code that creates a popup
for the user:
Modifying content-tutorial4.js:
var clickableWords = document.getElementsByClassName('click-me');
for (var word of clickableWords) {
  word.addEventListener('click', function() {
    var popup = document.createElement("div");
    popup.style.width = "500px";
    popup.style.height = "250px";
    popup.style.border = "solid 1px #000";
    popup.style.margin = "10px";
    popup.style.padding = "10px";
    popup.style.position = "fixed";
    popup.style.top = "50px";
    popup.style.left = "50px";
    popup.style.backgroundColor = "#fff";
    popup.style.zIndex = "9999";
    popup.textContent = "Hello this is some sample text.";
    document.body.insertAdjacentElement("afterbegin",popup);
  });
}
This new code creates a new HTML element, which is
a <div>, and which is represented in
JavaScript with the popup variable. The other lines
are setting CSS properties on popup. You can modify
these to control the size, position, and color of
the <div> as well as any other CSS
properties. The line that begins popup.textContent
sets the text that will be the content of the pop-up. Finally,
the last new line inserts this new HTML element (represented
by popup) into the document body.
Reload the extesion, relead the page, and click an element.
But wait! Now we can't close that pop up. Let's add some code so that when we create the popup, we are also creating a new event listener that listens for a click, and when it receives one, removes this new element:
Modifying content-tutorial4.js:
var clickableWords = document.getElementsByClassName('click-me');
for (var word of clickableWords) {
  word.addEventListener('click', function() {
    var popup = document.createElement("div");
    popup.style.width = "500px";
    popup.style.height = "250px";
    popup.style.border = "solid 1px #000";
    popup.style.margin = "10px";
    popup.style.padding = "10px";
    popup.style.position = "fixed";
    popup.style.top = "50px";
    popup.style.left = "50px";
    popup.style.backgroundColor = "#fff";
    popup.style.zIndex = "9999";
    popup.textContent = "Hello this is some sample text. (Click anywhere to close.)";
    document.body.insertAdjacentElement("afterbegin",popup);

    popup.addEventListener('click', function() {
      popup.remove();
    });
  });
}